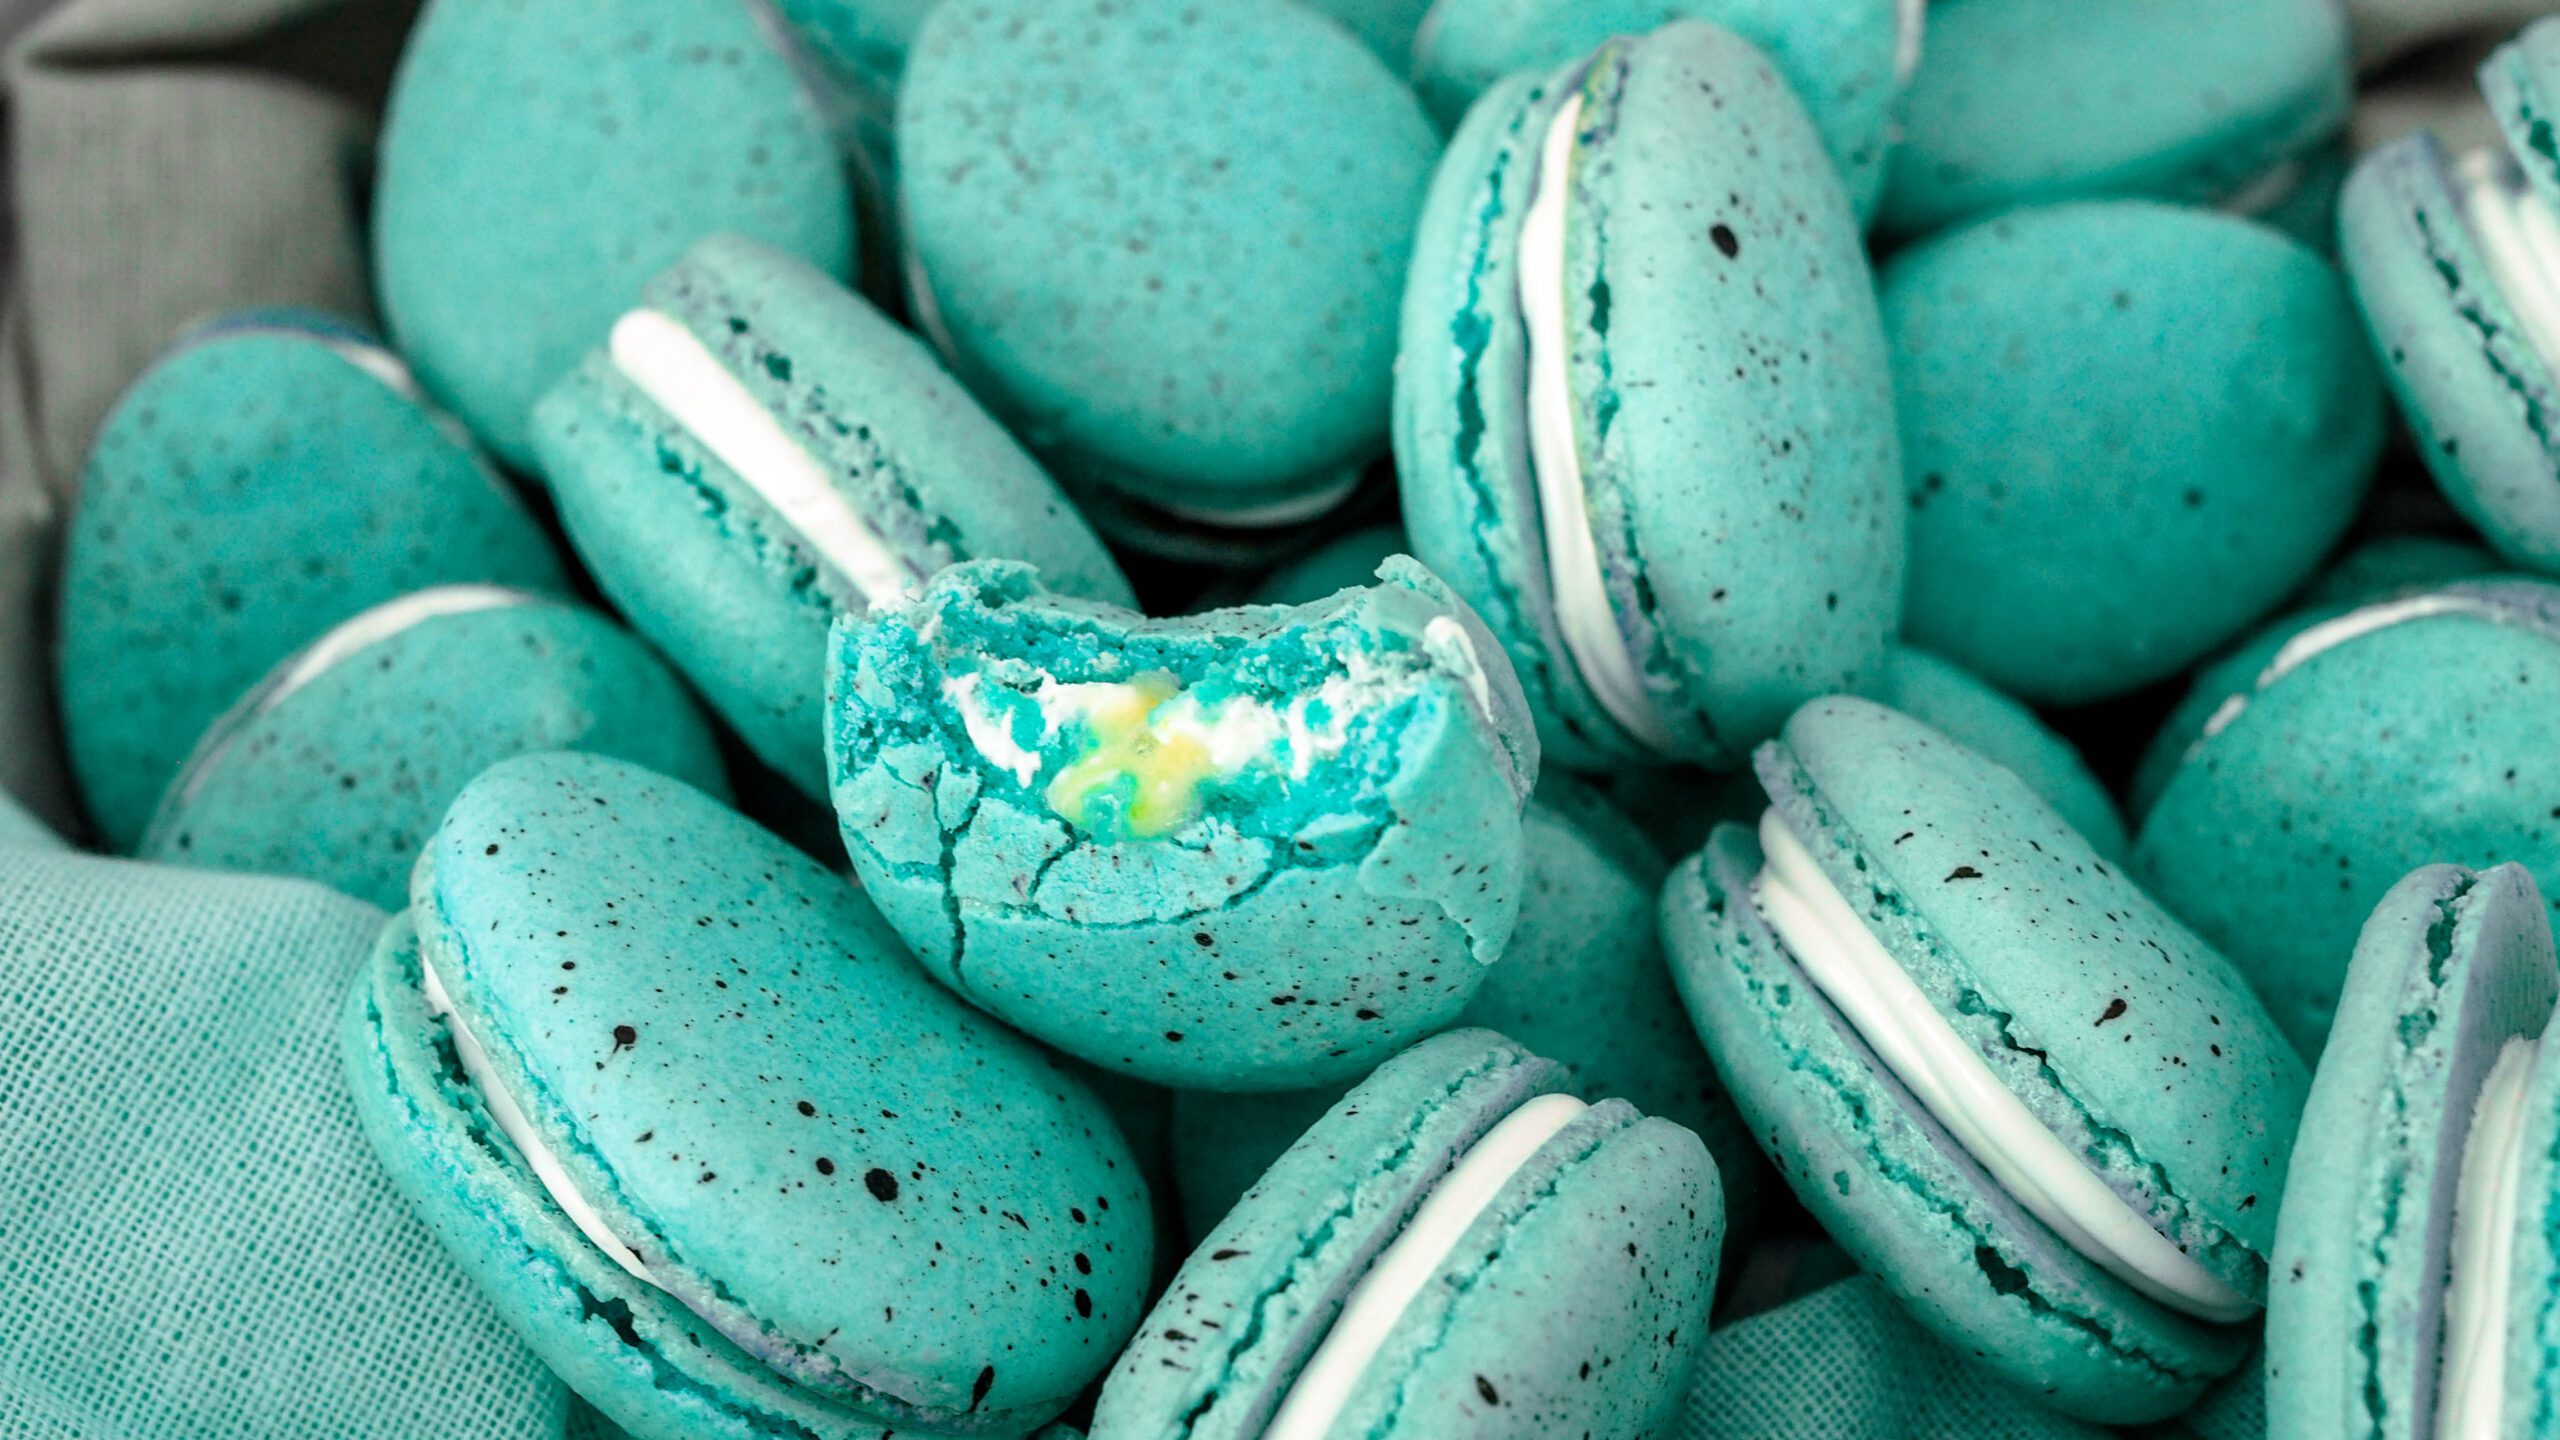
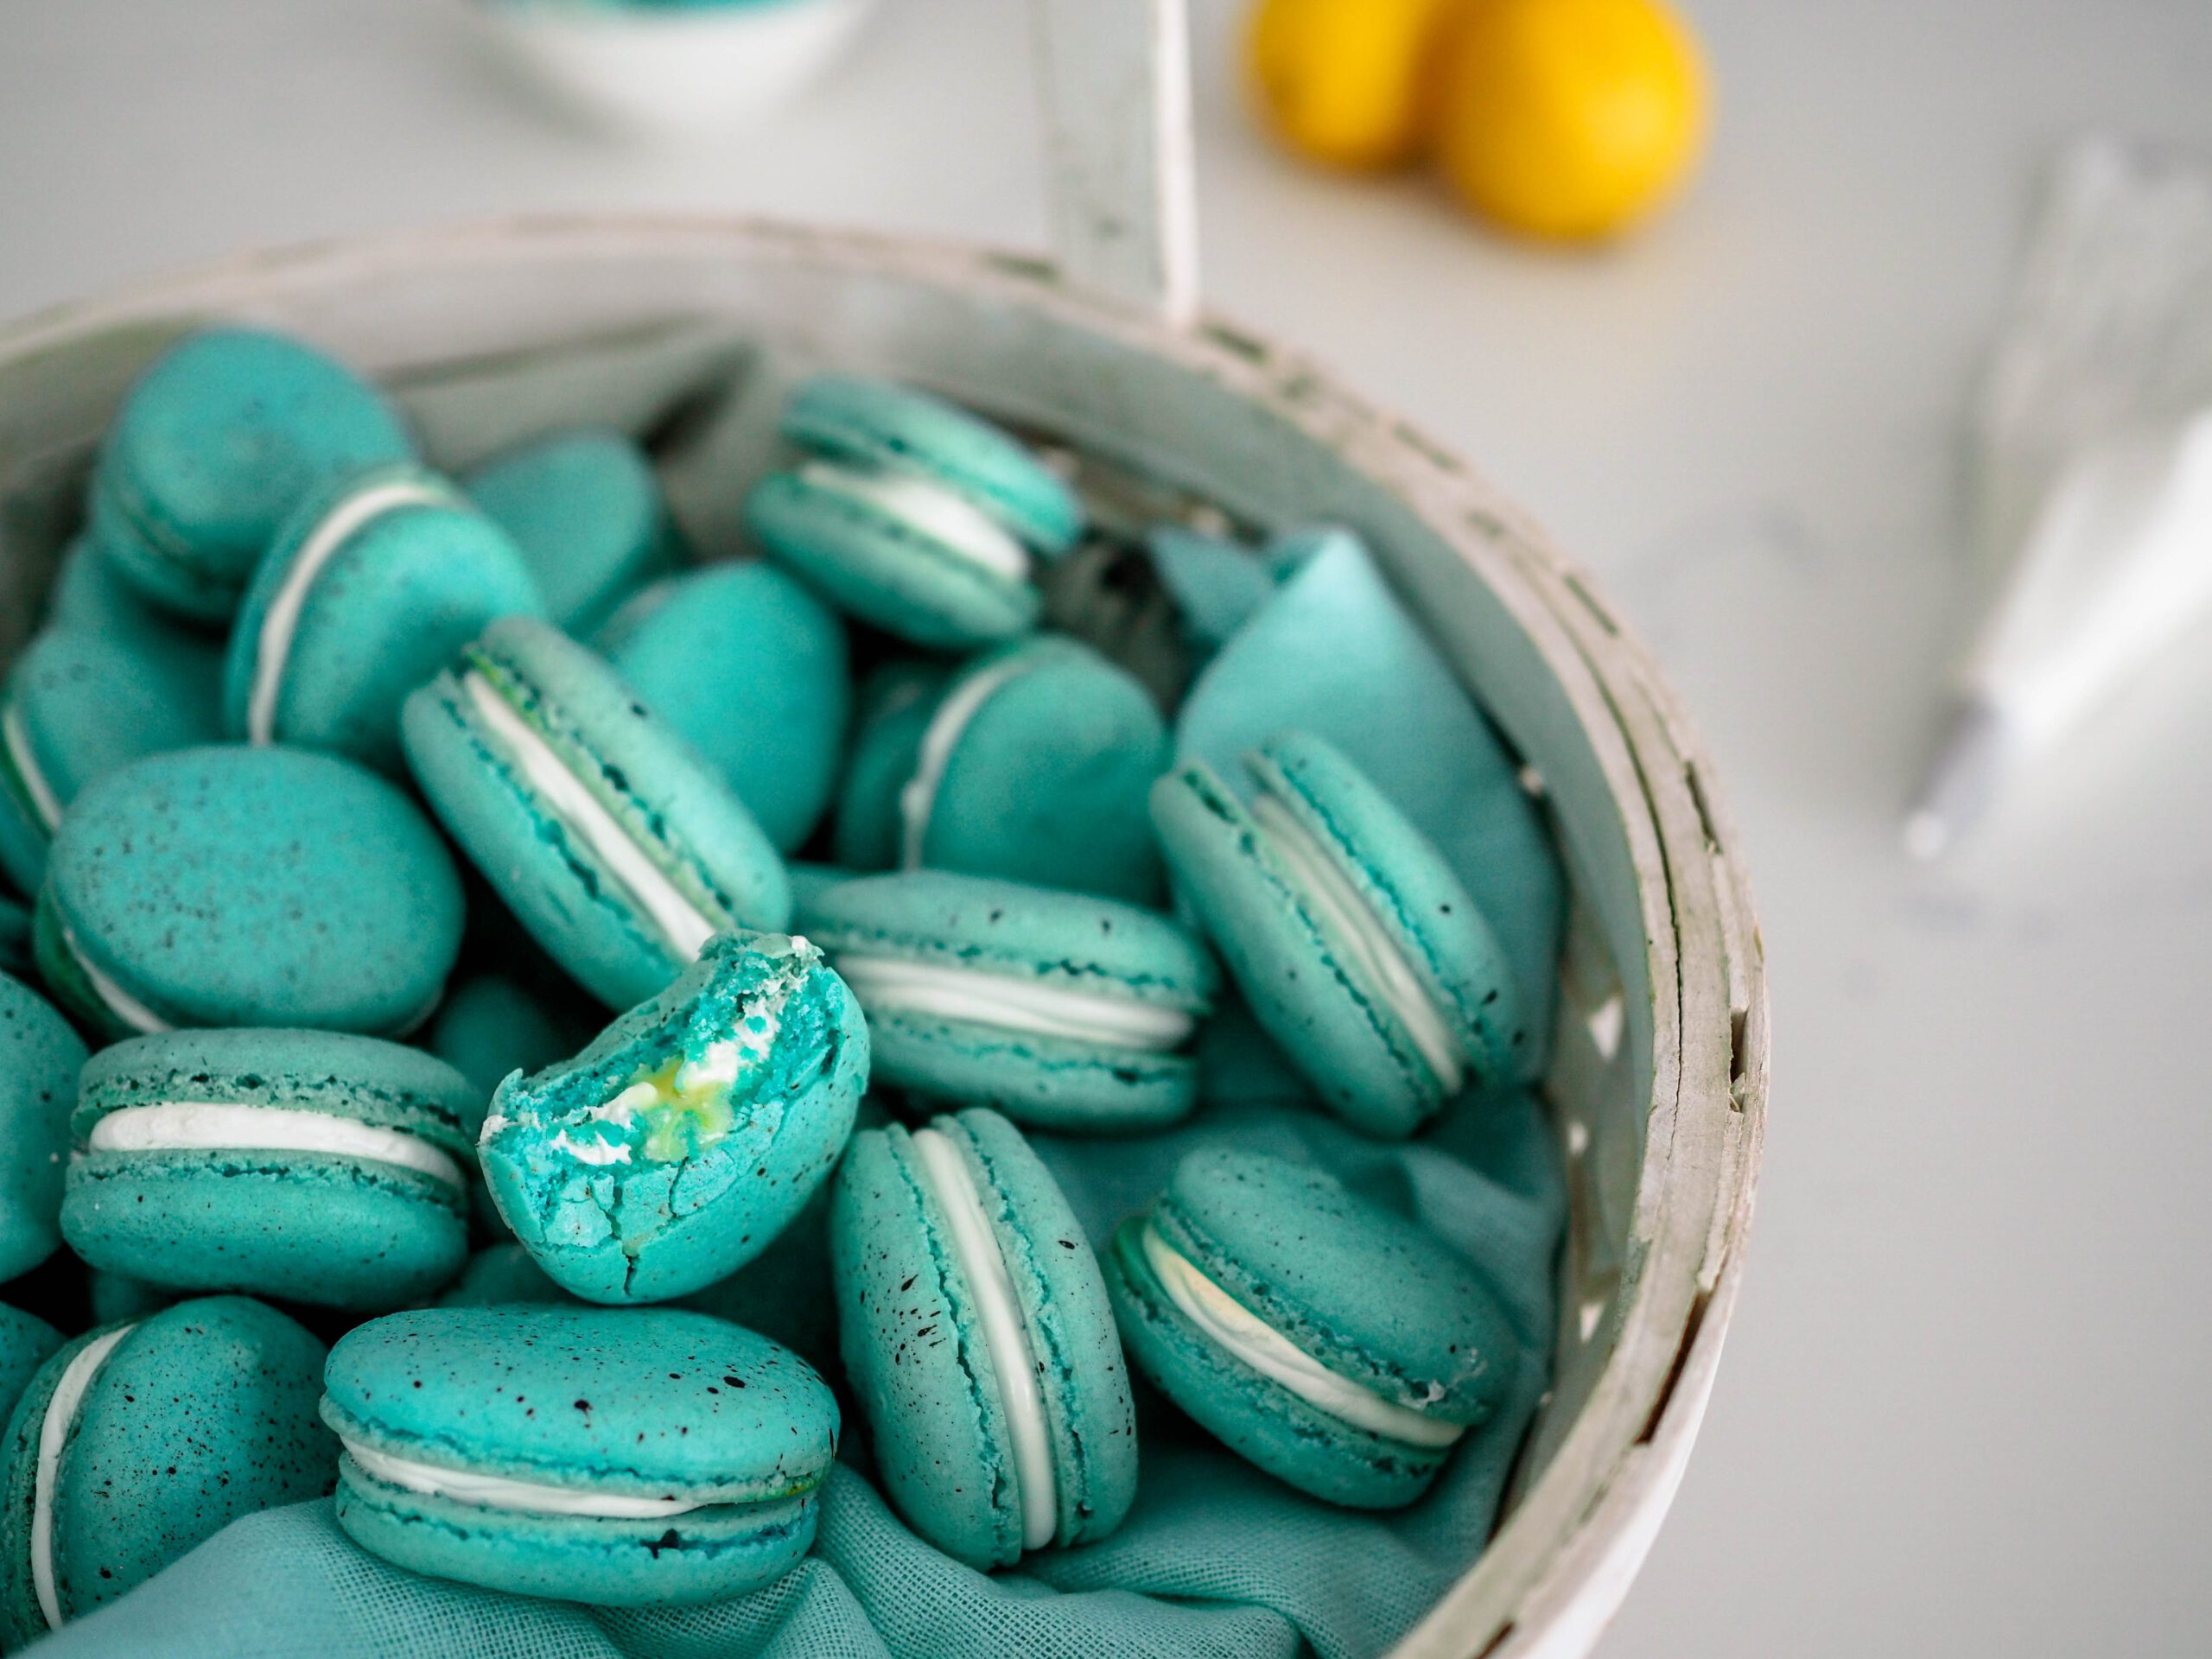
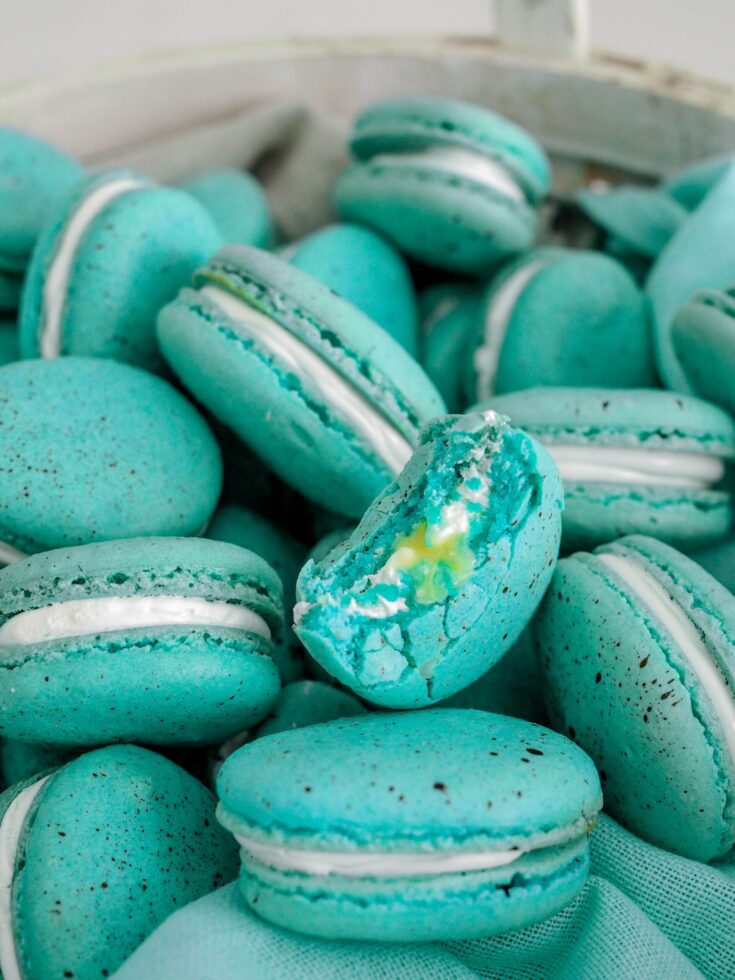
Robin’s egg macarons, or Easter egg macarons, are the perfect addition to your Easter celebrations. Part of the fun is that these lemon macarons look just like real robin’s eggs when bitten into: They’re filled with a swirl of meringue for the white and a dollop of lemon curd for the yolk! These were the first shaped macarons I made for my website, and they are always a big hit around spring.
I love making a small batch of lemon curd so that I can use it in a couple batches of macarons. These lifelike robin’s egg macarons and flower-shaped lemon lavender macarons would be great on your table for Easter celebrations with little ones and adults alike!
This recipe was originally posted in 2022 but was updated with more helpful tips for success in March 2024. Until I can reshoot this recipe to give you a better visual, I’ve used some photos from other macaron recipes to supplement the content.
This post contains affiliate links. If you click through and make a purchase, I may receive a small commission at no cost to you. Thank you for helping to support The Floral Apron!
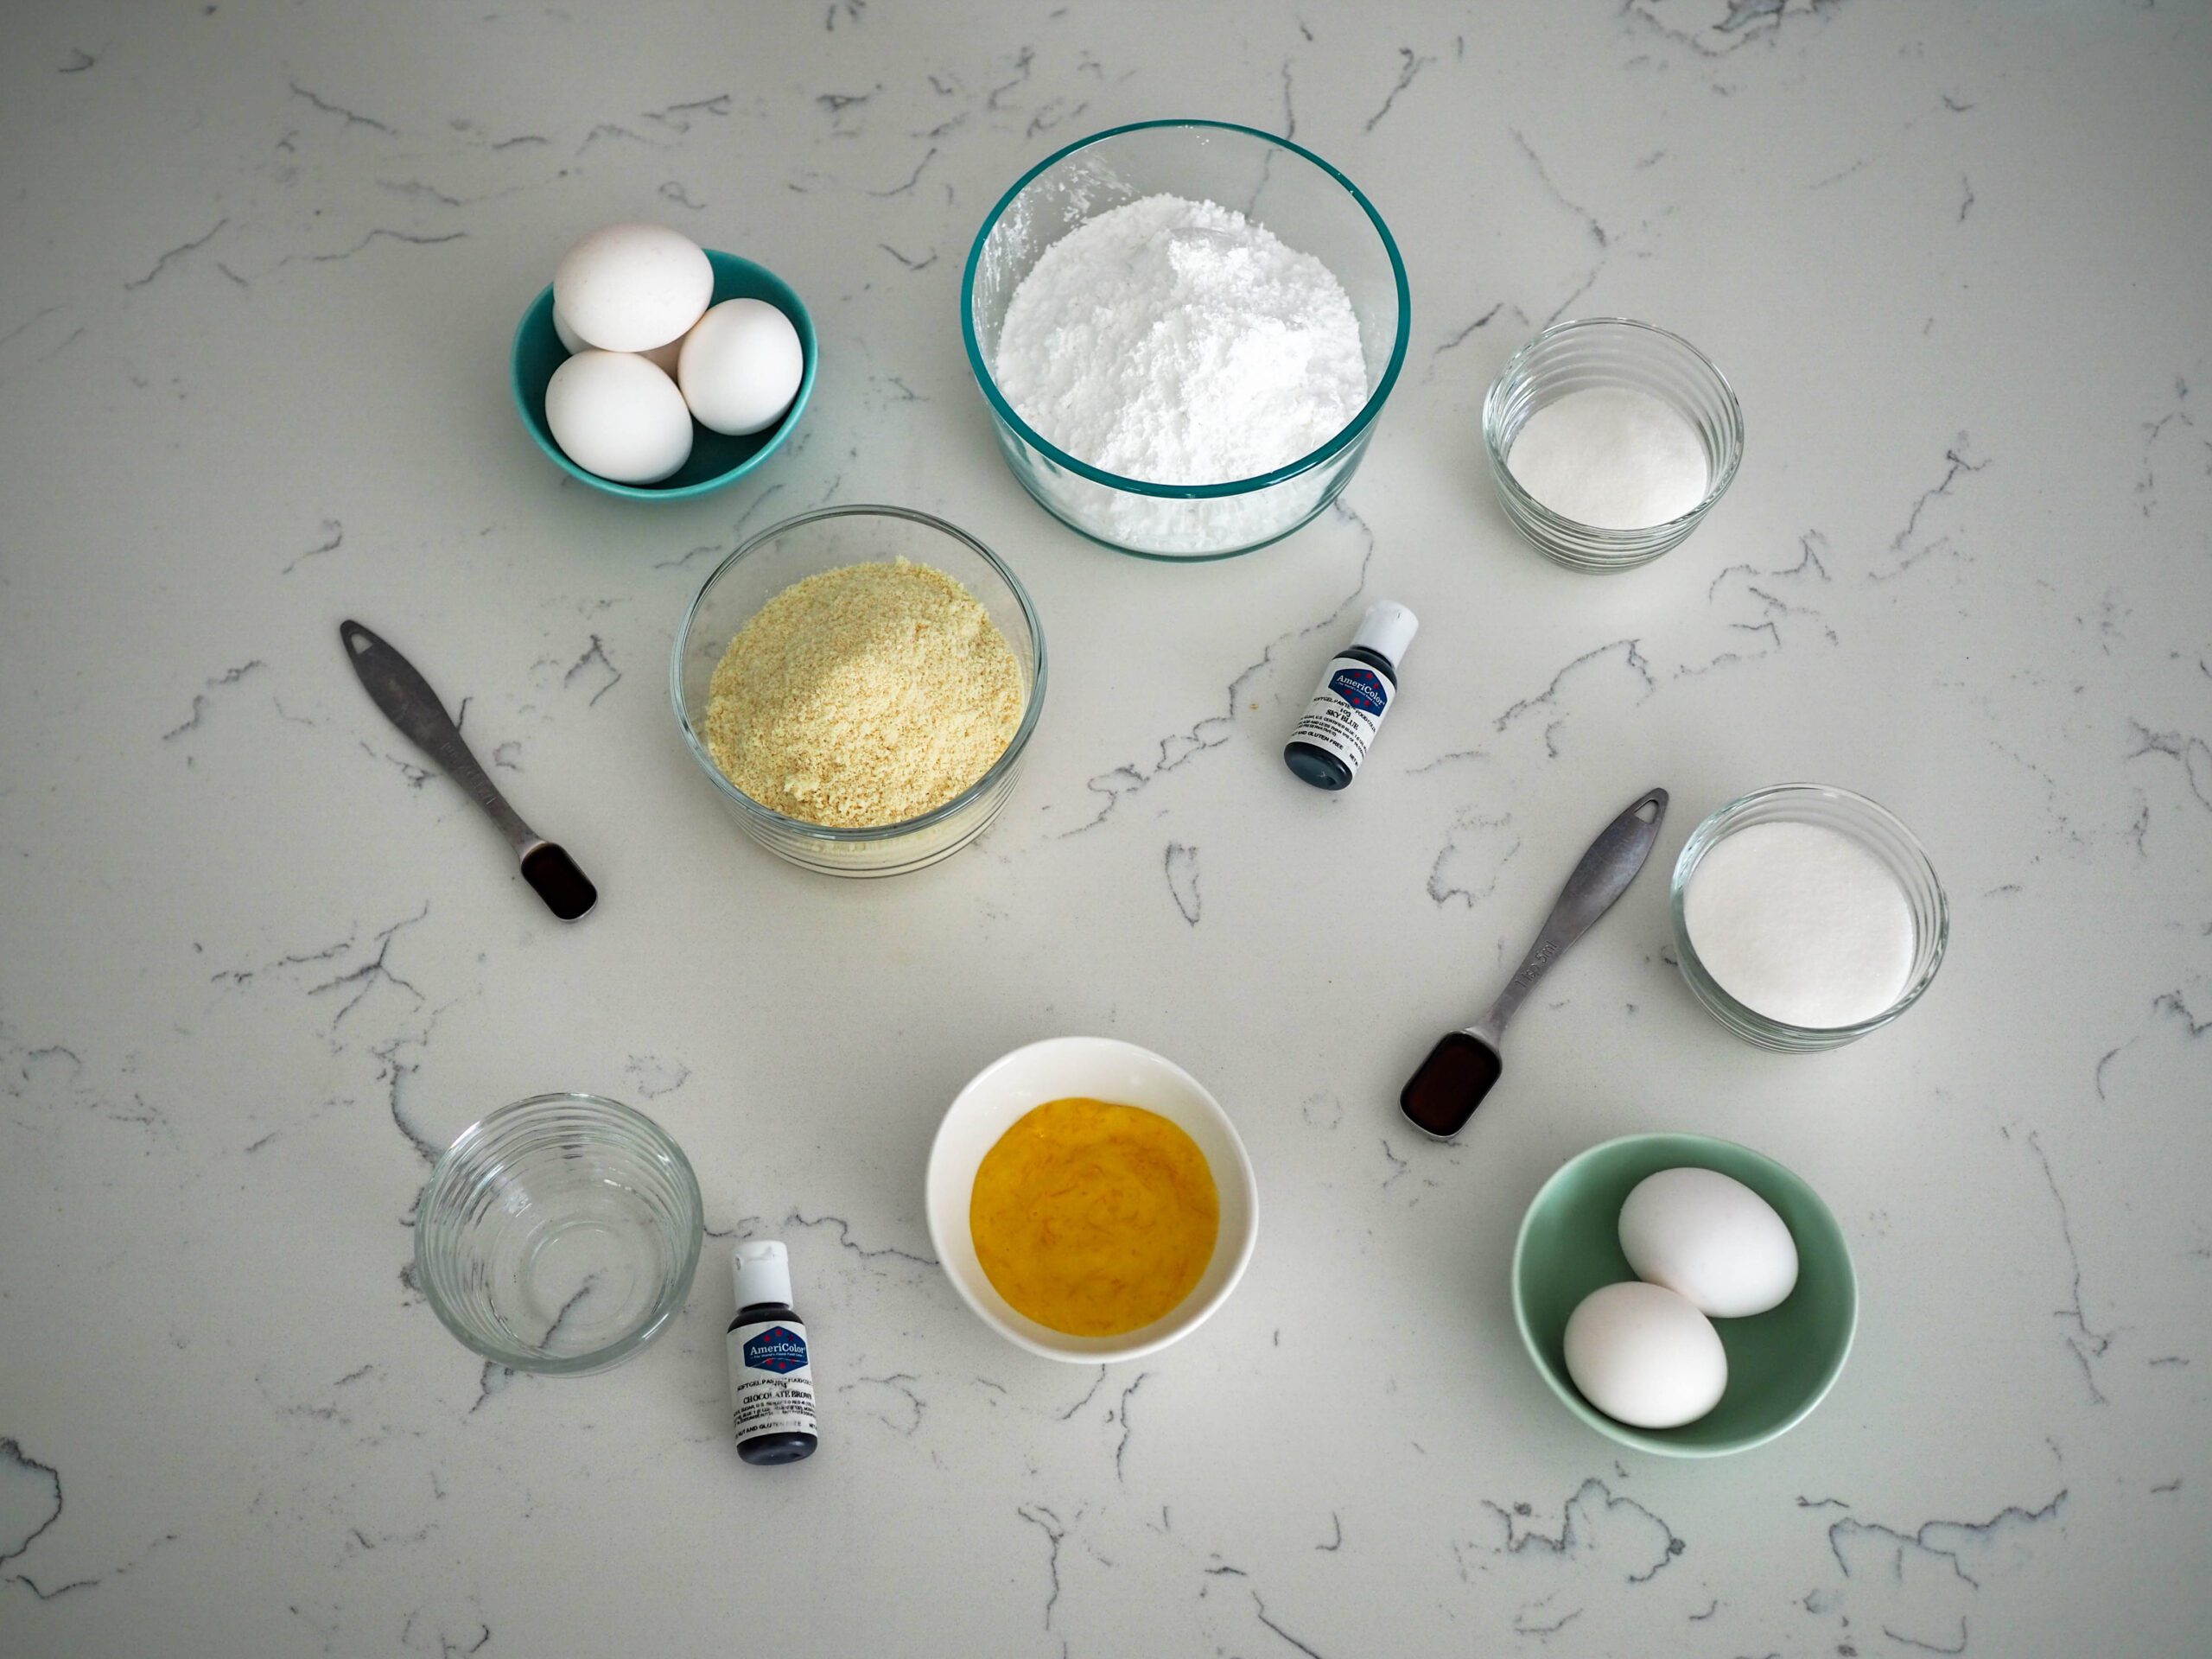
Ingredients for Easter Egg Macarons
French macarons require only a few ingredients to make, but they are notoriously particular. Macarons are made by folding almond flour and powdered sugar into a stiff-peaked meringue. These Easter macarons are filled with lemon curd and meringue.
- Egg whites. For best results, use eggs in the shell rather than egg whites from a carton. Most egg whites in a carton have been pasteurized and may not whip into a meringue.
- Granulated sugar. Sugar helps to stabilize the meringue, allowing you to fold in the almond flour mixture and rest the macarons without worrying about the meringue collapsing.
- Almond flour. Almond flour provides structure for the macaron shell and a nutty flavor.
- Powdered sugar. Powdered sugar helps to thicken the macaron batter and provide structure.
- Gel food coloring (optional). Please do not use liquid food coloring—it will not work! If you don’t have any gel food coloring, I recommend this kit from Americolor. It has all the colors you’ll need!
- Vanilla extract. This will give both meringues a subtle vanilla flavor.
- Lemon curd. The “yolk” of the filling, lemon curd is much more palatable than a real yolk.
How to Make Robin’s Egg Macarons
The most important thing to remember is that macarons are finicky. Even if they don’t look perfect, they’ll still taste great!
The number one tip I have for making French macaron shells is to be patient. It can take a number of tries to get a perfect batch. My first few batches came out really nicely, but it took me months to feel like I had finally gotten the hang of macarons. And then the clock reset when we moved and I had to learn how to make macarons all over again in my new kitchen!
This recipe And even then, when I was making the macarons for this recipe, I was having the worst time with concave bottoms. Even experienced macaron makers have difficulty!
Recommended Supplies for Making Macarons
Each oven and home varies. While these supplies are the cream of the crop when it comes to making macarons in my home, you may find something that works better for you in yours.
In my old house and old oven, I could use a dark nonstick pan and parchment paper on top of silicon macaron mats with no issues. In my new house and new oven, I have to use aluminum pans with silicon macaron mats.
If you are following all the steps and your macarons still aren’t consistent after three batches, I would look into your supplies. Try changing one variable at a time to determine what the problem is.
Tips for French Meringue for Macarons
A good meringue is key for a good macaron. French macarons generally call for aged or at least room temperature egg whites—I can use eggs directly from the fridge without a stabilizer because of the way I mix up my meringue.
I adapted this technique from Cenk Sönmezsoy’s The Artful Baker (though he recommends room temperature egg whites). If you’re newer to meringue, I would recommend using room temperature egg whites, as they are a bit more elastic (read: forgiving).
For a perfect French meringue every time, start by whipping the egg whites on low in a stand mixer, just to incorporate. Once the whites begin to foam, increase the speed to medium. The whisk will begin to leave trails in the foam; at that point, sprinkle in the sugar about a teaspoon at a time.
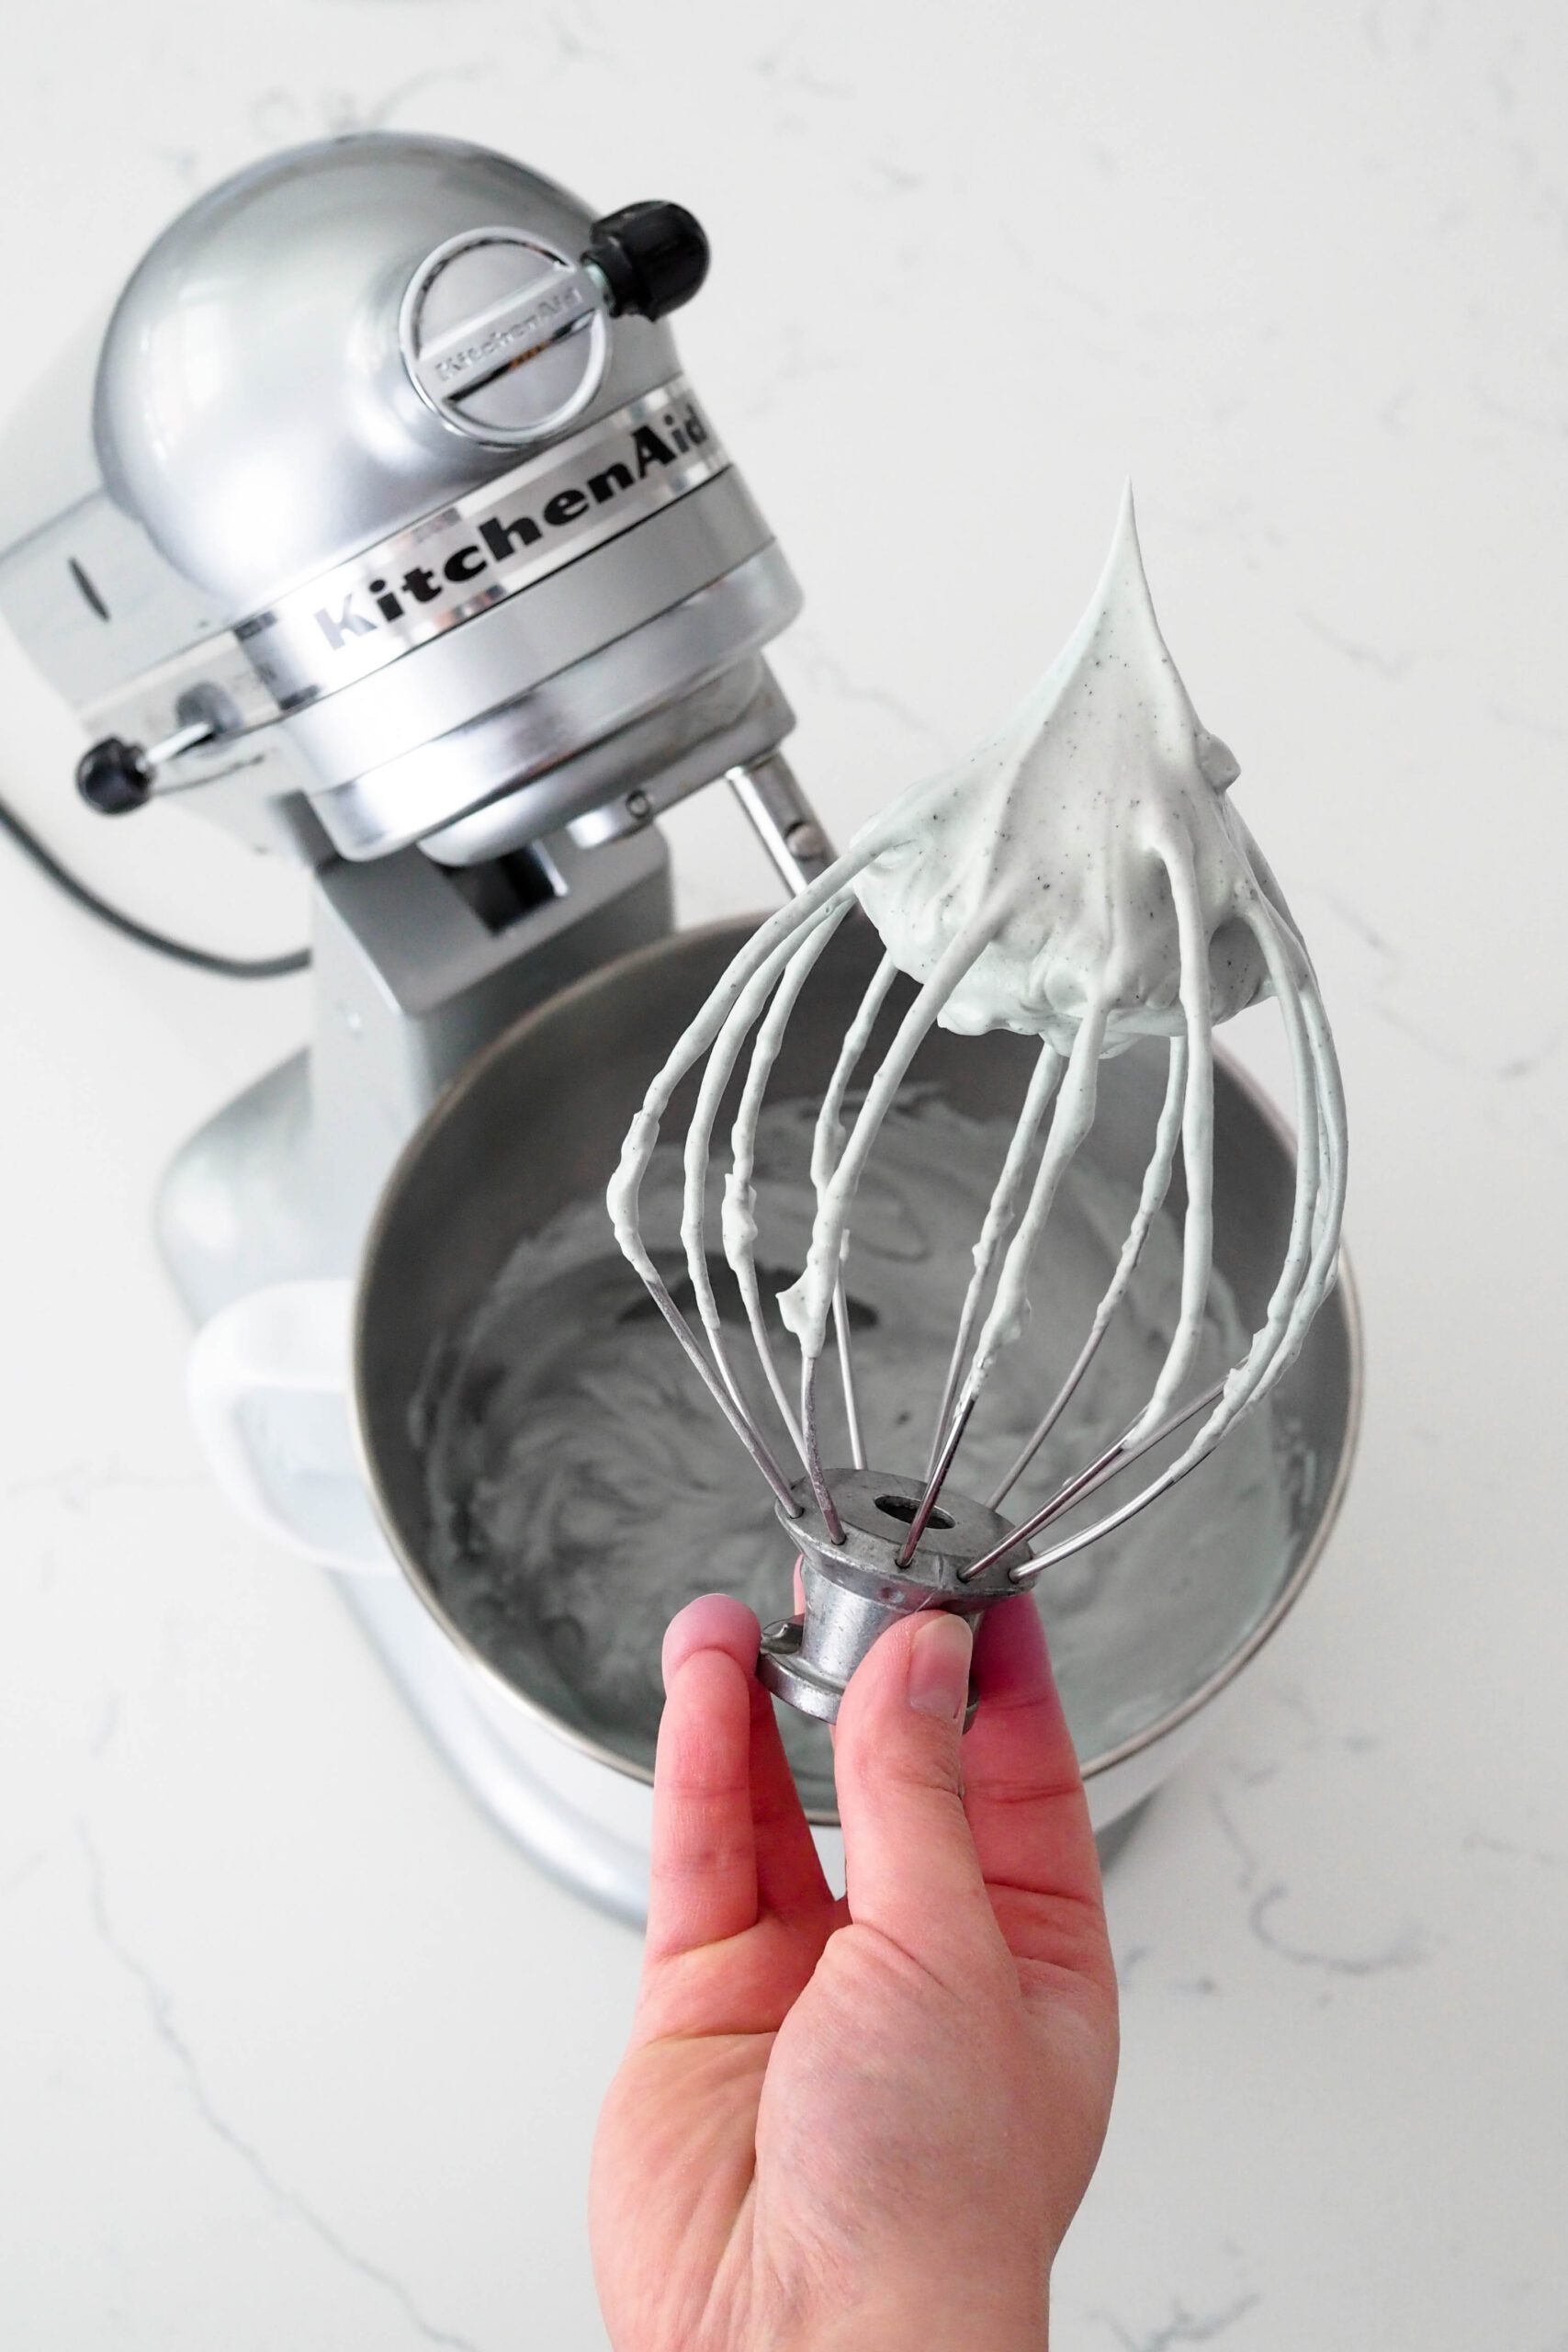
When all the sugar is incorporated, increase the speed to high and whisk until you begin to see the whisk leave deep indents in the meringue (anywhere from three to five minutes).
Test to see if the meringue has stiff peaks by removing the whisk and flipping it upside down. If the meringue stands straight up or curls into itself lightly with a sharp point, stop whisking. (See photo below.) If the point is soft and looks like it has a lot of tiny bubbles in it, whisk for another 10 seconds, then test again.
The Perfect Macaron Batter Consistency
Macaron batter needs to be a certain consistency in order to develop feet. The consistency and process is so important that it has its own name: “macaronage.”
The top descriptor I have read for testing macaron batter consistency is it “flows off the spatula like hot lava…” I have never seen hot lava in person, much less seen it being picked up with a spatula. That phrase does not personally help me figure out how to macaronage, which is one of the most important things for beginners to understand.
A more fitting description for the perfect macaron batter consistency is to think of macaronage as a process, not an end result.
Macaronage as a Process
The egg whites start out as liquid with no air in them. Then you whip in lots of very tiny air bubbles to transform the egg whites into a meringue. You have added so much air into the egg whites that now they essentially function as a solid instead of a liquid.
Then, you fold in almond flour and powdered sugar. As you fold the batter with a spatula, you are knocking the air out of the meringue. That helps to transform our previously solid meringue back into a liquid batter. The more folds you give the batter, the more liquid the batter becomes. (My husband says this is called viscosity, but that’s a bit technical.)
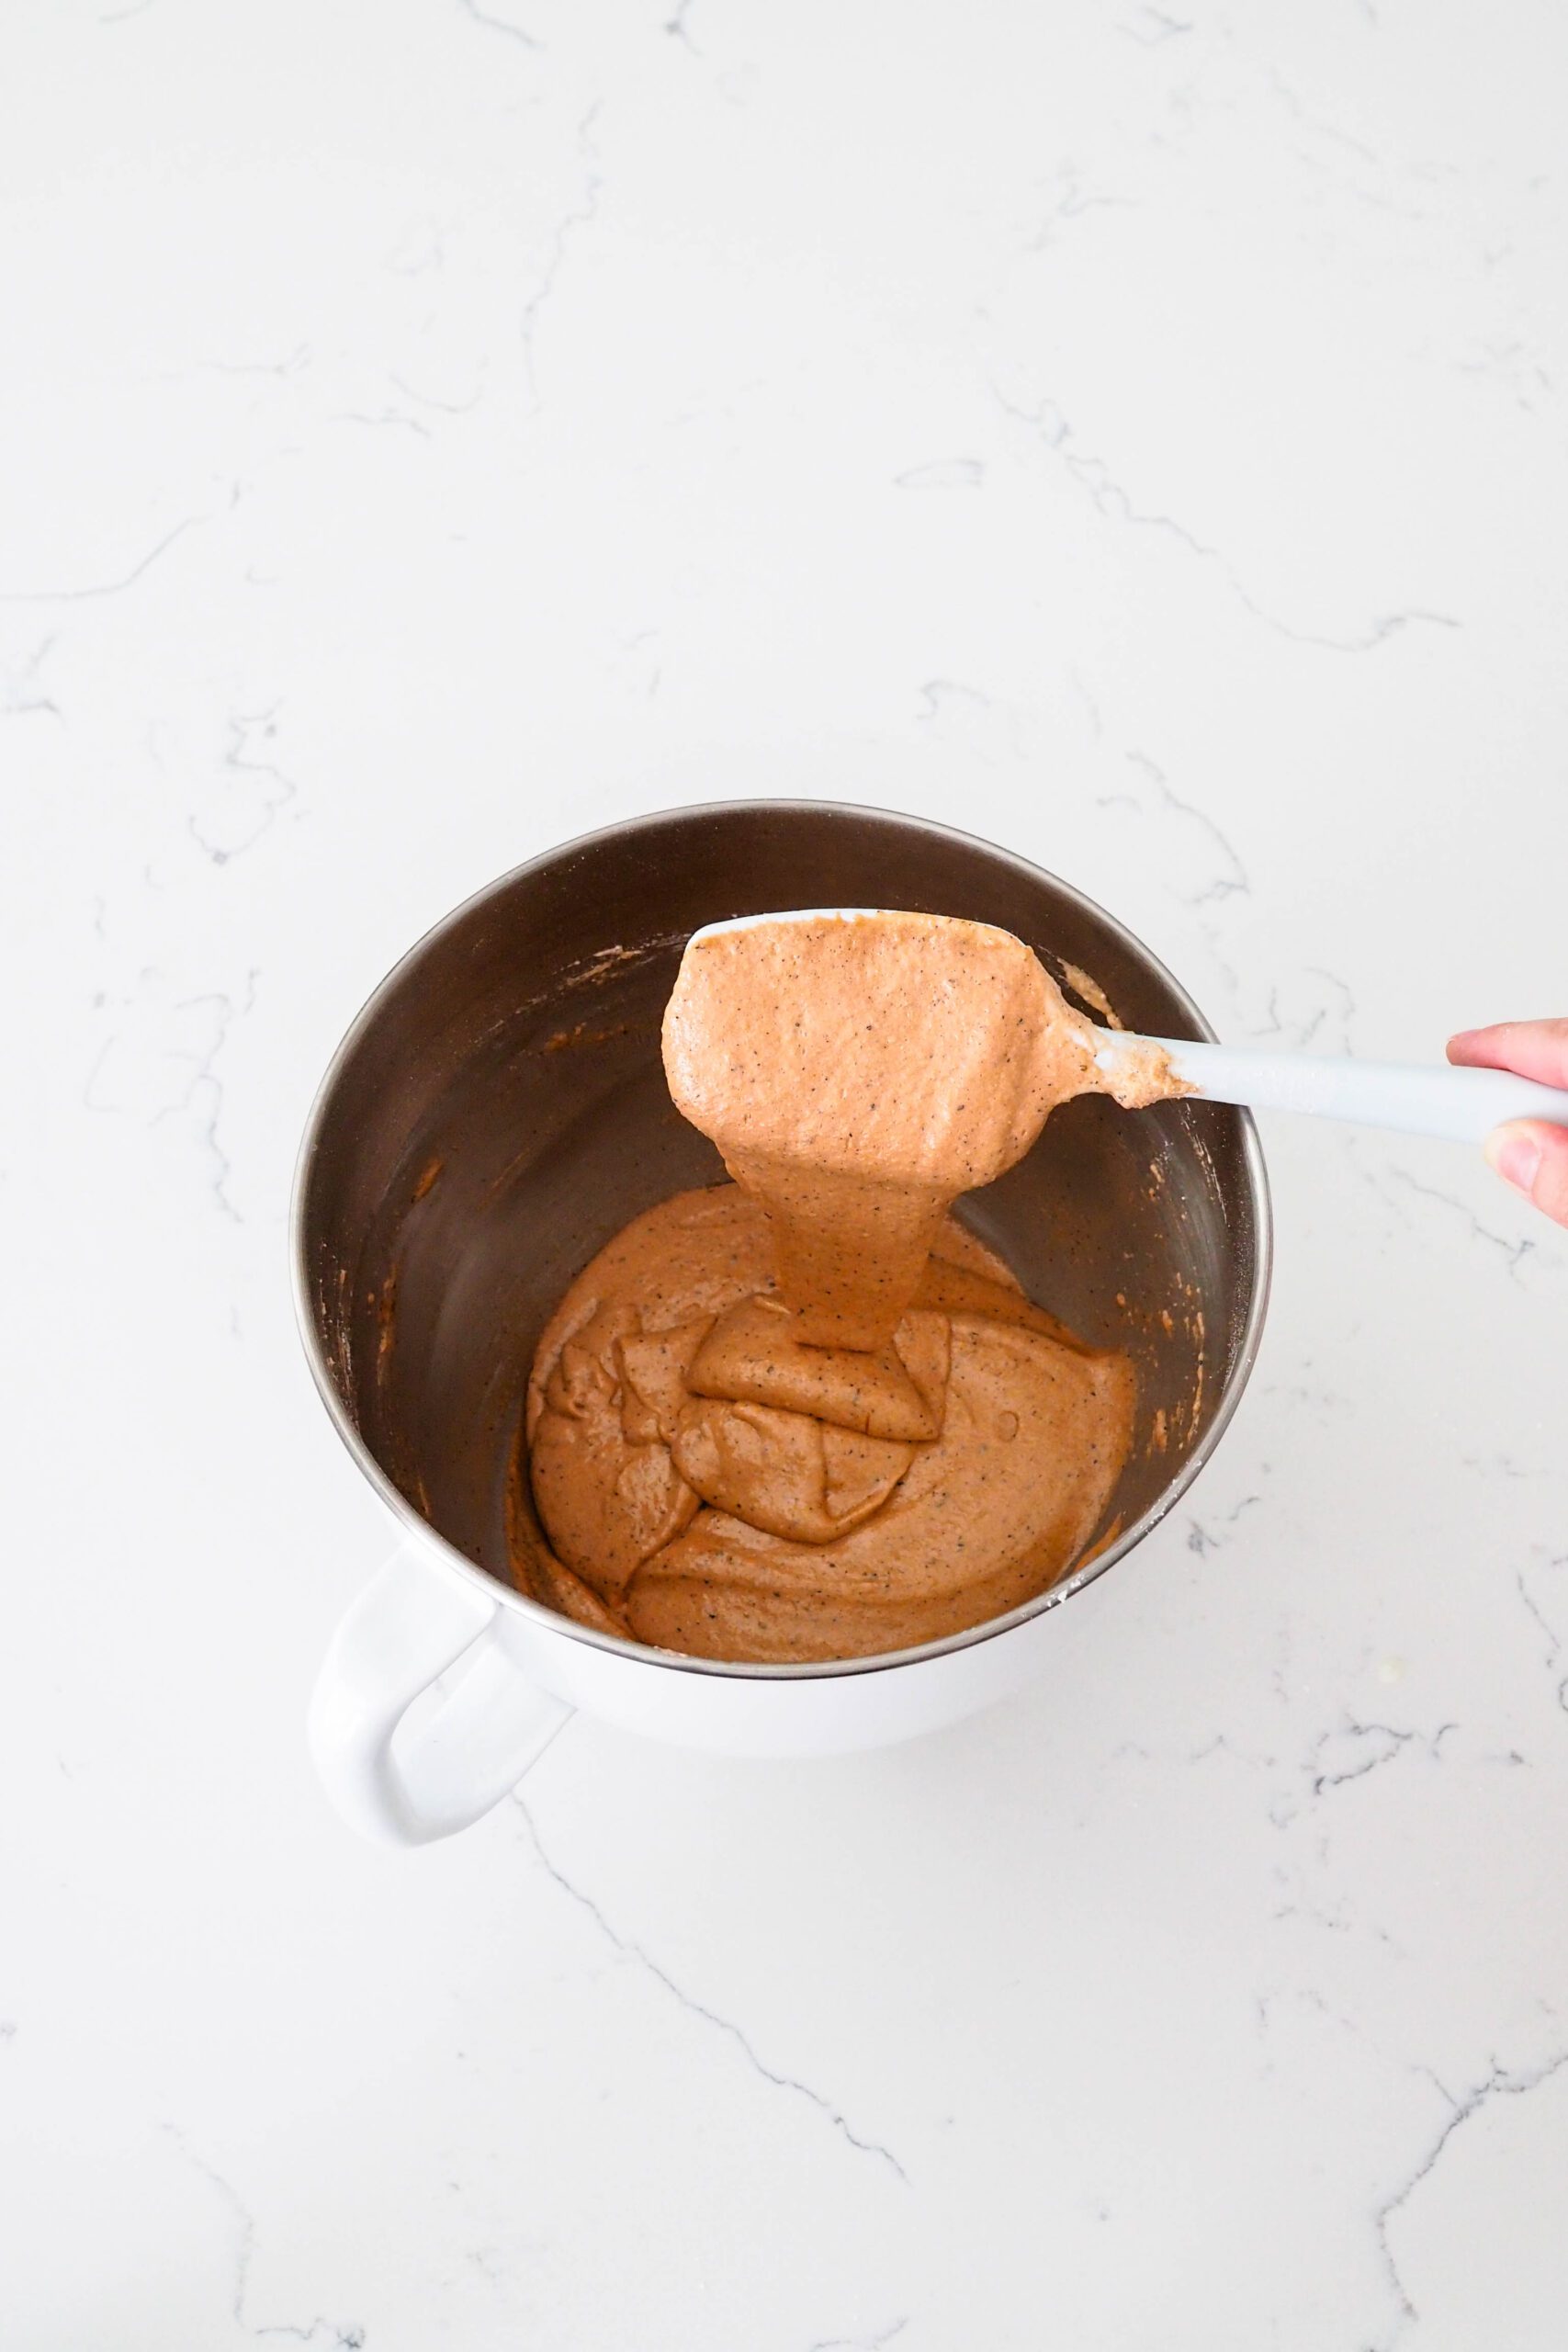
The perfect consistency of macaron batter will look grainy as it flows off the spatula in one long, stacking ribbon. Then, it will begin to absorb back into the rest of the batter (within 10-15 seconds) and will leave a smooth and shiny surface.
If your batter takes more than 15 seconds to absorb, you need to knock more air out of the meringue. If your batter takes closer to 5 seconds to absorb, it’s likely overmixed; however, it will probably still turn out decent macarons. Unfortunately, if your batter absorbs immediately, there is not enough air left in the meringue to form proper macarons. I recommend starting over.
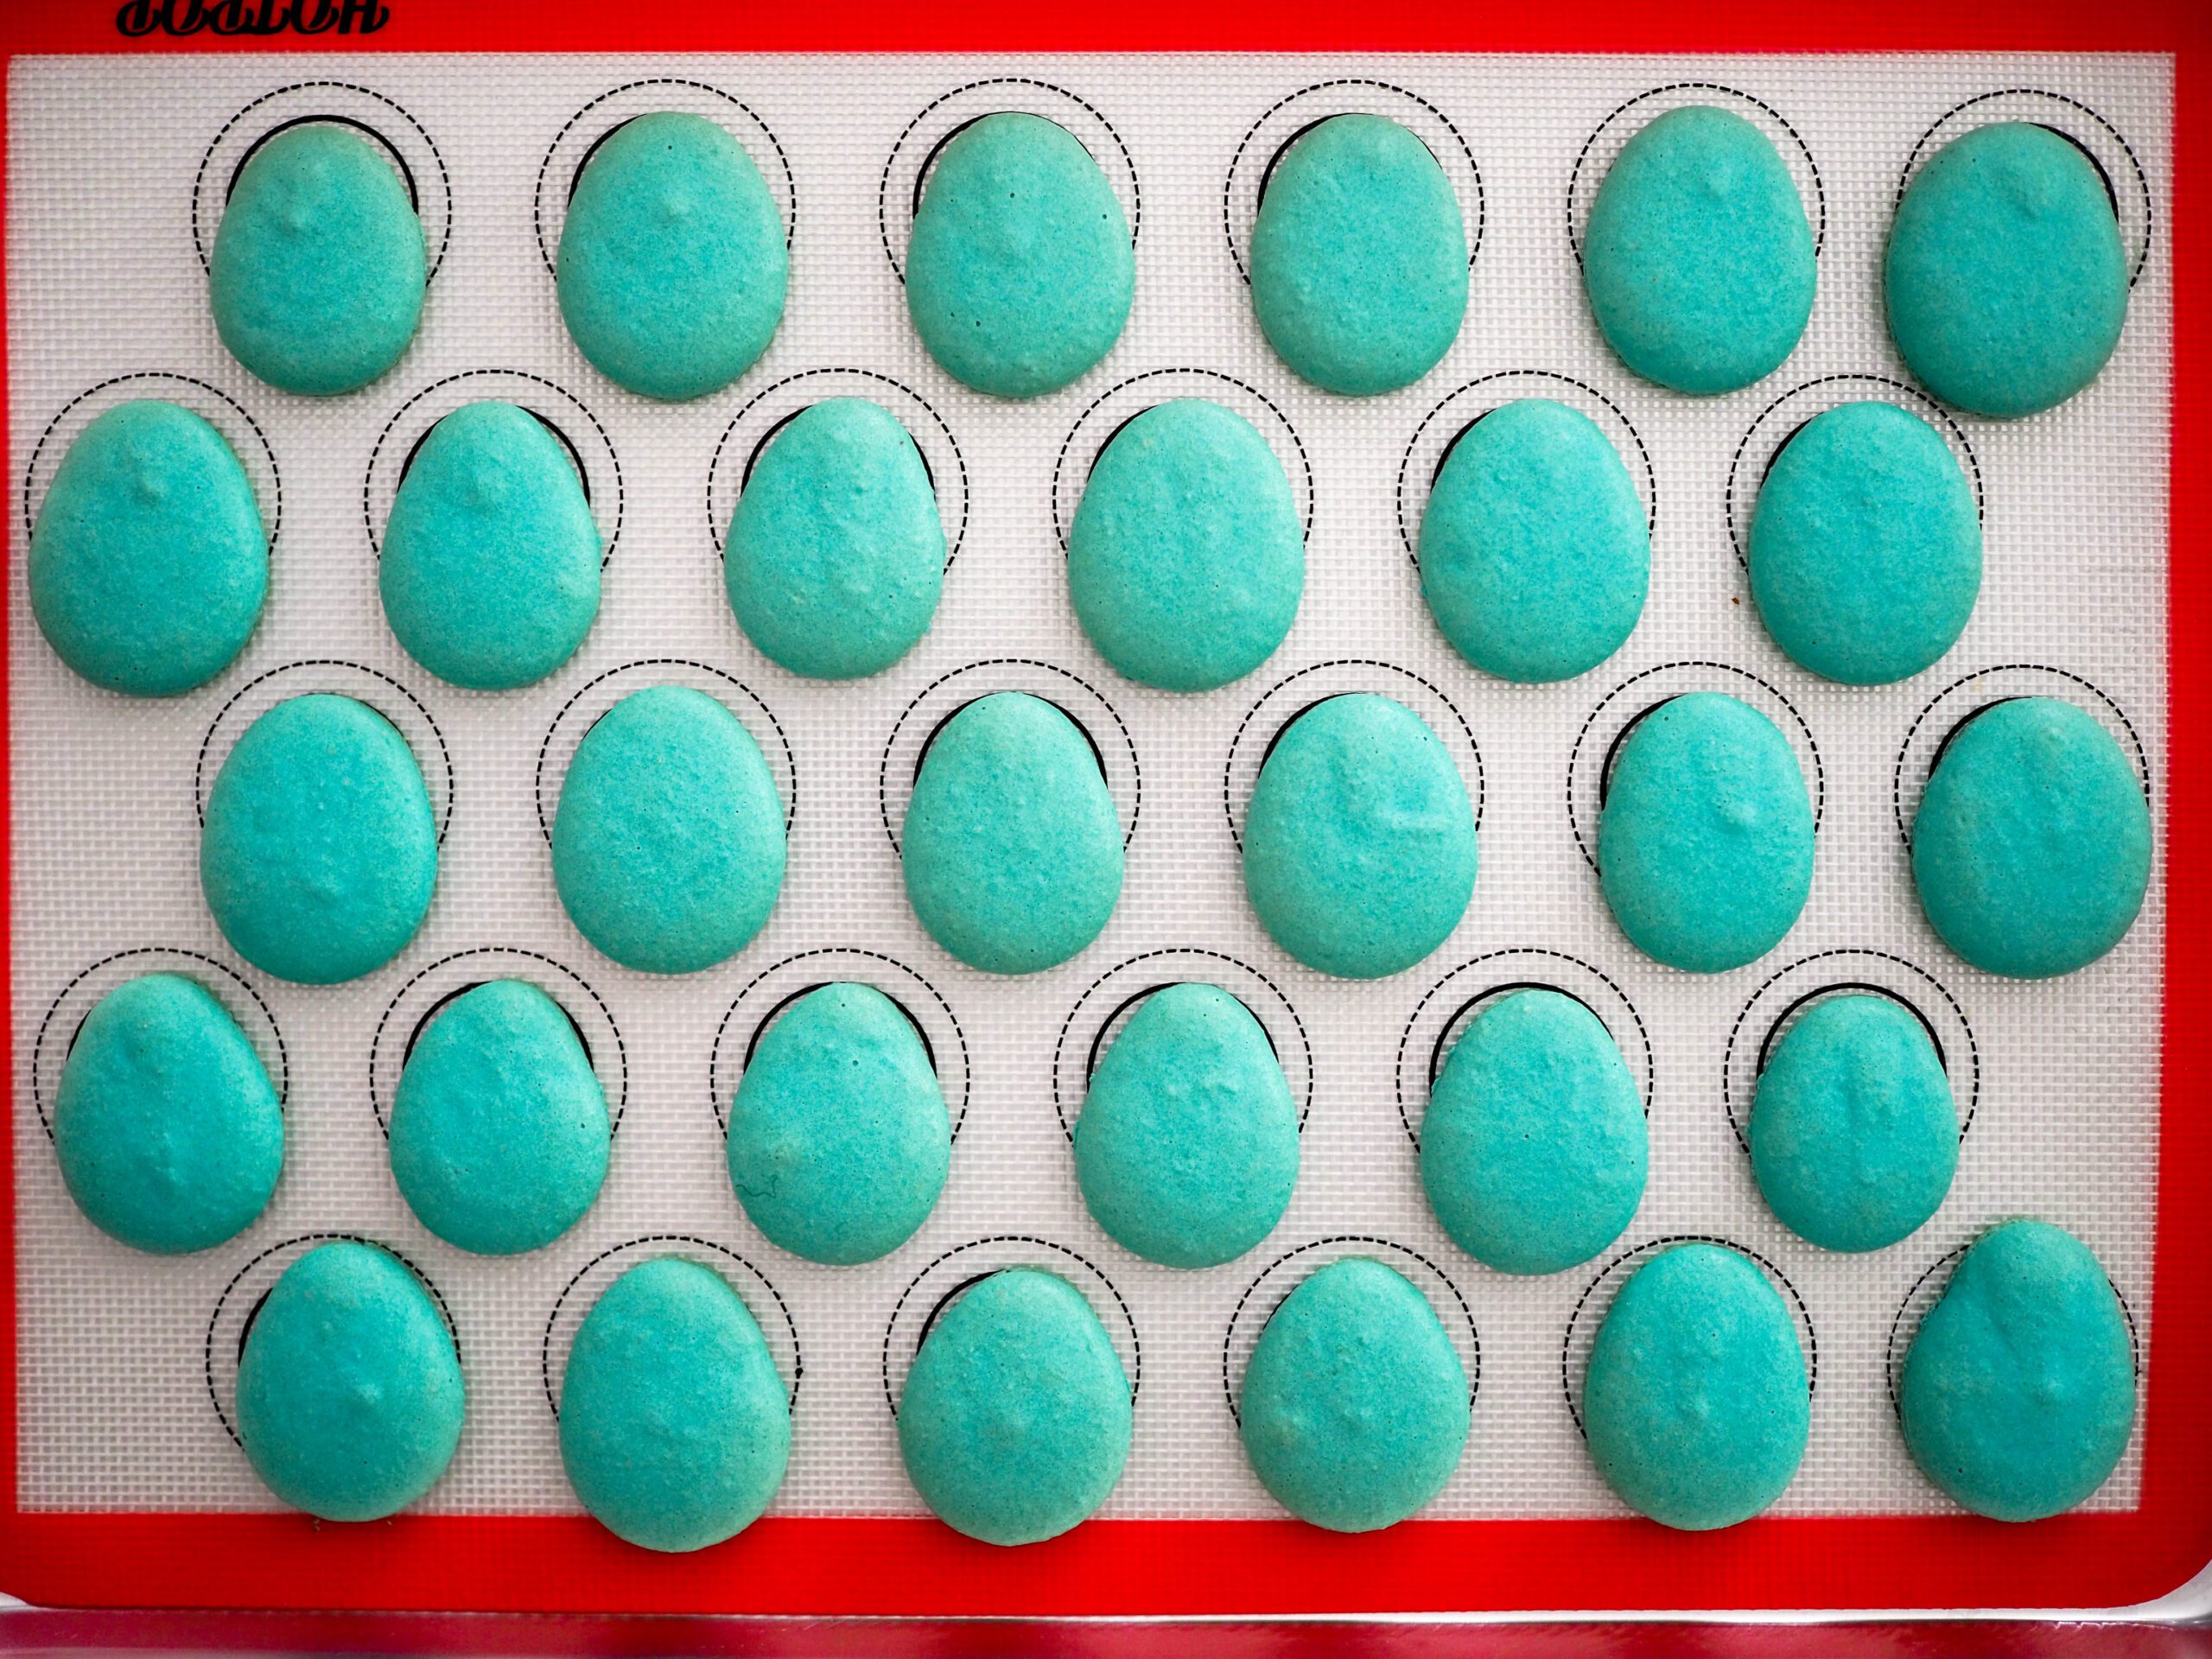
How to Pipe Egg-Shaped Macarons without a Template
It is entirely possible to make egg-shaped macarons without printing out a special template. I used my regular silpats with circles printed on them, and I didn’t have a single mismatched egg in the three batches I made.
When piping your macarons, start at the very bottom of the circle. Pipe a full 1″ mound on that circle, and while still gently squeezing the bag, pull the bag away from you to the very top of the same circle. Then stop squeezing the bag and pull away sharply before moving onto the next. That will give you a wide base and a narrower top.
It may take a few tries to get it right. Once you get the hang of it, you’ll be piping egg-shaped macarons in no time!
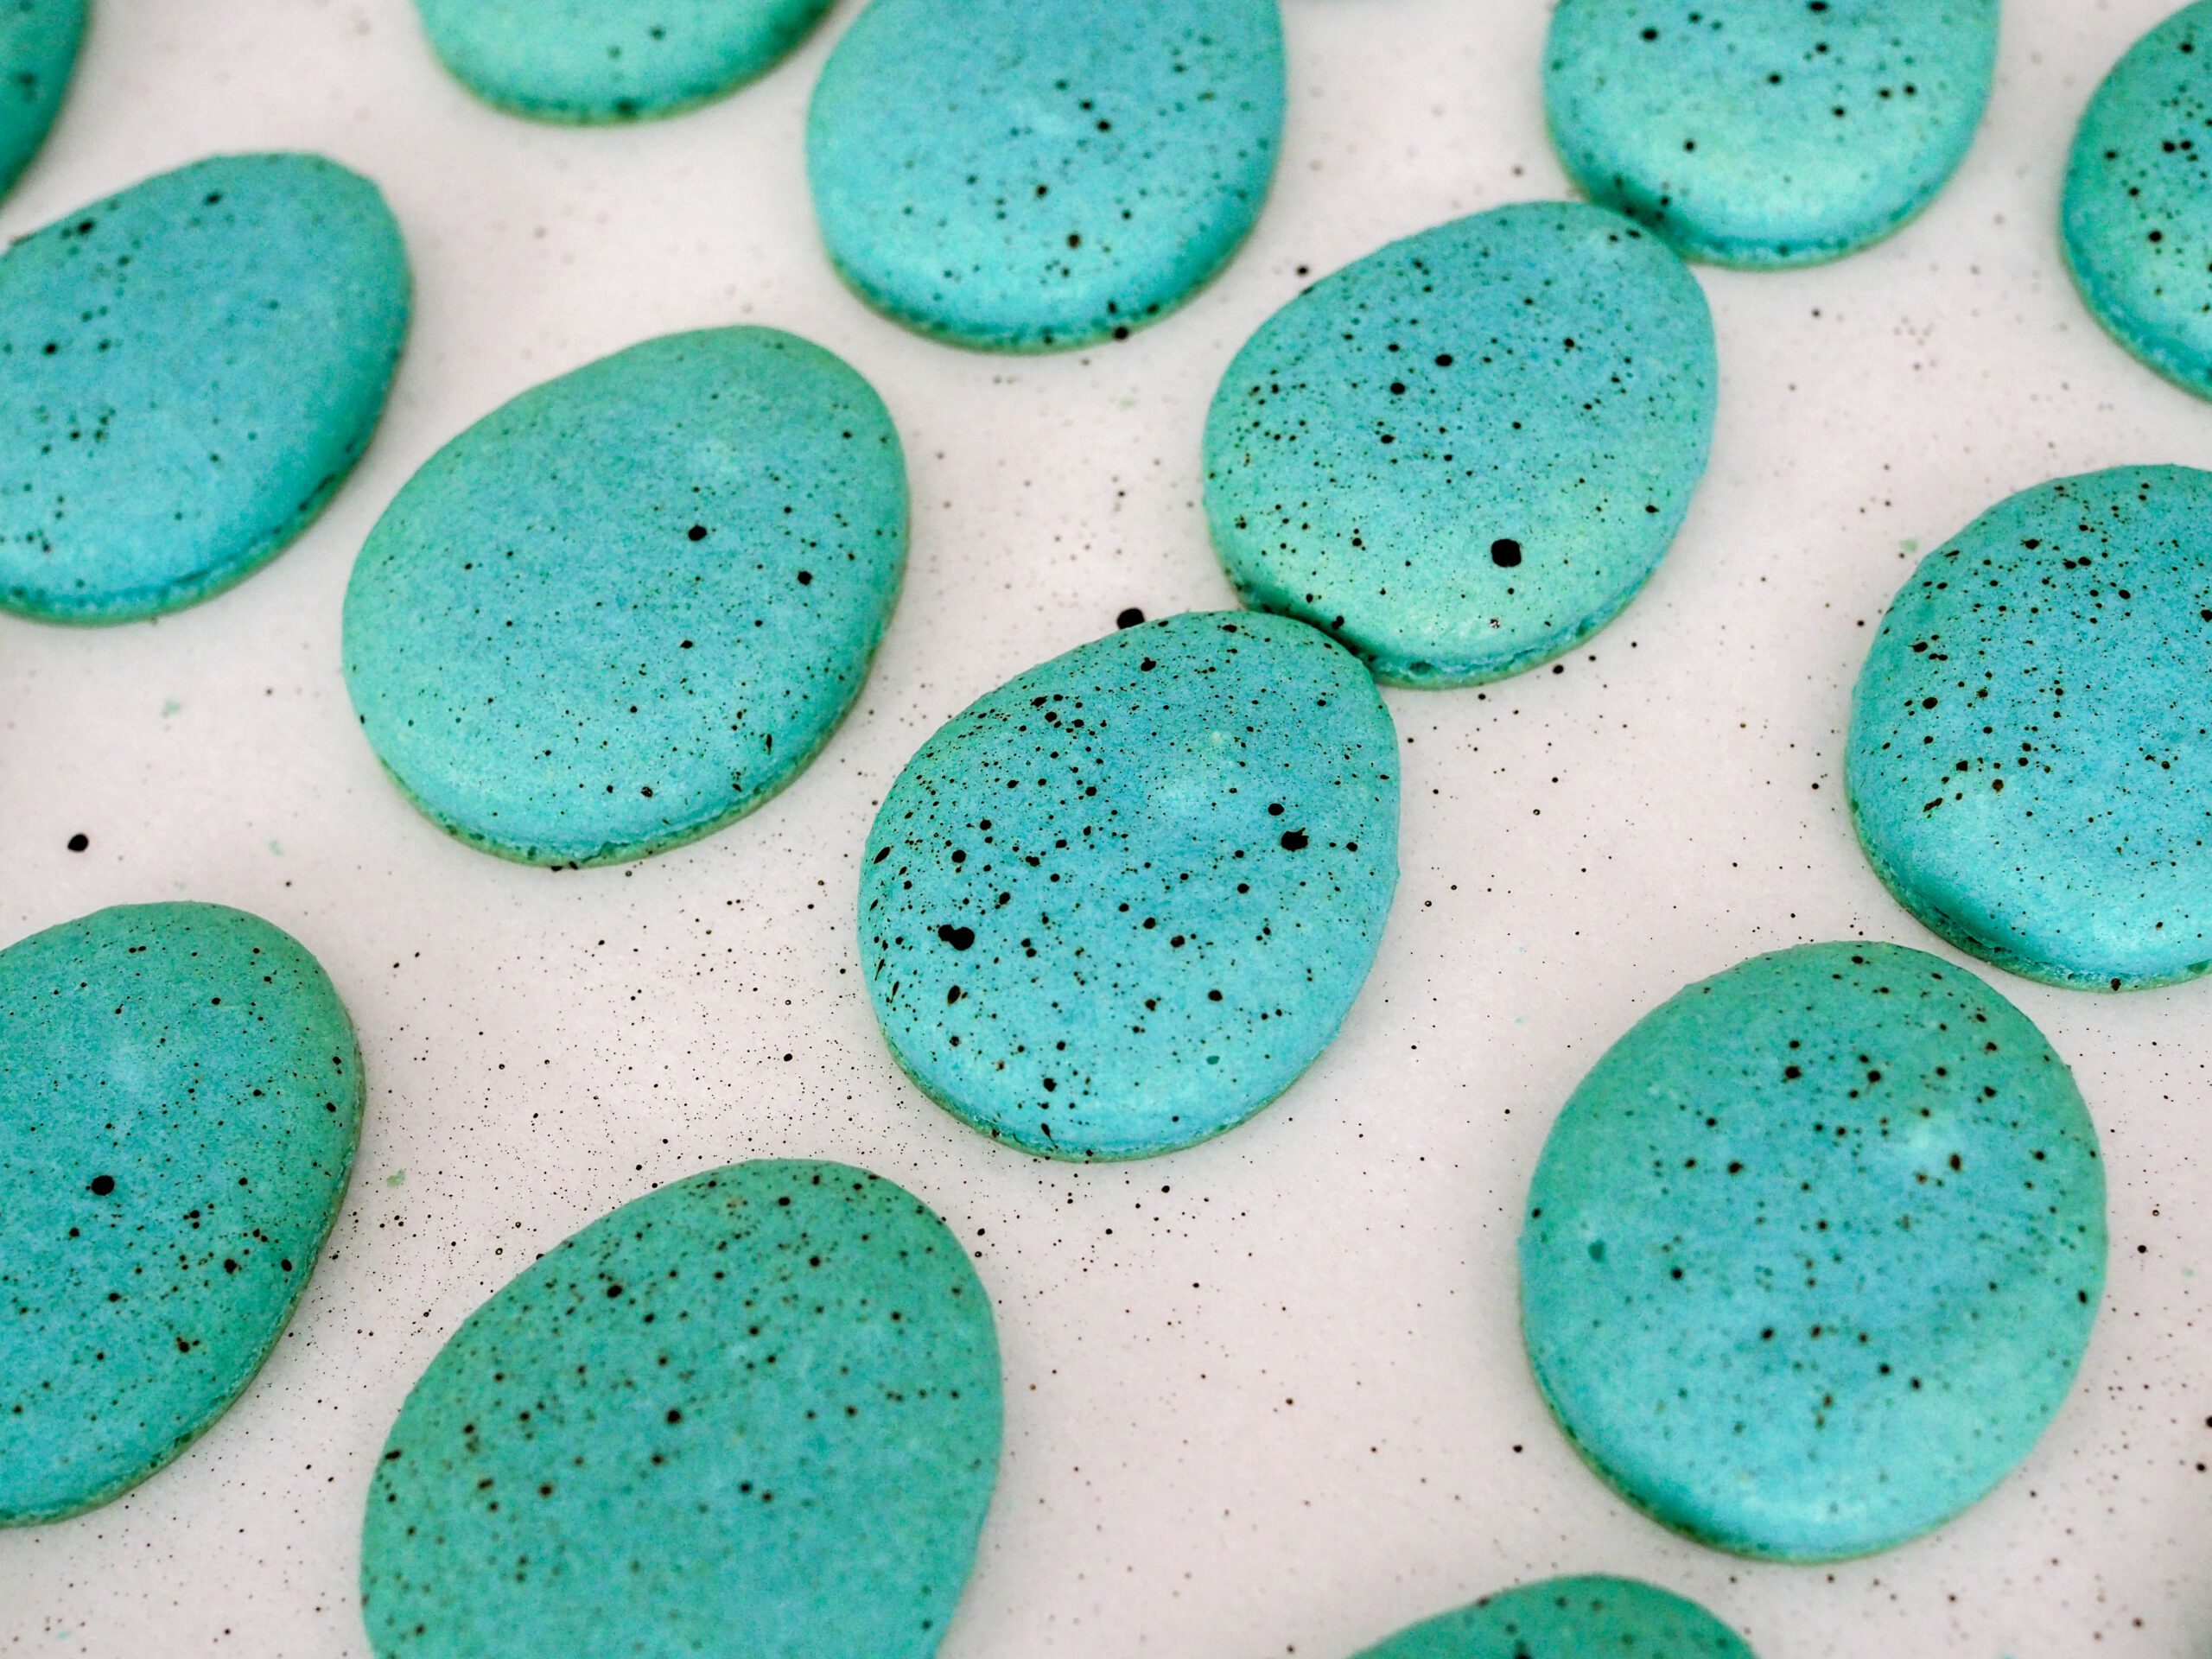
Quick Tips for Speckling the Robin’s Egg Macarons
To color the macarons with the traditional speckles, use a drop of brown food coloring diluted by a splash of alcohol. The alcohol will evaporate much more quickly than water and will prevent the shells from becoming soggy. Mix the color together well.
Use a food-safe paintbrush and a fork to apply the speckles. Then, drag the paintbrush along the tines of the fork directly above the macarons. The closer you are to the macarons, the larger the drops will be. The same goes for how much liquid you have in the paintbrush. The more color in the brush, the larger the drops will be.
Move the brush closer and further away while you’re speckling to get different looks. No two eggs are the same, and your macarons shouldn’t be, either!
Quick Tips for Prepping Swiss Meringue
I was inspired by lemon meringue pie to get a realistic egg look for these macarons! The lemon curd makes up the yolk, and the meringue makes up the white.
To make the meringue, you’ll want to use a heat-safe bowl, like a metal stand mixer bowl, over a pot of simmering water. Whisk together the egg whites and sugar while over the heat until they reach 140°F (60°C). This takes around seven minutes. Then, transfer the mixture to your stand mixer.
Whip the meringue until it’s cool to the touch and glossy before placing it in a piping bag.
Toasting the Meringue
I love the taste and texture of toasted meringue, so I lightly toasted my macarons in the oven. This was living dangerously, as I burned a batch when I looked away for a couple of minutes.
If you choose to toast the meringue (and subsequent macarons), a culinary torch is preferred to prevent scorching the macaron shells. If you don’t have a torch, use your oven’s broiler setting on high—just don’t look away!

Other Recipes You May Enjoy
There are more macaron flavors available on the macaron page here on my blog.
If you’ve never made macarons, ladyfingers are a great place to start. The light, bite-sized sponge cakes are great to have on hand for trifles and no-bake desserts.
If you’re reevaluating your life’s choices after a full day making macarons in the kitchen, my candied orange slices are easy to make and great to have on hand for a quick pick-me-up.
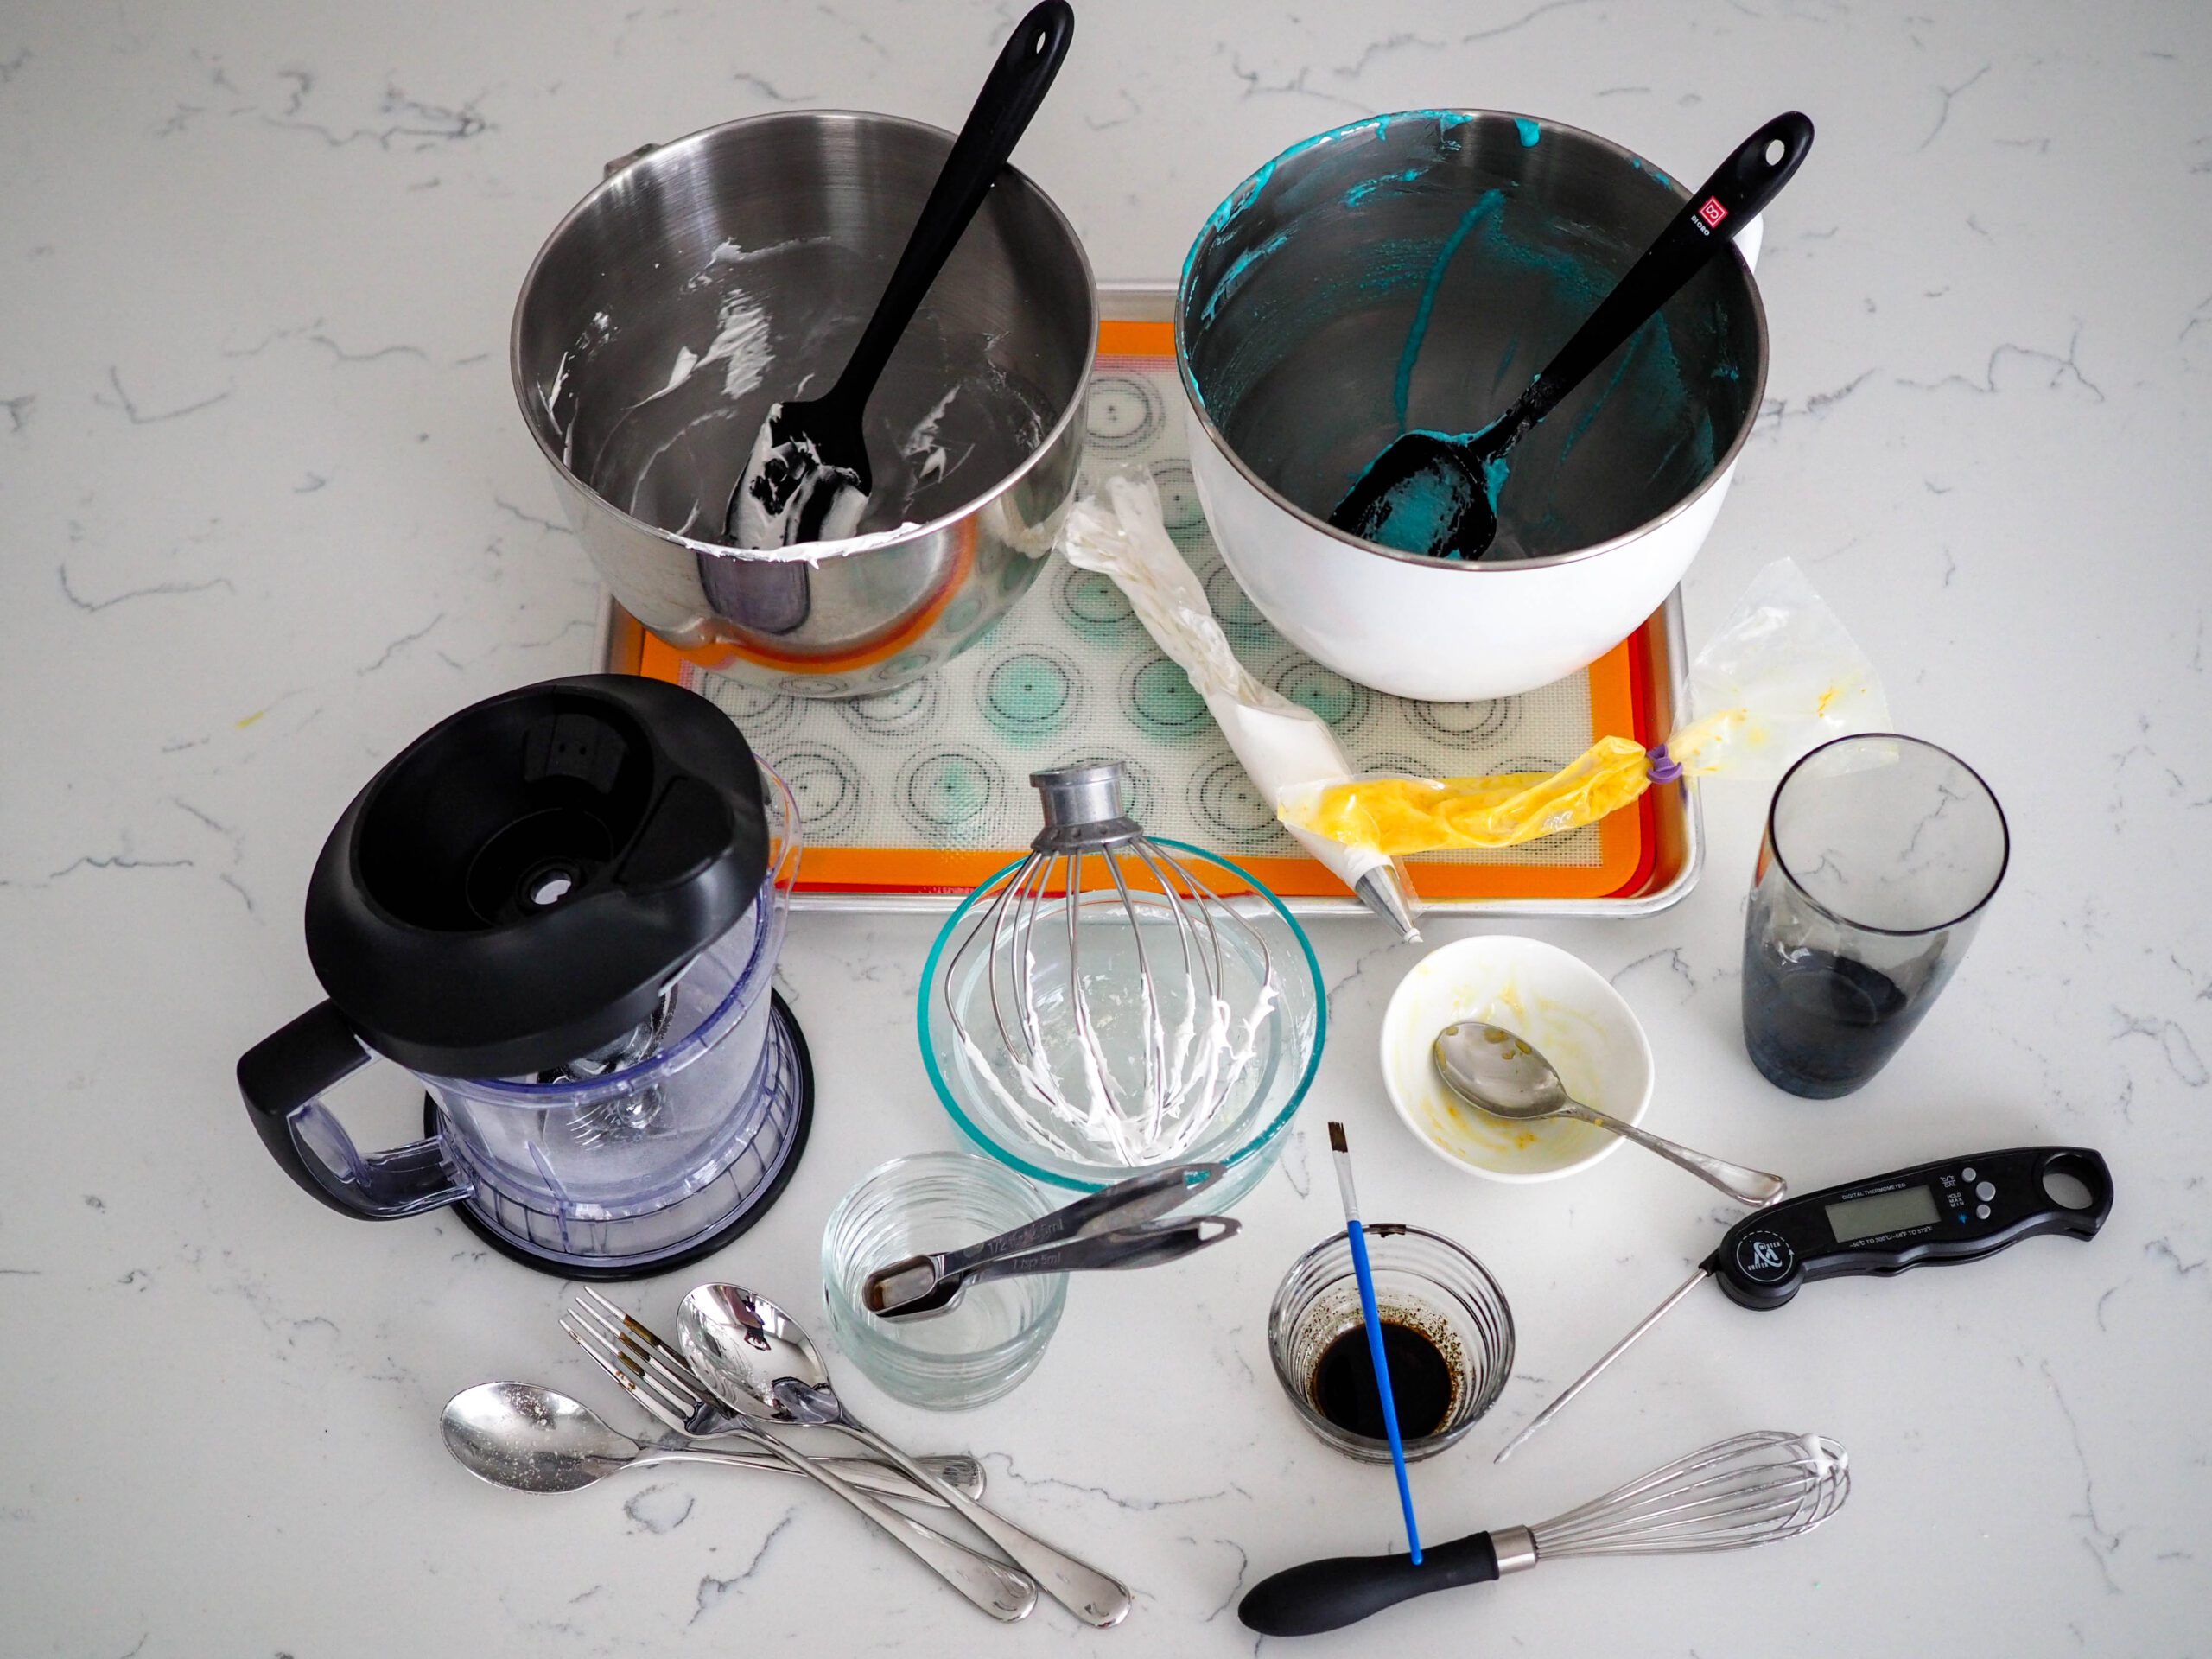
Dish Cleanup: Gonna Take a While
I rate my recipe cleanups on a scale of 1 to 5. 1 is only a handful of dishes, and 5 is everything including the kitchen sink.
My lifelike robin’s egg macarons recipe is a 4. Macaron shells don’t dirty too many dishes by themselves, but the meringue adds another bowl. If you make the lemon curd at the same time, it’ll add yet another bowl to clean. However, it is entirely worth it for the little beauties that these robin’s egg macarons turn out to be.
Easter Egg Macarons Recipe
Thanks for trying out my robin’s egg macarons recipe!
If you liked it, please consider rating this recipe five stars so others find it, too.
Lifelike Robin's Egg Macarons
Filled with lemon curd and meringue for a sweet and delicious version of the real thing, these robin's egg macarons make a great addition to your Easter celebrations.
Ingredients
For the Egg-Shaped Macaron Shells
- 120g egg whites, from about 4 large eggs
- 50g granulated sugar
- 120g almond flour
- 200g powdered sugar
- 1/2 teaspoon vanilla extract
- Sky blue gel food coloring
- Chocolate brown gel food coloring
- Splash of vodka
For the Lemon Meringue Filling
- 2 egg whites
- ½ cup granulated sugar
- 1 teaspoon vanilla extract
- ½ cup lemon curd
Instructions
Making the Macarons
- Prepare two baking sheets with macaron silpats or parchment paper. Prepare a piping bag fitted with a round tip (I use Wilton #12 or Ateco 808) and set aside.
- Process powdered sugar and almond flour together in a food processor or blender for a superfine consistency. This is necessary for perfectly smooth shells. Set aside.
- Separate the eggs. Place egg whites in the bowl of a stand mixer fitted with the whisk attachment and mix on low until frothy. Increase speed to medium. Once the whisk begins leaving a trail, sprinkle in the sugar about a teaspoon at a time. Once all the sugar is incorporated, increase speed to high and whisk until stiff peaks form. Add in two drops of sky blue gel food coloring. Whisk on high for just a couple of seconds to fully incorporate. It will look really bright, but the color fades once you mix in the rest of the ingredients.
- Remove the bowl from the stand mixer and pour half of the almond flour mixture into the meringue. Fold together until fully incorporated, scraping the sides and bottom of the bowl. Add in the remaining almond flour mixture and fold together. The mixture will be thick, but as you continue folding, it will lose some air and thin out. Continue folding and pressing the batter into the sides of the bowl until the batter is the correct consistency (covered in the next step).
- To test the consistency, scoop the batter up, and let it flow back into the bowl. Continue folding until the mixture flows in one solid ribbon off the spatula. It should look a bit grainy as it flows off the spatula, then dissolve back into the batter in about 15 seconds and look glossy instead of grainy.
- Pour the batter into the prepared piping bag. To make egg-shaped macarons, hold the bag at a 90° angle to the silpat- or parchment-lined pan. Gently squeeze out the macaron batter into lumps about 1" in diameter, then, while still lightly squeezing, move the piping tip away from you about an inch. That will result in a ovoid shape with a wider base and narrower top for macaron eggs! They will spread as they settle.
- Once piped, rap the baking sheets against the counter five times or until you see air bubbles rise from the bottoms of the shells. Use a toothpick to pop any remaining bubbles for a perfectly smooth top.
- Set the macarons aside in a well-ventilated area to dry for about 20-30 minutes. On particularly humid days, this may take about an hour; you can point a fan on low to speed up the process. While the macarons are drying, preheat the oven to 320°F. The macarons are ready to go in the oven when you can lightly touch the top of a macaron without it leaving residue on your finger.
Baking the Macarons
- Once the macarons are dry, bake one tray at a time in the center rack for 16-19 minutes or until the macaron is set. Test to see if the macarons are set: Try to gently wiggle a macaron back and forth from the center of the pan with your thumb and forefinger. If the center moves at all, put the tray back in the oven for another minute or two until the center of the macaron is set and does not move when prompted.
- Let each tray cool completely before removing the macarons from the mats, about 10 minutes.
Making the Meringue
- Combine two egg whites and sugar in a heat-proof bowl (I use the bowl of my stand mixer) over a pot of simmering water. Whisk continuously until the mixture reaches 140°F (60°C). Remove from heat.
- Transfer the mixture to the bowl of a stand mixer, add in vanilla extract, and whisk on medium high for three to five minutes until the meringue is glossy and the sides of the bowl are cool to the touch. Transfer into a piping bag with your preferred tip. I used Wilton #10.
Assembling the Macarons
- Pair each macaron shell with a similarly-sized shell and place them face-up (flat-side down) on a large sheet of parchment paper.
- Mix together one drop of brown gel food coloring and a splash (½ teaspoon) of vodka with a food-safe paintbrush. Dip the paintbrush in the mixture, then flick the paintbrush over the tines of a fork to speckle the eggs. The more color on the paintbrush, the larger the spots will be.
- Let the spots dry for a minute or two, then flip half of the macarons and place them upside down on a baking sheet. (If you keep them in order, it will be easier to match them up with their counterparts later.) Pipe a tall border of meringue around the macaron shells. For a toasted meringue (optional), place the pan in the broiler for a couple of minutes until the meringue has just started to brown. The meringue will burn quickly, and the macaron shells themselves can get a little dark around the edges, so remove them as soon as you have the color you want. Or, use a culinary torch if you have one.
- Place the lemon curd in a piping bag and cut off the very tip of the bag. Fill inside of the meringue border with lemon curd and lightly press on the matching shell. Store in the fridge for up to a week.
Notes
Macarons are best enjoyed after they have matured for a full day in the refrigerator, though you can enjoy them at any time you like.
Nutrition Information:
Yield:
30Serving Size:
1 macaronAmount Per Serving: Calories: 97Total Fat: 3gSaturated Fat: 1gTrans Fat: 0gUnsaturated Fat: 2gCholesterol: 30mgSodium: 28mgCarbohydrates: 15gFiber: 1gSugar: 14gProtein: 3g
The nutrition facts are estimated and may vary based on specific ingredients used.
I’d love to see how your robin’s eggs turn out: Take a photo and tag me on Instagram @floralapronblog to share with me, or use the hashtag #floralapronbakes.