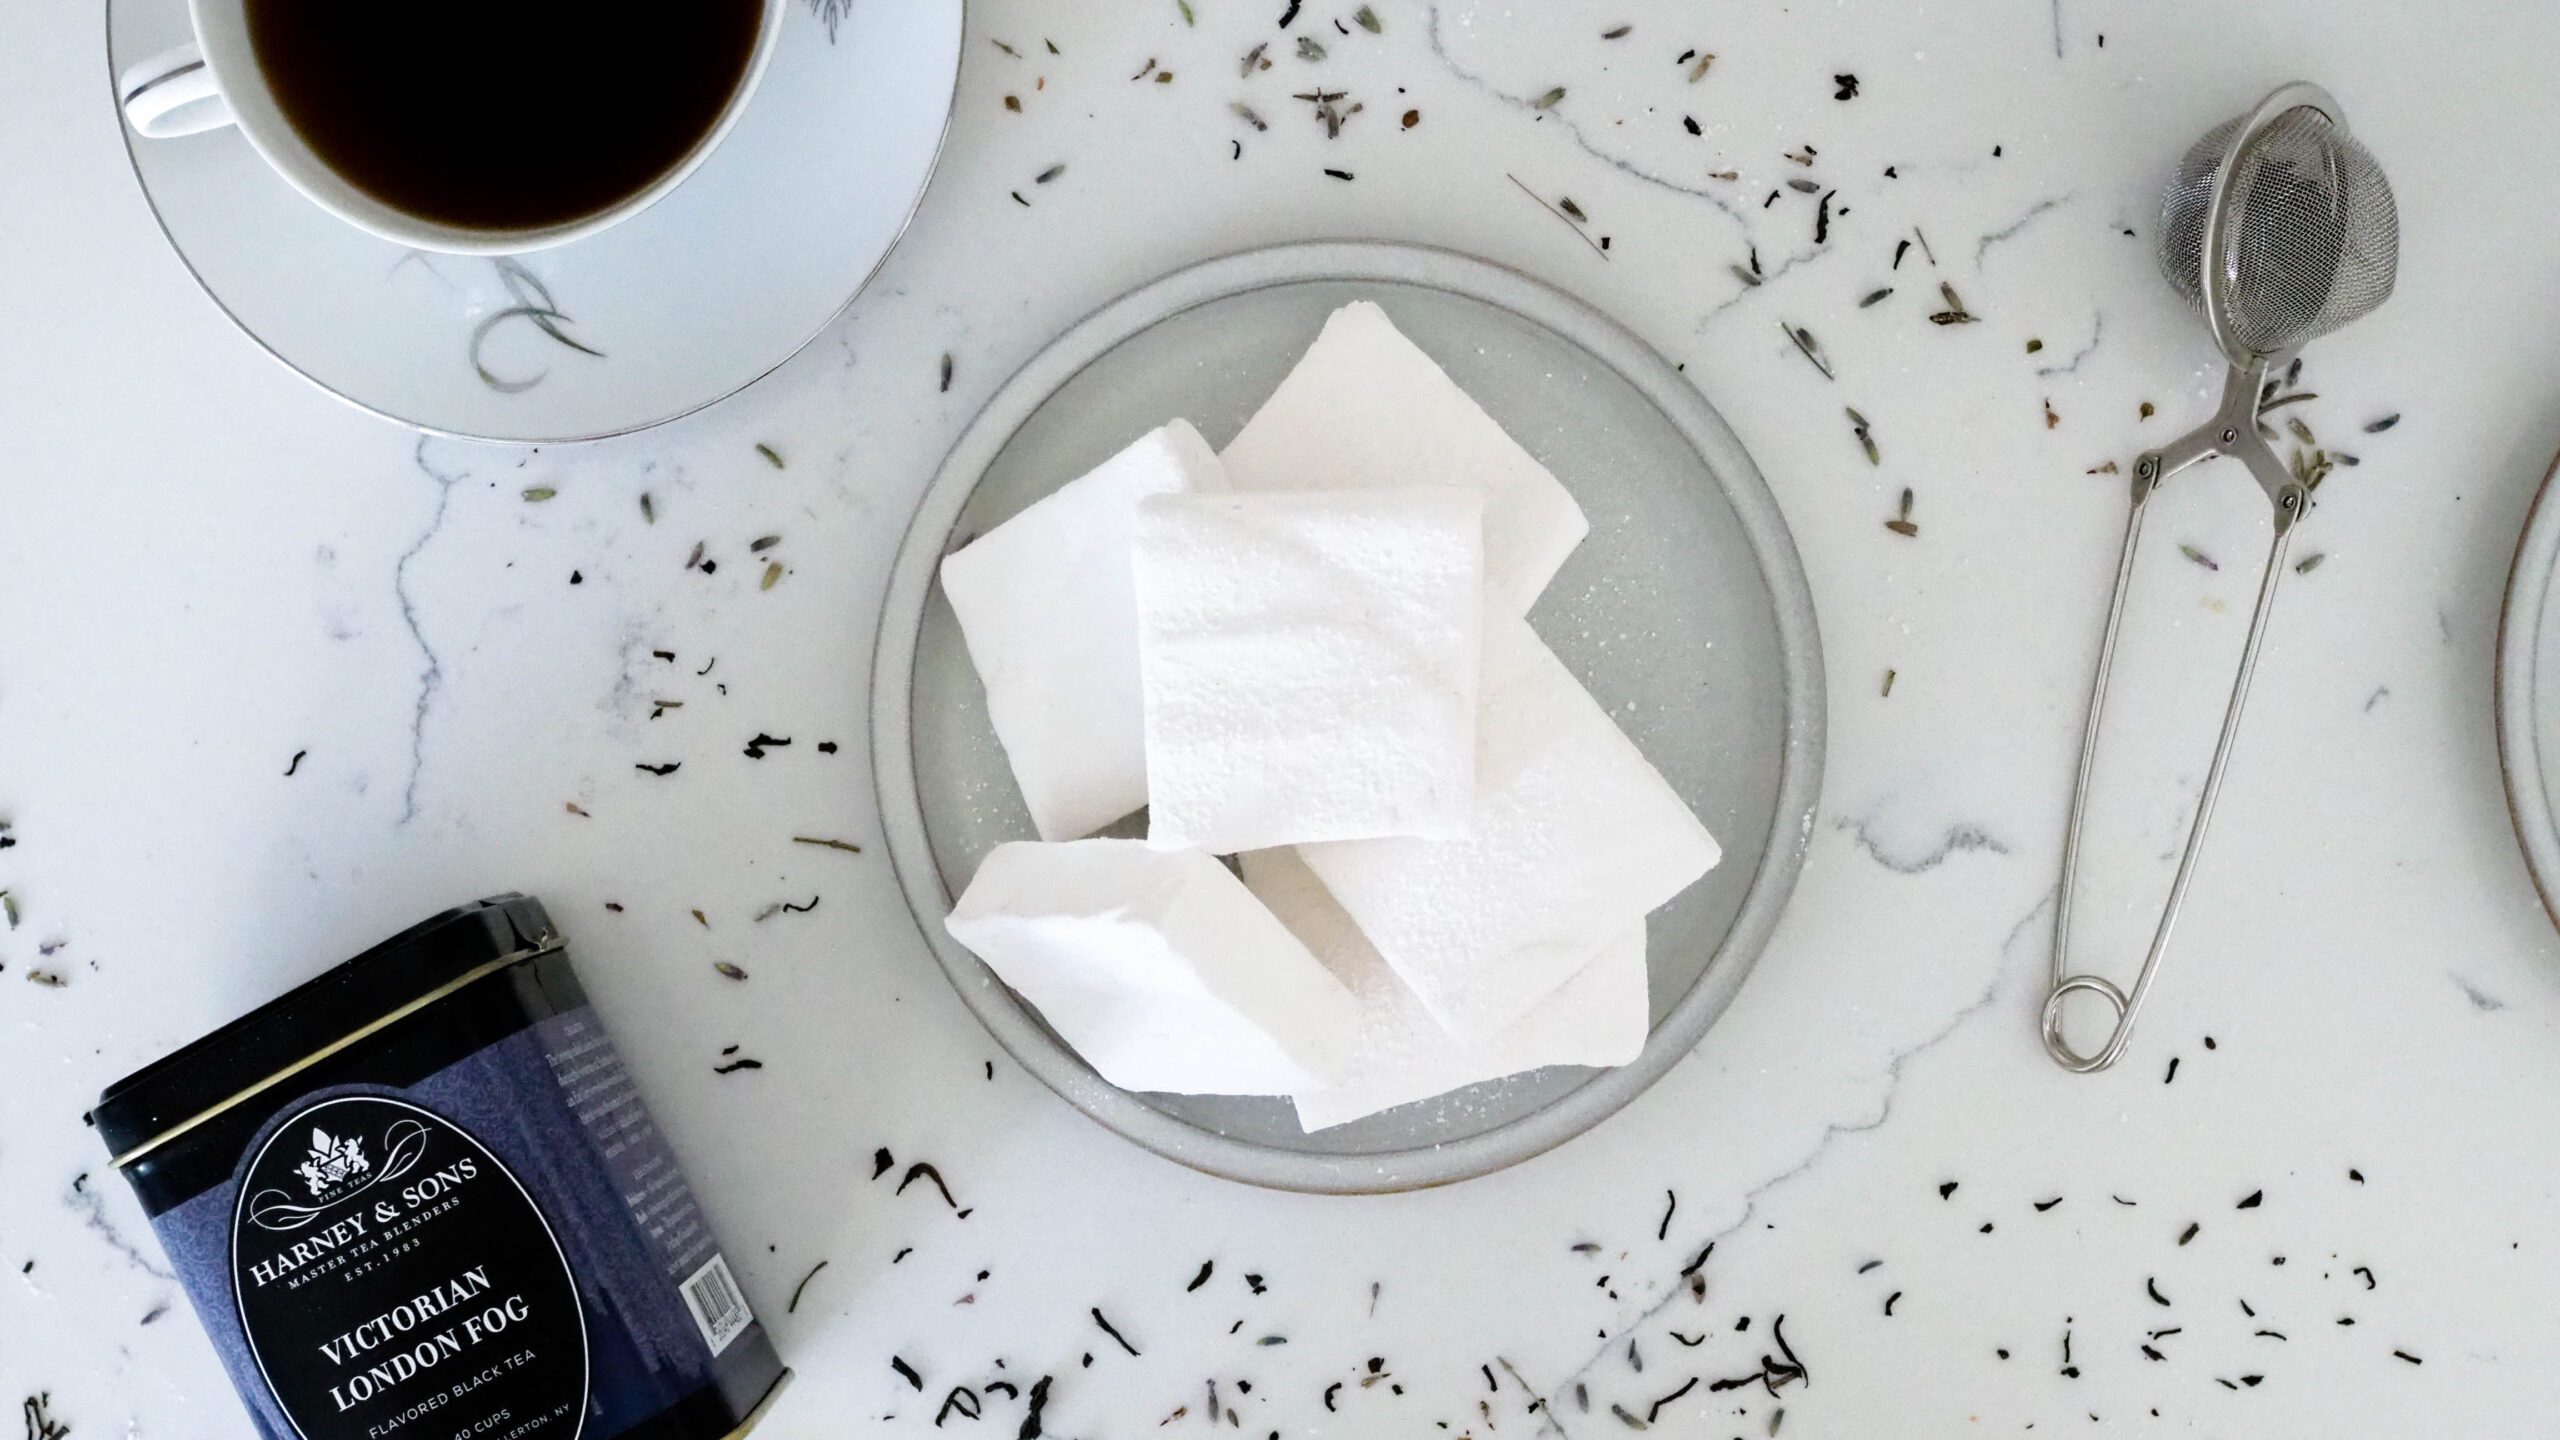
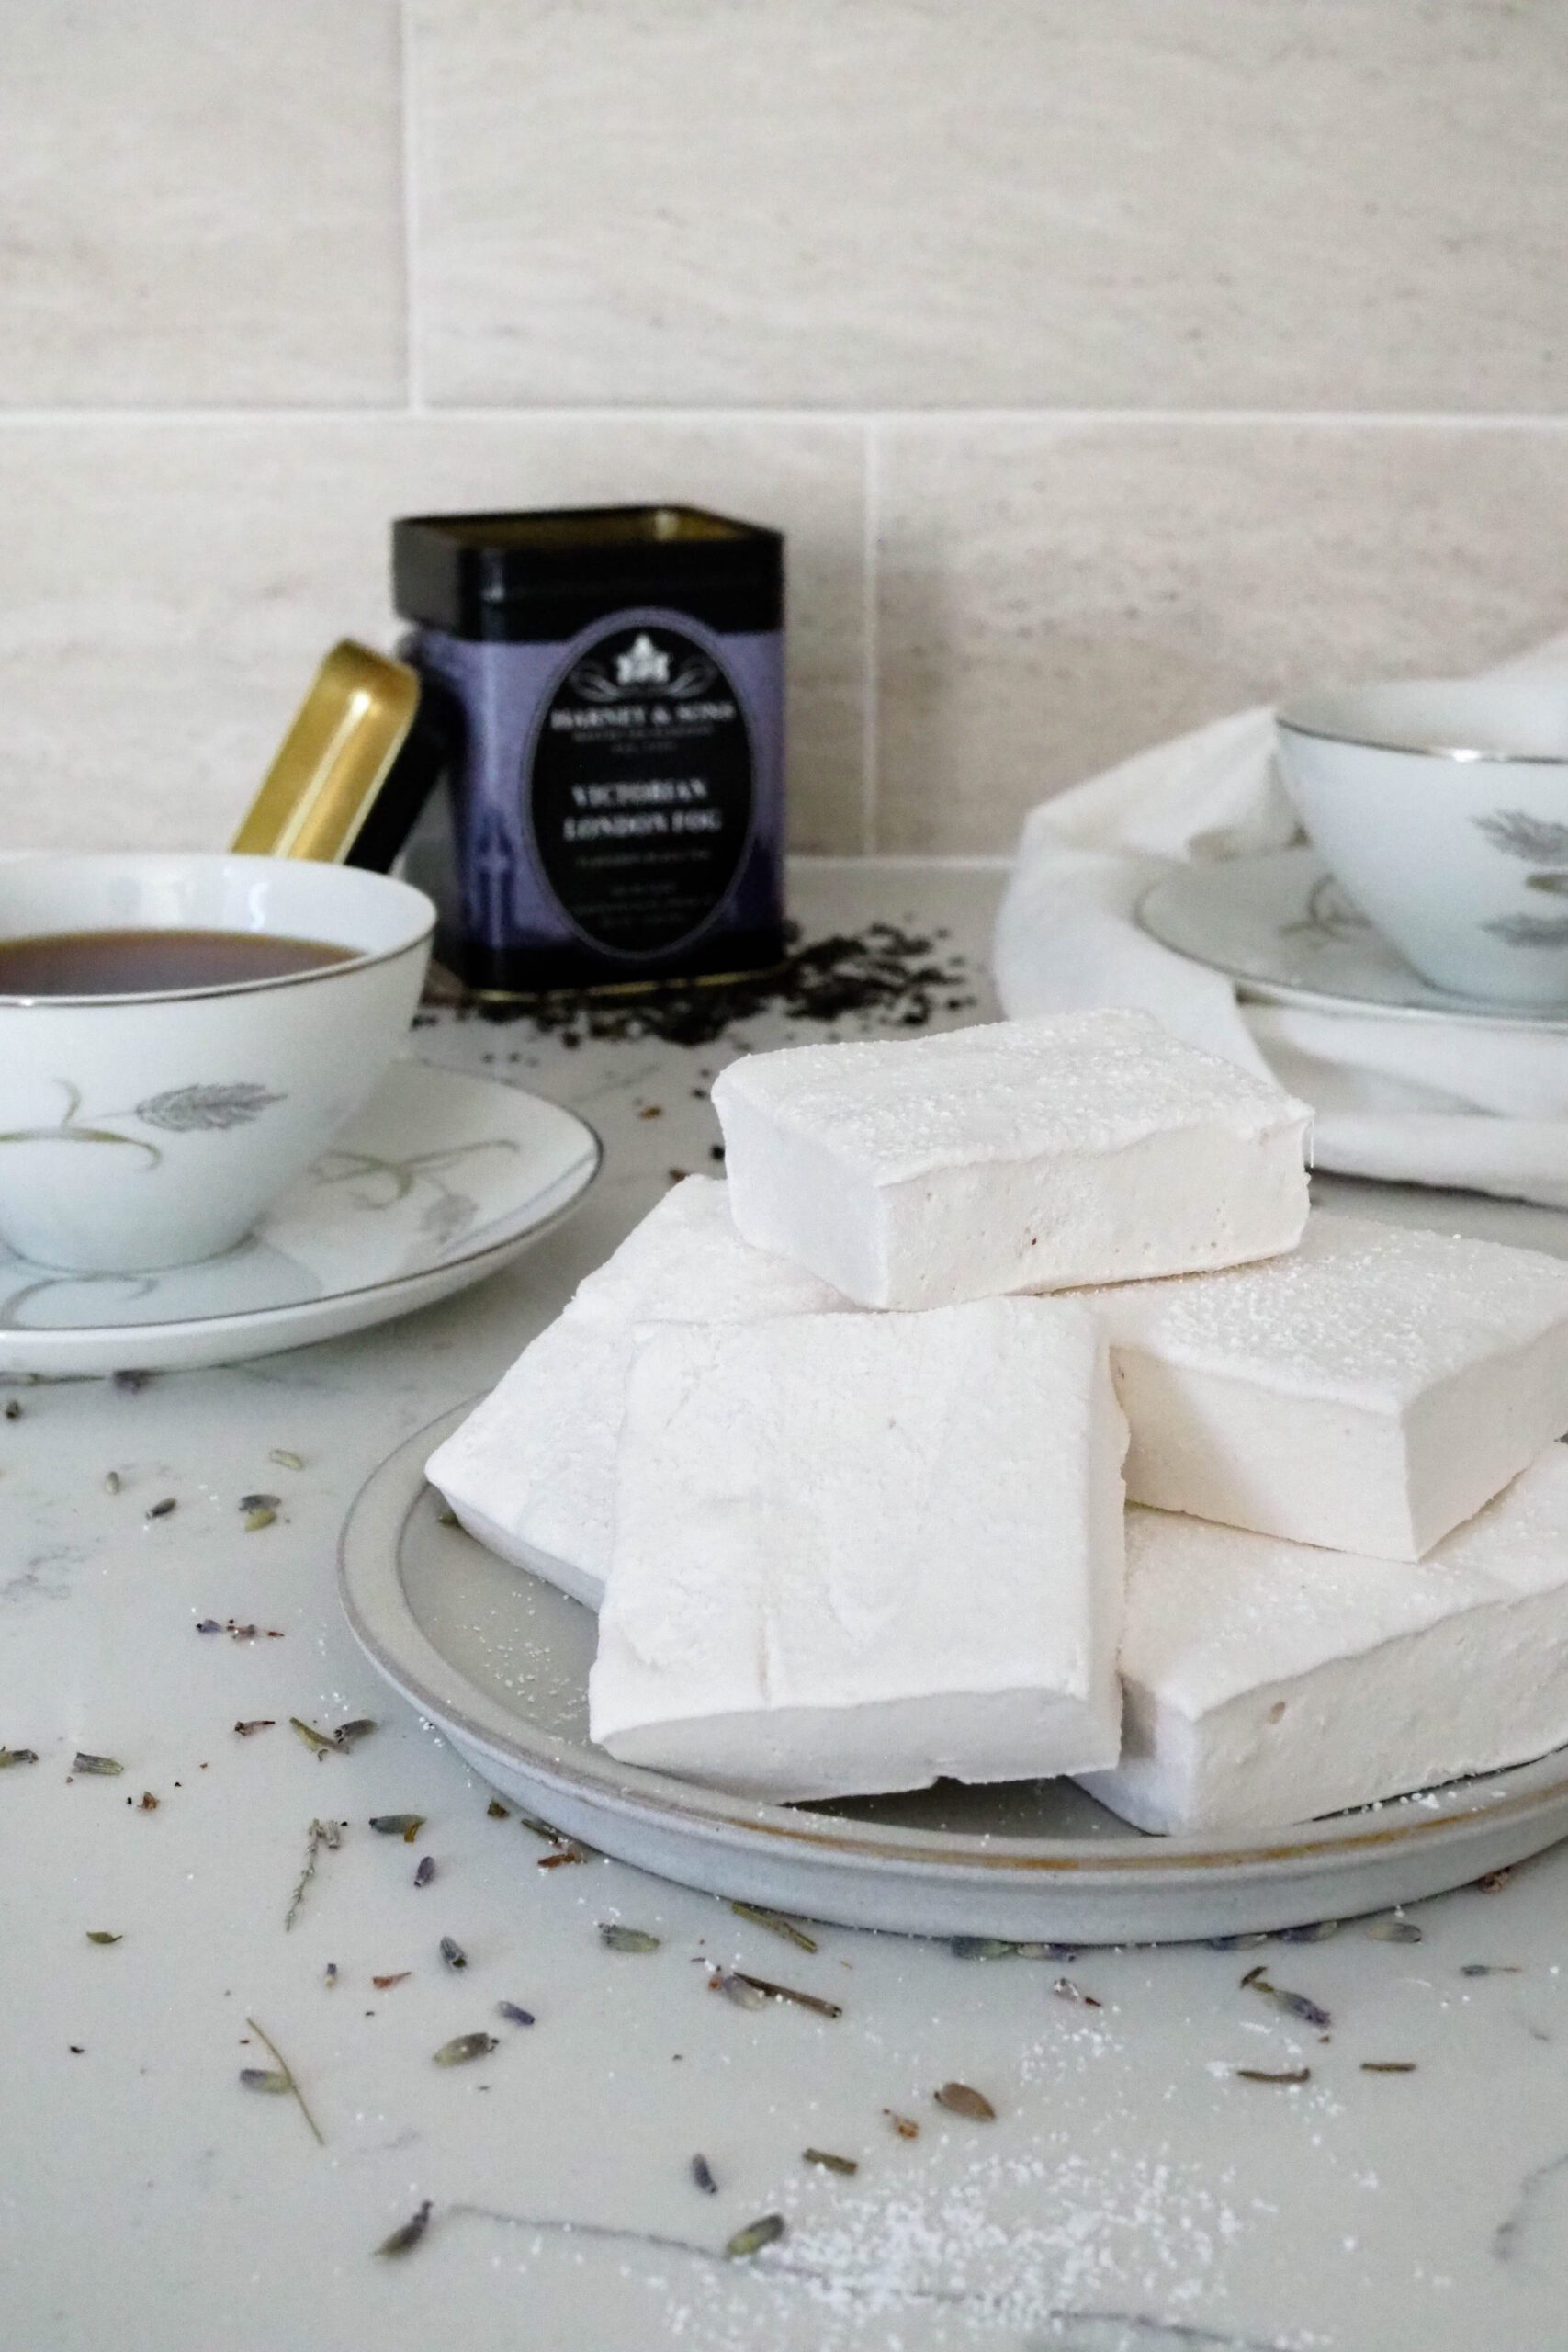
Marshmallows made at home are already much better than those from the grocery store, but it’s when you begin to infuse them with your favorite flavors that they become something truly special. Homemade Earl Grey marshmallows are just as easy to make as homemade vanilla marshmallows, but they have an extra hint of bergamot that makes them simply irresistible.
Ingredients for Homemade Earl Grey Marshmallows
Homemade Earl Grey marshmallows require only a couple of ingredients and are inexpensive to make! If Earl Grey tea isn’t your favorite, you can absolutely substitute another tea flavor you like better. Even fruity herbal teas would give these marshmallows a light, fruity flavor.
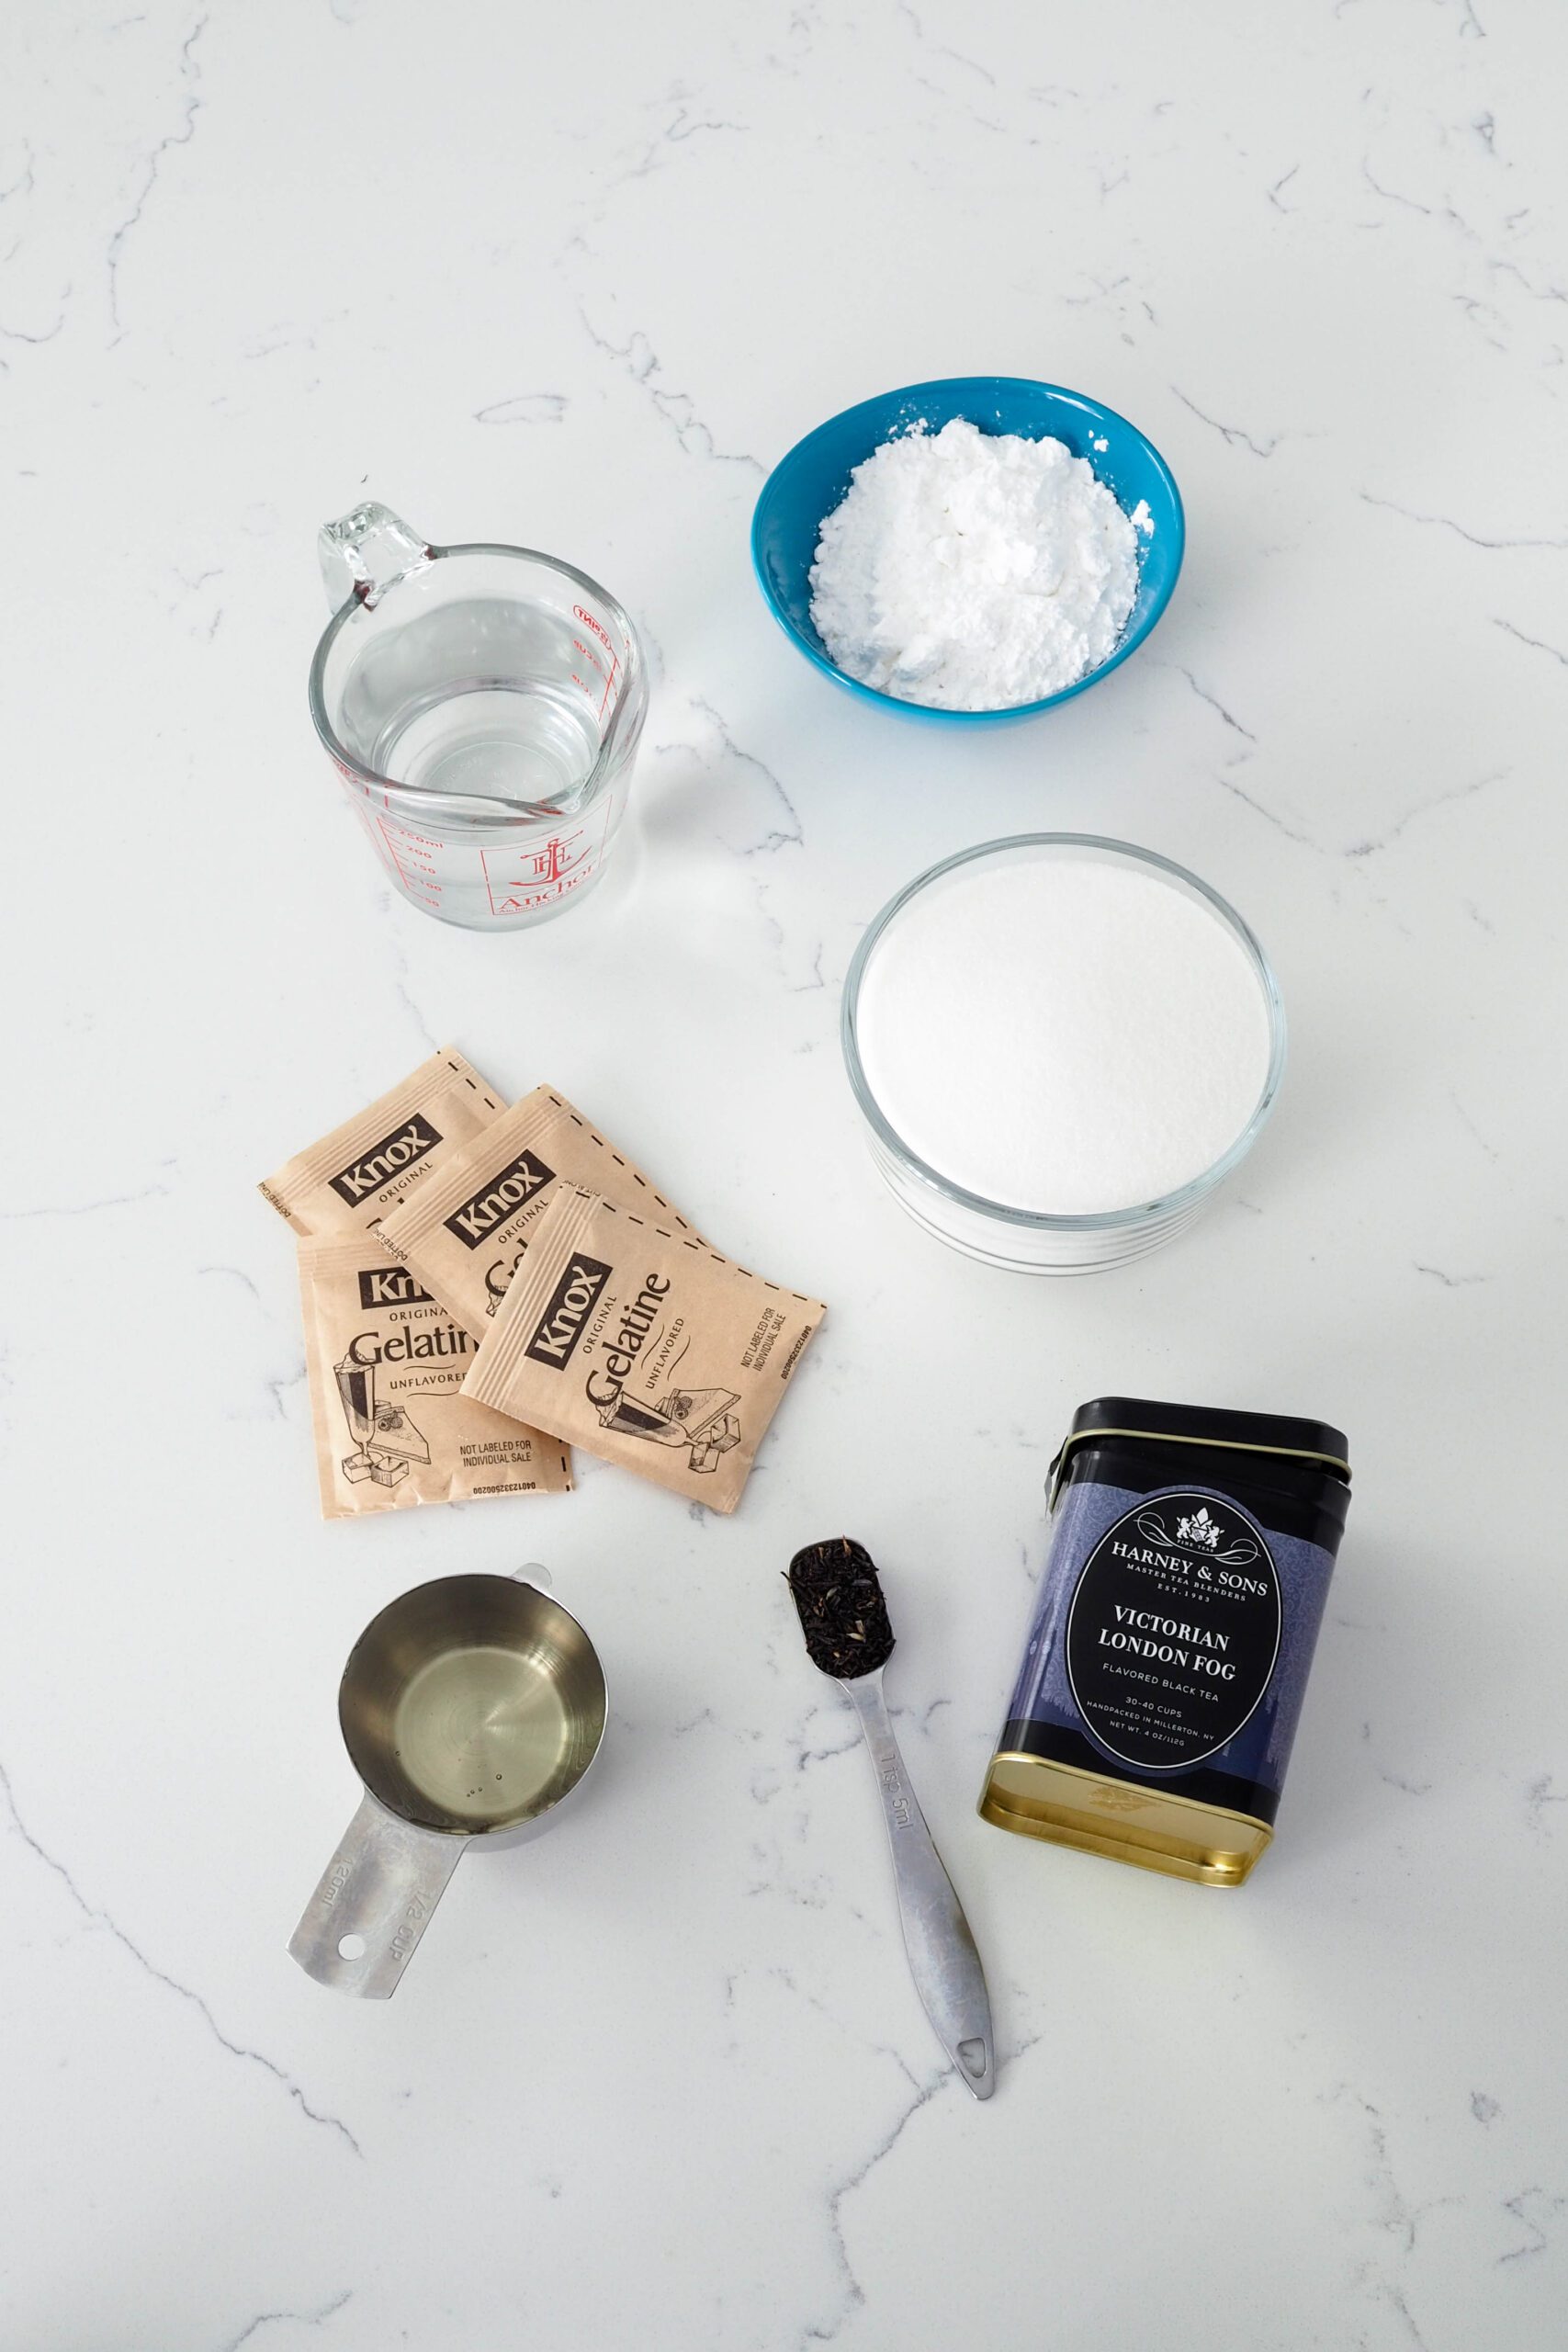
- Earl Grey tea. Necessary for Earl Grey marshmallows made at home, the type of tea you use will have an impact on the flavor. For best results, I recommend a loose leaf tea that has been open for less than one year. (You can also use a single Earl Grey tea bag with good results.) The fresher the tea, the greater the flavor. My husband and I love Harney and Son’s Victorian London Fog tea, which is an Earl Grey with hints of vanilla and lavender. Those flavors complement the bergamot beautifully.
- Unflavored gelatin. Gelatin gives the marshmallows their unique, fluffy texture. My favorite brand to use is Knox. You should be able to find it at the grocery store near the flavored gelatin mixes, like Jello.
- Granulated sugar. Sugar helps to stabilize the amount of air whipped into the marshmallow, in addition to giving the marshmallow its sweet flavor.
- Light corn syrup or golden syrup. Syrup is used to help prevent crystallization when heating the sugar. Both light corn syrup and golden syrup work in this recipe. See the next section for more details.
- Powdered sugar. Homemade marshmallows are incredibly sticky. Dusting each side with powdered sugar prevents the marshmallows from sticking to each other or the container.
Making Homemade Marshmallows without Corn Syrup
If you’re looking for a homemade marshmallow without corn syrup, substitute golden syrup for corn syrup. I began making marshmallows with British recipes that used golden syrup (thank you, Martha Collison!), which is just water and sugar boiled down to a thick syrup on the stove. I prefer to use that over corn syrup, but it’s harder to find in the United States. It’s easy to make golden syrup at home, but it does take an hour or two.
Quick Tips for Homemade Earl Grey Marshmallows
If you’ve never made marshmallows before, there are a few key things you need to know:
- Marshmallow is made by whipping a hot sugar syrup directly into a mixture of gelatin and water. If you’ve never poured hot sugar syrup into a mixing bowl with the mixer on, don’t worry. It’s not as terrifying as you’d expect, and you’ll be fine. But it does require concentration.
- Marshmallow begins setting almost immediately after whipping.
- Marshmallows take one to three hours to set before you can cut them, depending on the humidity and temperature.
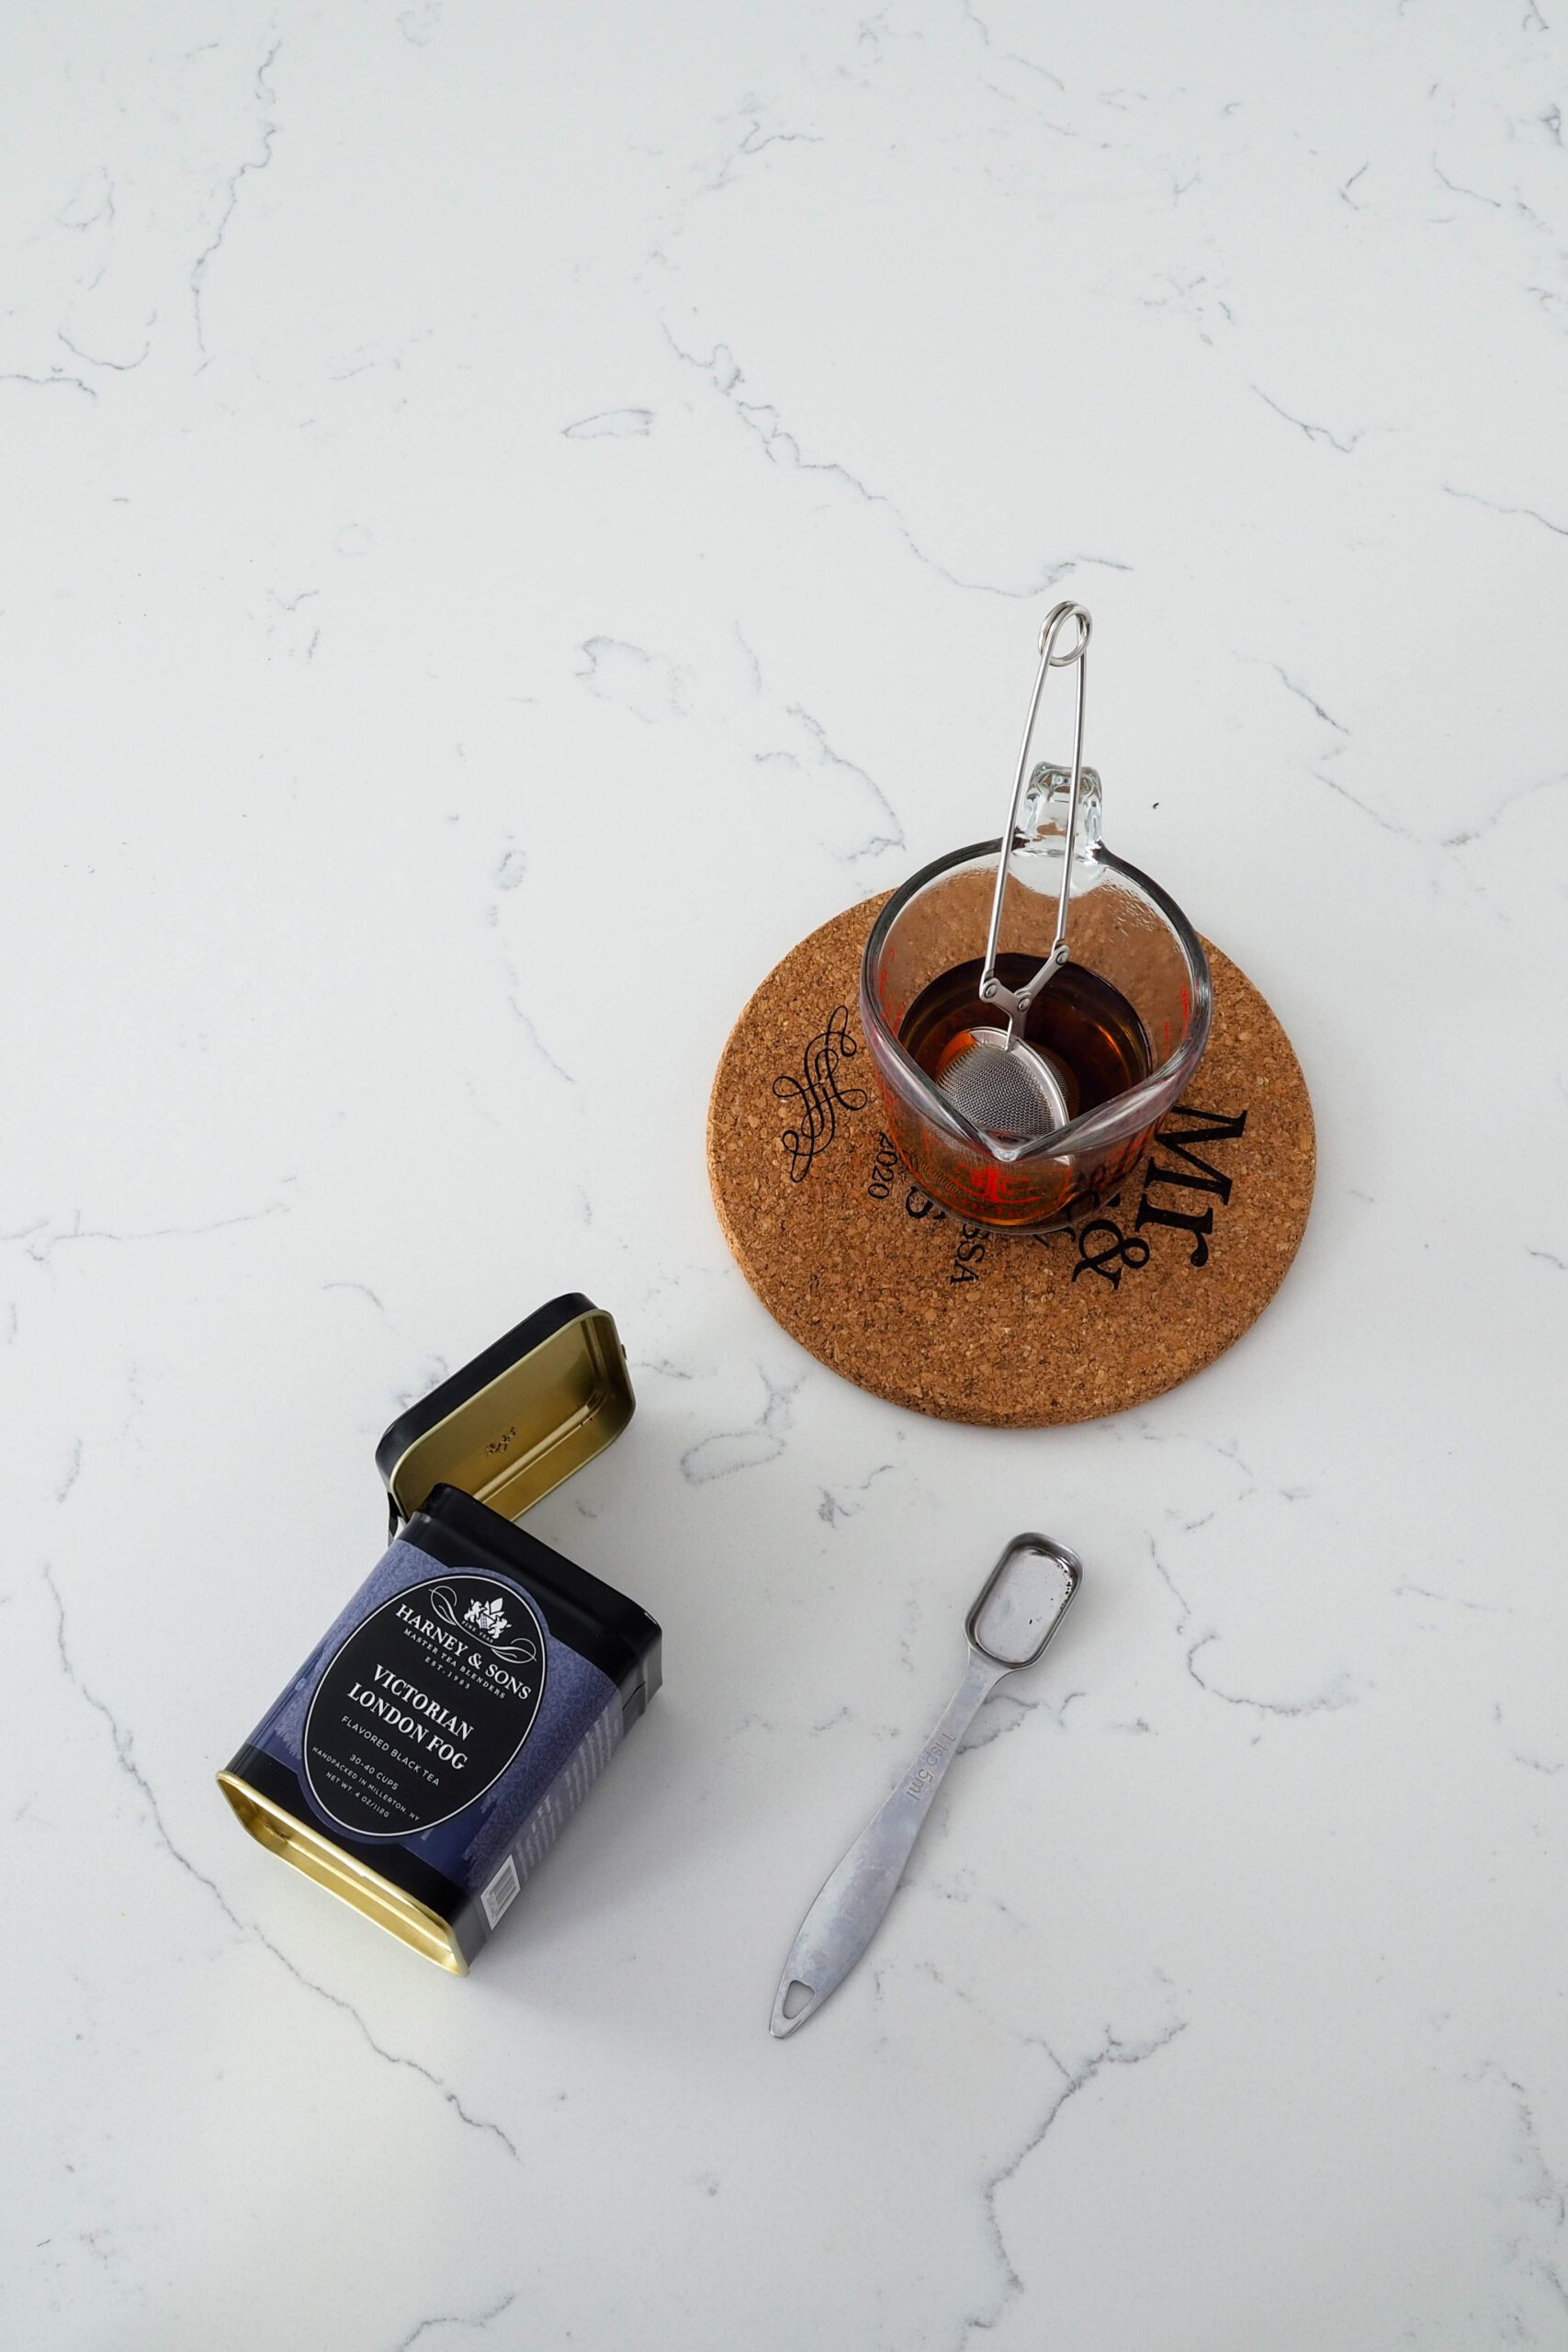
Brewing the Earl Grey Tea for the Marshmallows
The Earl Grey tea is what gives these marshmallows their distinct bergamot flavor. For best results, use a newer container of Earl Grey tea. Generally, the fresher the tea, the stronger the flavor.
Steep one tea bag or a teaspoon of loose leaf tea in half a cup of hot water for up to five minutes. We want it strong!
Be sure to let the tea cool significantly until it’s just barely warm or even slightly cool before moving on.
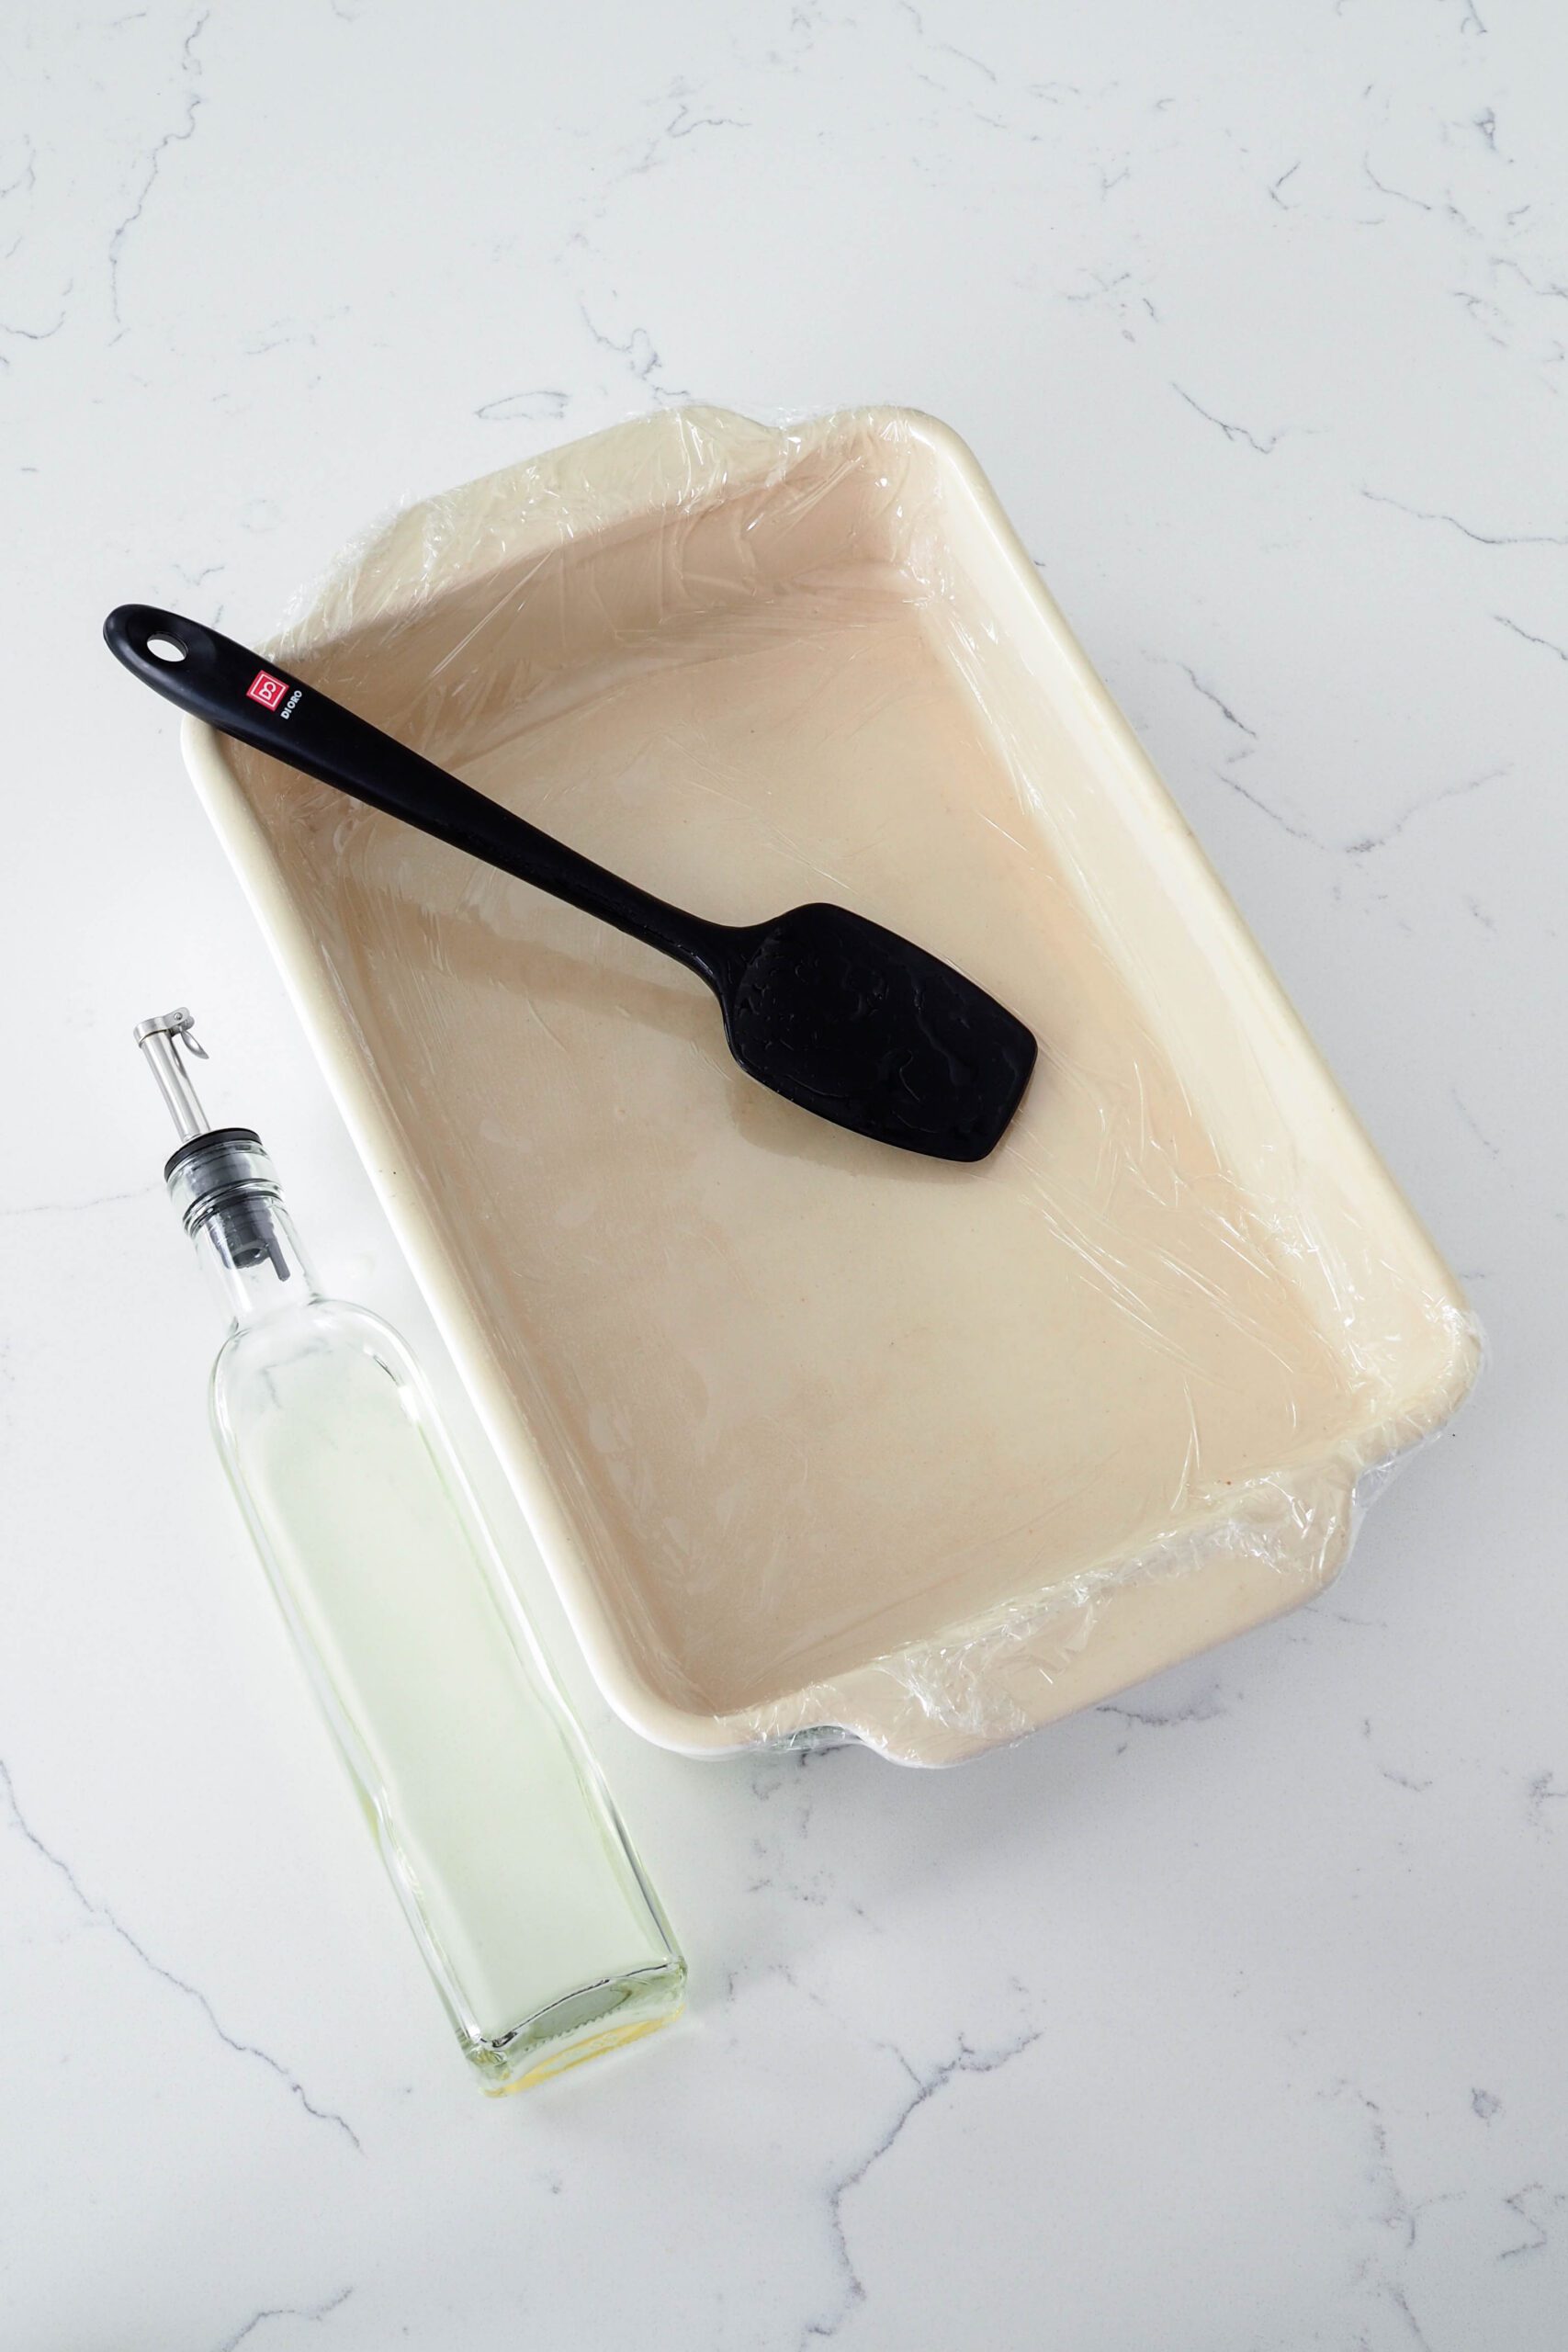
Grease Your Pan and Any Spatulas You Plan to Use
Marshmallow is incredibly sticky and begins to set almost immediately, so line and grease your pan before you do anything else.
I cannot emphasize this enough. I once forgot to line and grease my pan in advance, and I had the hardest time getting the marshmallow out of the bowl. It had already begun to set on the sides, and everything became a sticky mess.
To make removing the marshmallow easy and painless, line a baking dish with plastic wrap. I tape the corners down to prevent the plastic wrap from moving too much.
Then spray with a nonstick spray. Or spread a few drops of canola oil with your fingers across the bottom and up the sides of the plastic wrap.
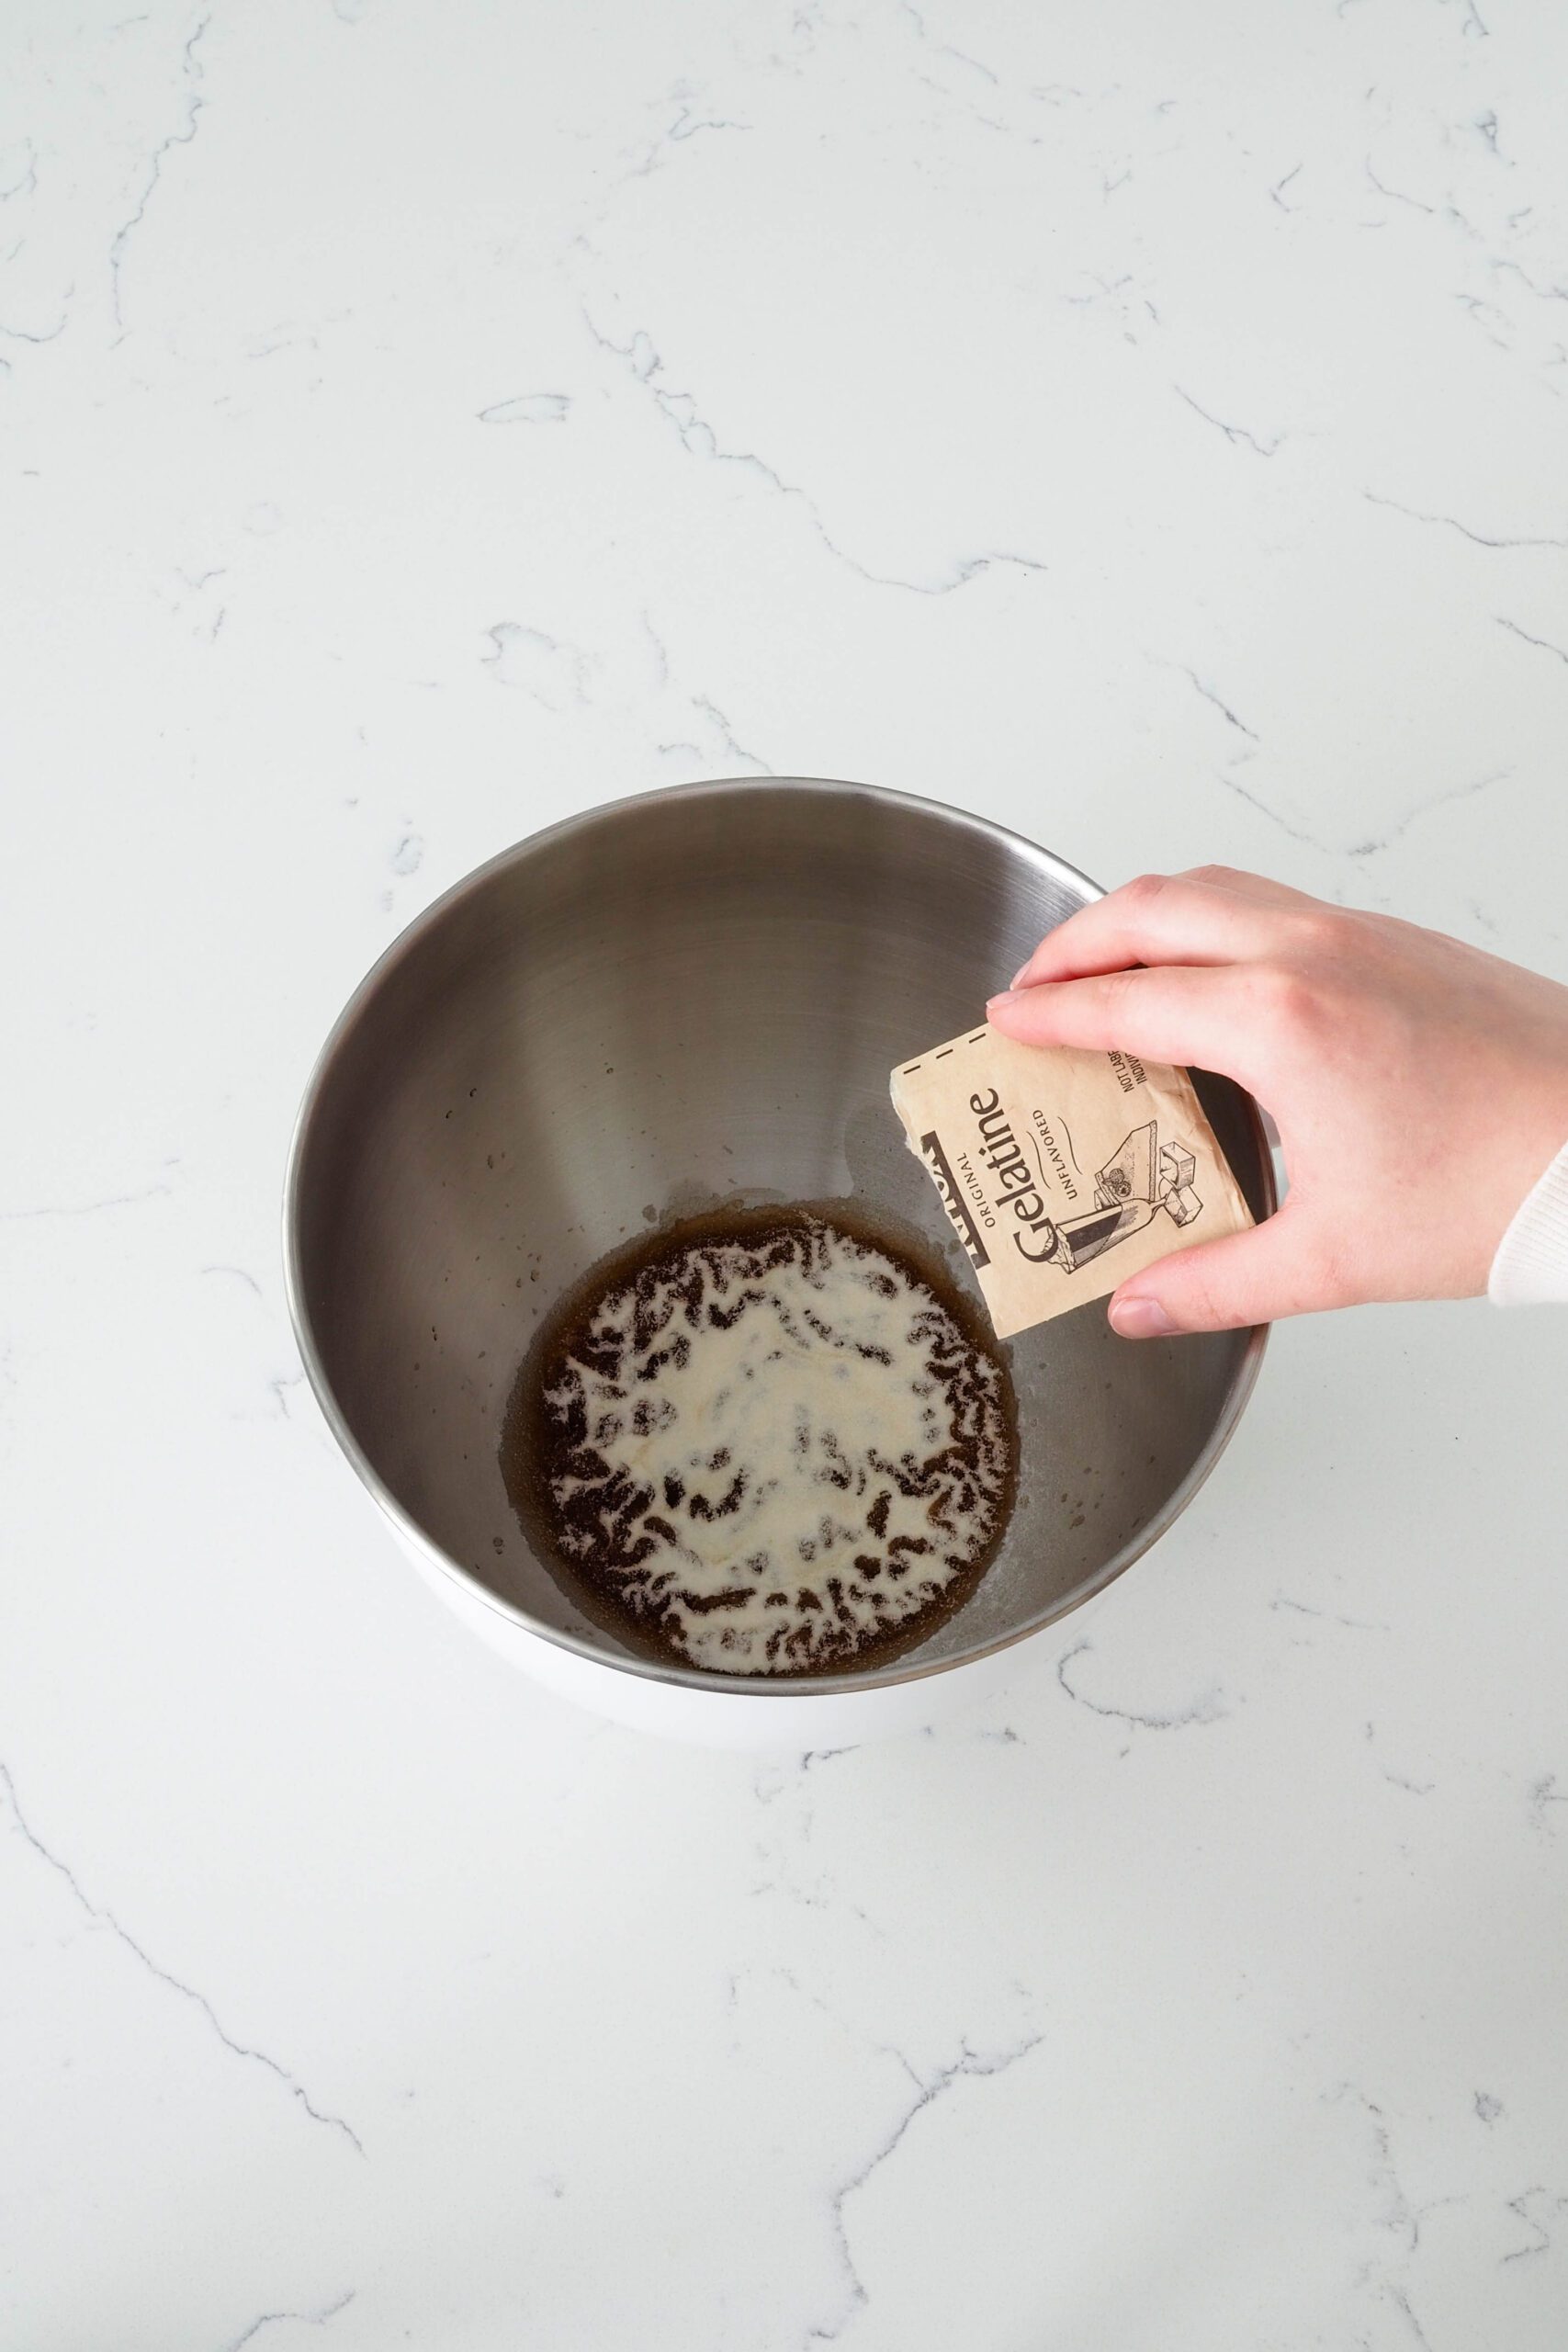
Preparing the Gelatin for Homemade Marshmallows
Gelatin needs to hydrate before we can use it to make marshmallows. To do this, which is called blooming the gelatin, sprinkle the gelatin over the cooled tea in your mixing bowl.
You’ll see the gelatin begin to absorb the tea. There will be a little of the gelatin left dry on the top; that’s okay.
There’s no need to stir the gelatin until right before you mix in the sugar syrup. The gelatin will soften up over the course of making the sugar syrup.
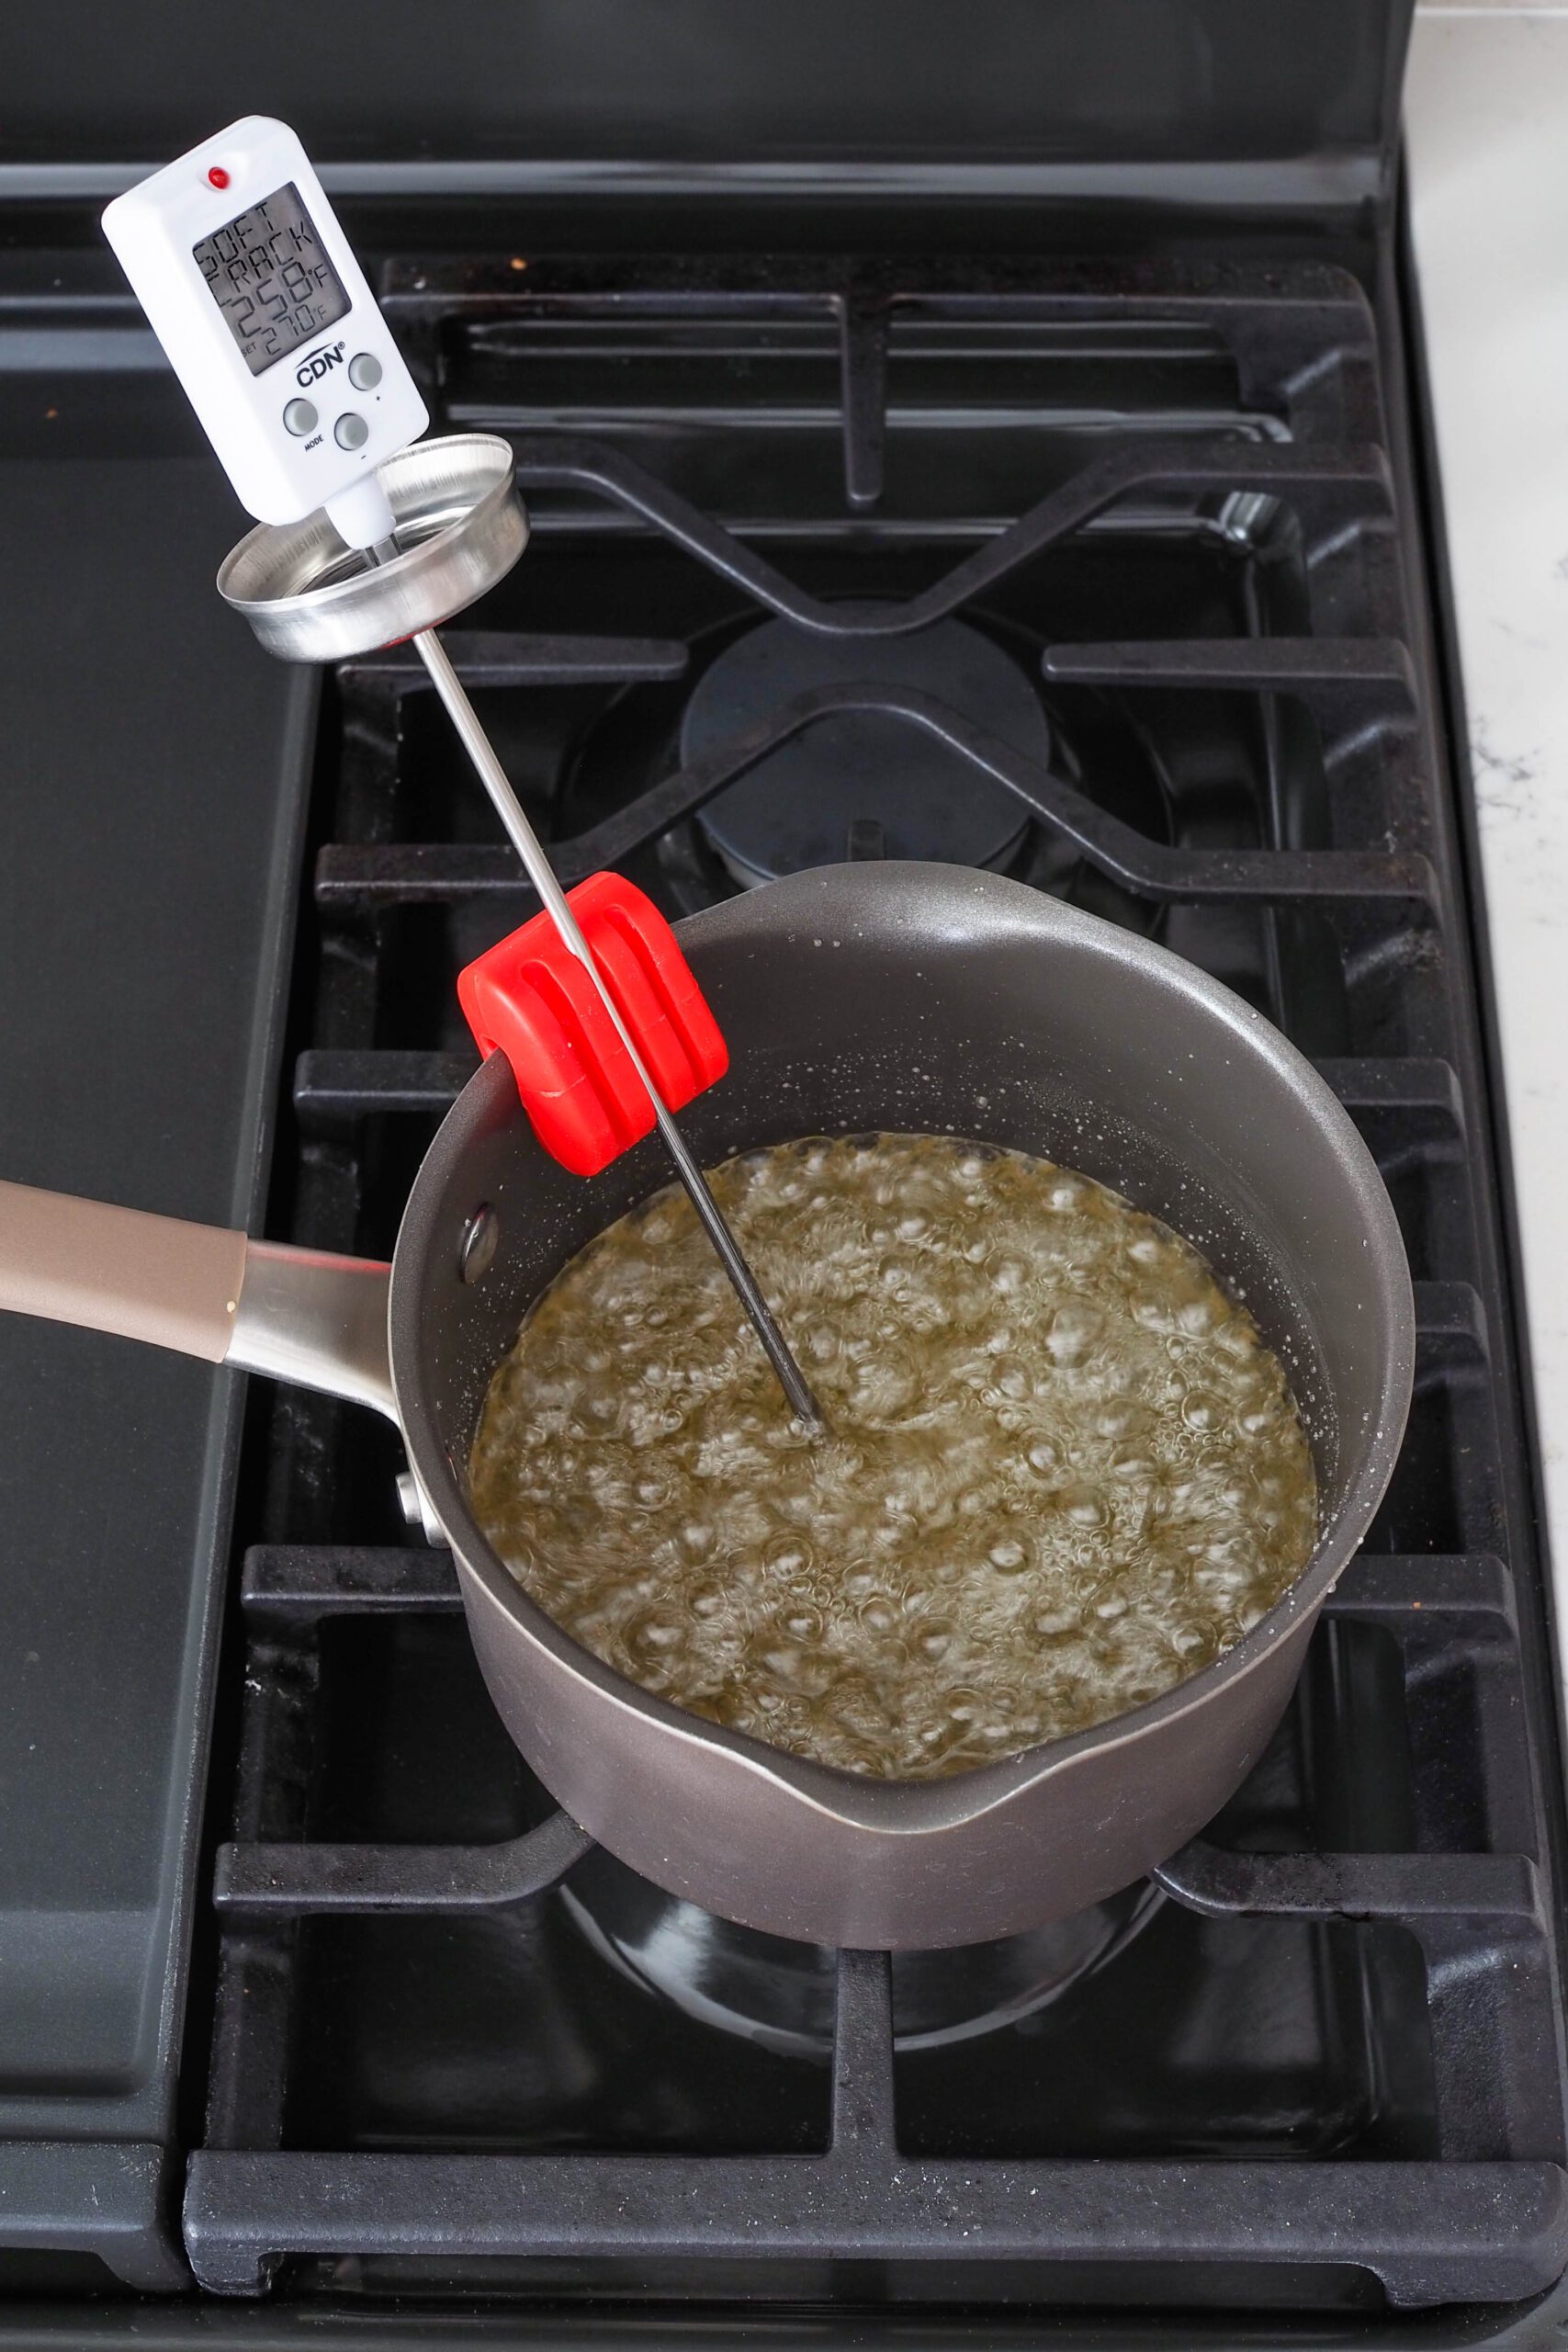
How to Make the Sugar Syrup for Homemade Marshmallows
The sugar syrup is pretty straightforward. Mix together sugar, corn syrup (or golden syrup), and water before setting it over medium heat and cooking it to 270°F/132°C. A candy thermometer is highly recommended to make this easy on you. If you don’t have a candy thermometer, you can use a glass of cold water to test if your syrup is at the soft crack stage.
You will want to swirl the pan or stir it every so often to ensure your candy thermometer is giving you the correct temperature. Because there’s not much syrup in the pan, the thermometer may be registering the heat of the bubbles on top of the syrup and not the temperature of the actual syrup below. I swirl the pan every couple of minutes in the beginning and then once every 30 seconds or so when the temperature starts getting close (around 250°F or so).
A note: You can stir the syrup with a spatula in this recipe, as it has enough corn syrup in it to prevent any worries about crystallization (see section on stirring if you’re curious).
Pouring the Hot Sugar Syrup into the Mixing Bowl
This is easily the most challenging part of the entire recipe, but it’s not difficult. Take it slow and concentrate on where the stream is landing inside the bowl, and you’ll be fine.
The first bit of syrup that comes into contact with the metal of the bowl cools down significantly and won’t stream down into the final mixture. However, any syrup poured on top of that syrup will make it into the marshmallow mixture.
That initial bit acts as an insulator between the syrup straight from the pan and the bowl. Do your best to limit the amount of syrup you pour directly onto the bowl after that first stream of syrup. Layer it all in the same spot, if possible.
I like to turn my mixer on low right before I begin pouring the sugar syrup into the bowl. Start slow, and begin pouring in a steady line down the side of the bowl. I aim for somewhere within the top half of the bowl to prevent pouring any of the syrup on the tines of the whisk as it goes past.
Continue to slowly tilt the pot to get almost all of the syrup in. It’s fine if you have a little syrup leftover (say, just enough to cover the bottom of the pan).
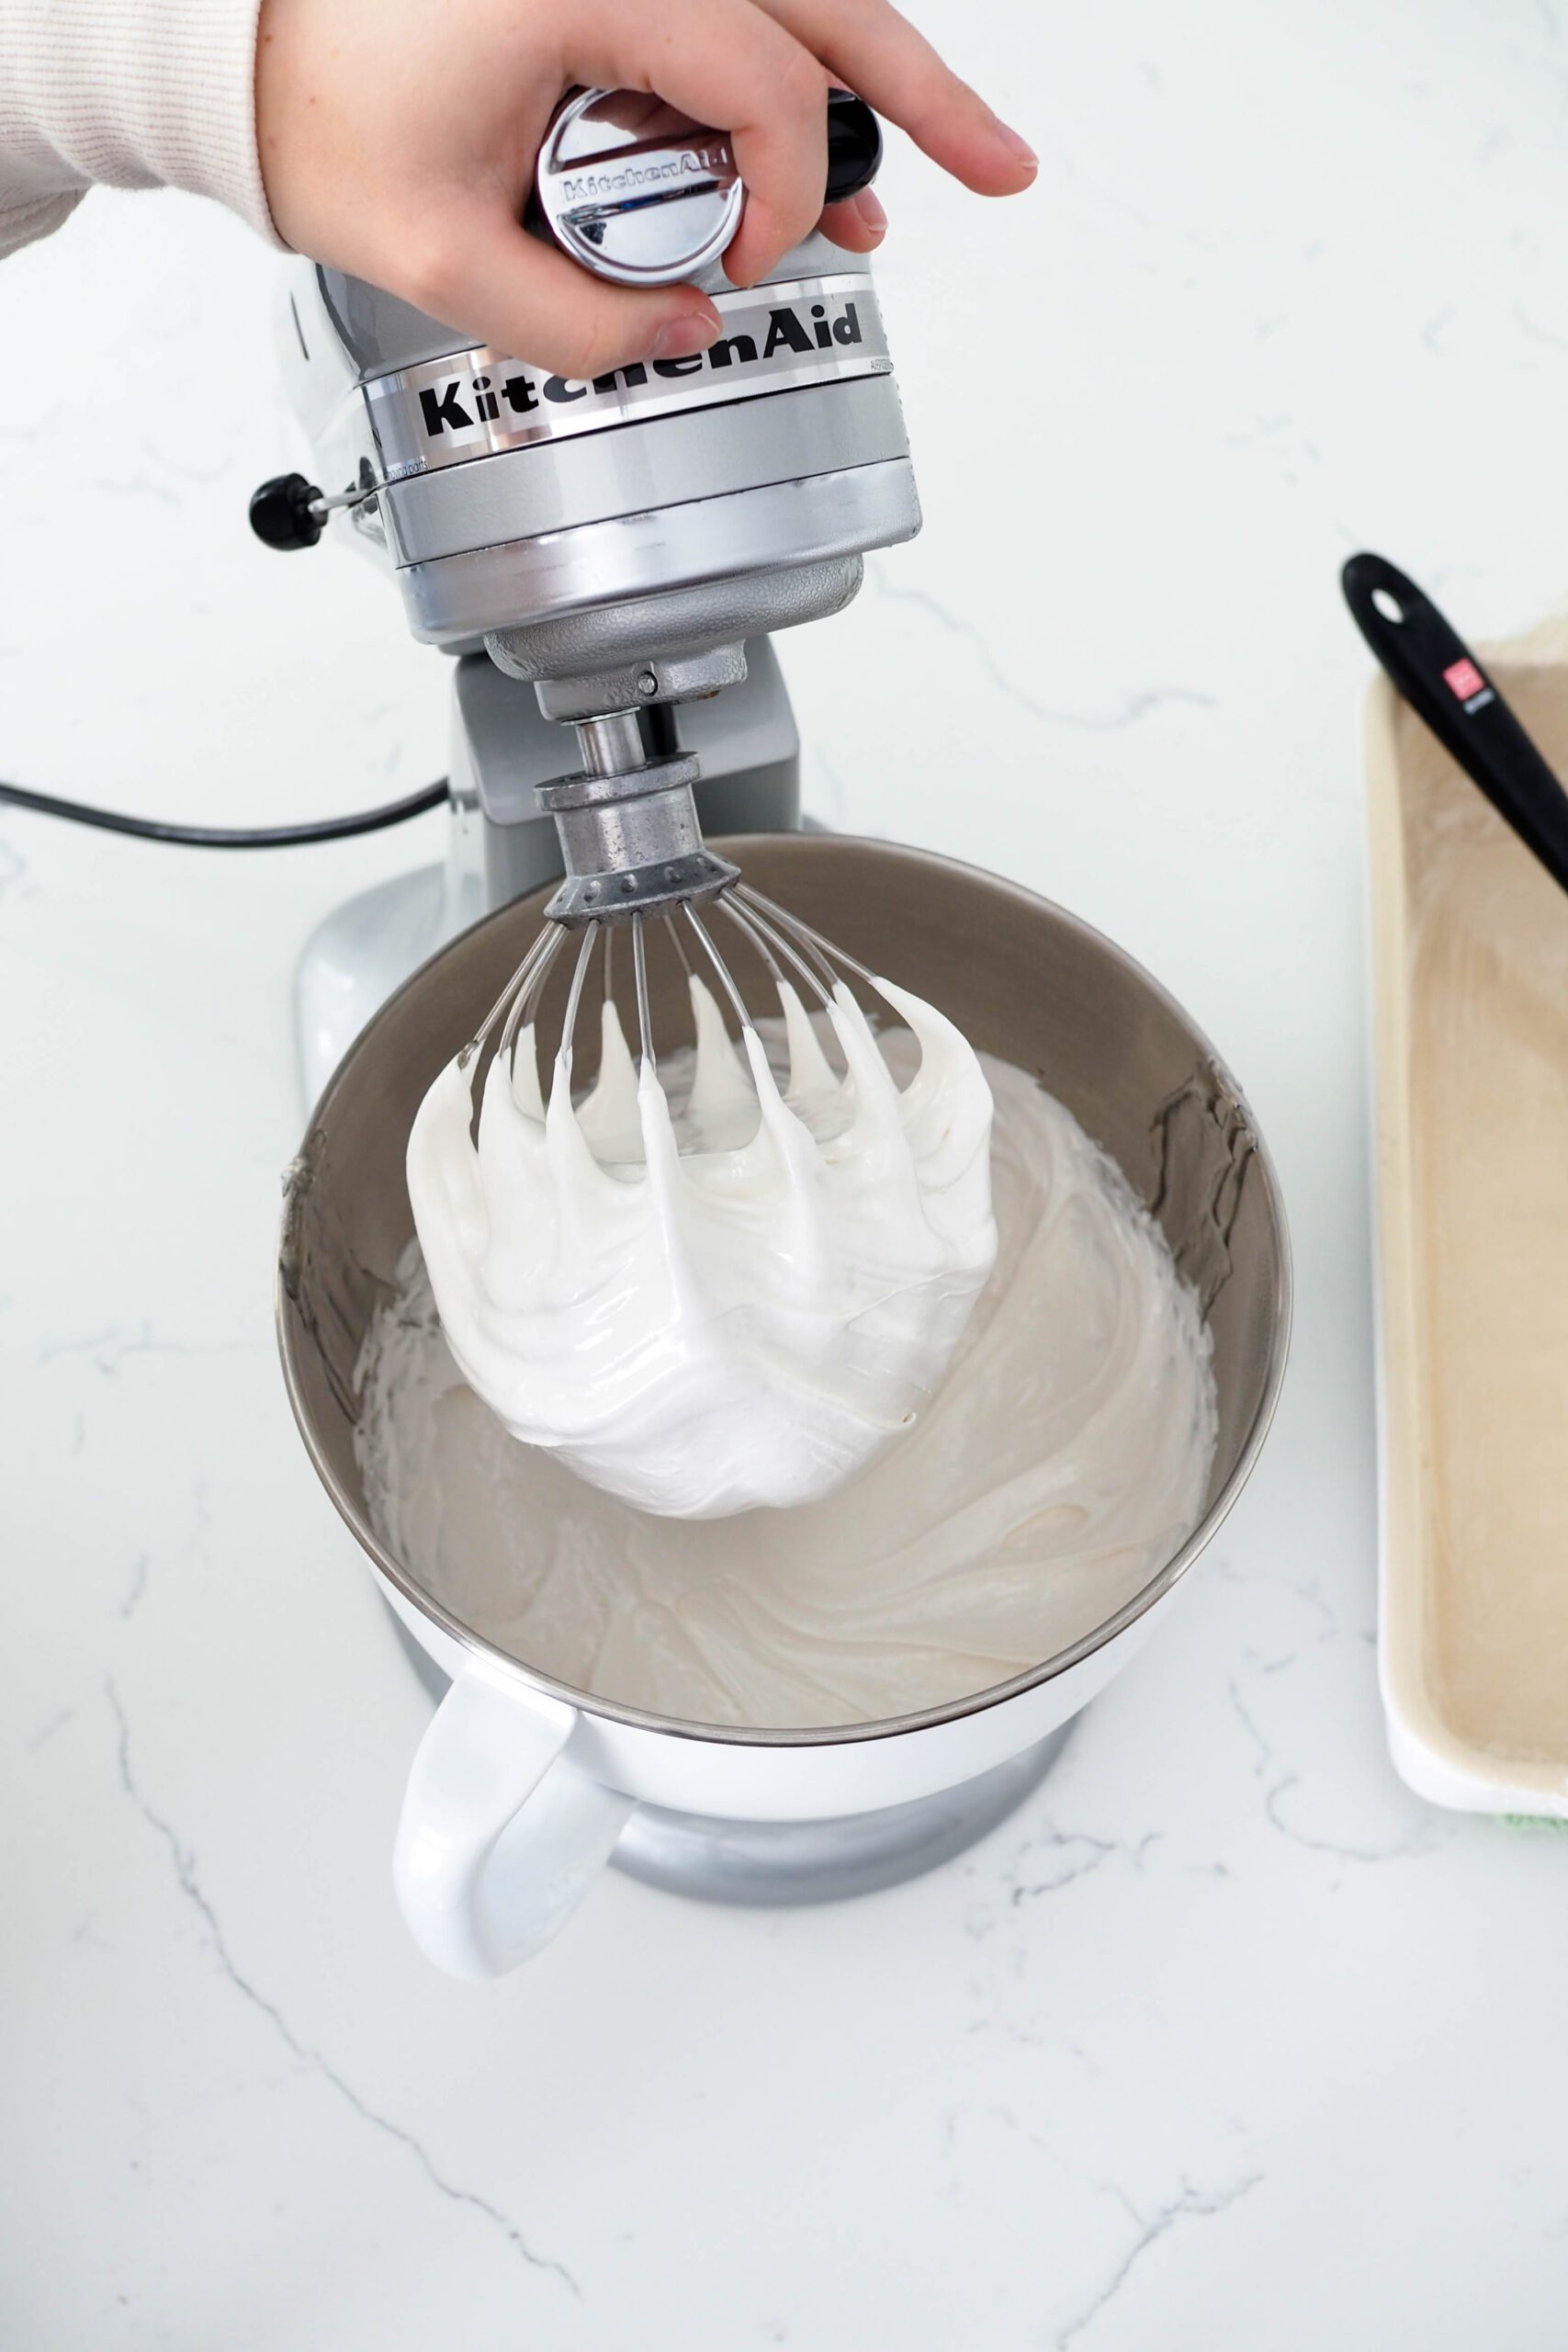
Whipping the Homemade Earl Grey Marshmallow Together
Marshmallows can easily be underwhipped, so follow these guidelines to make sure you end up with pillowy homemade marshmallows.
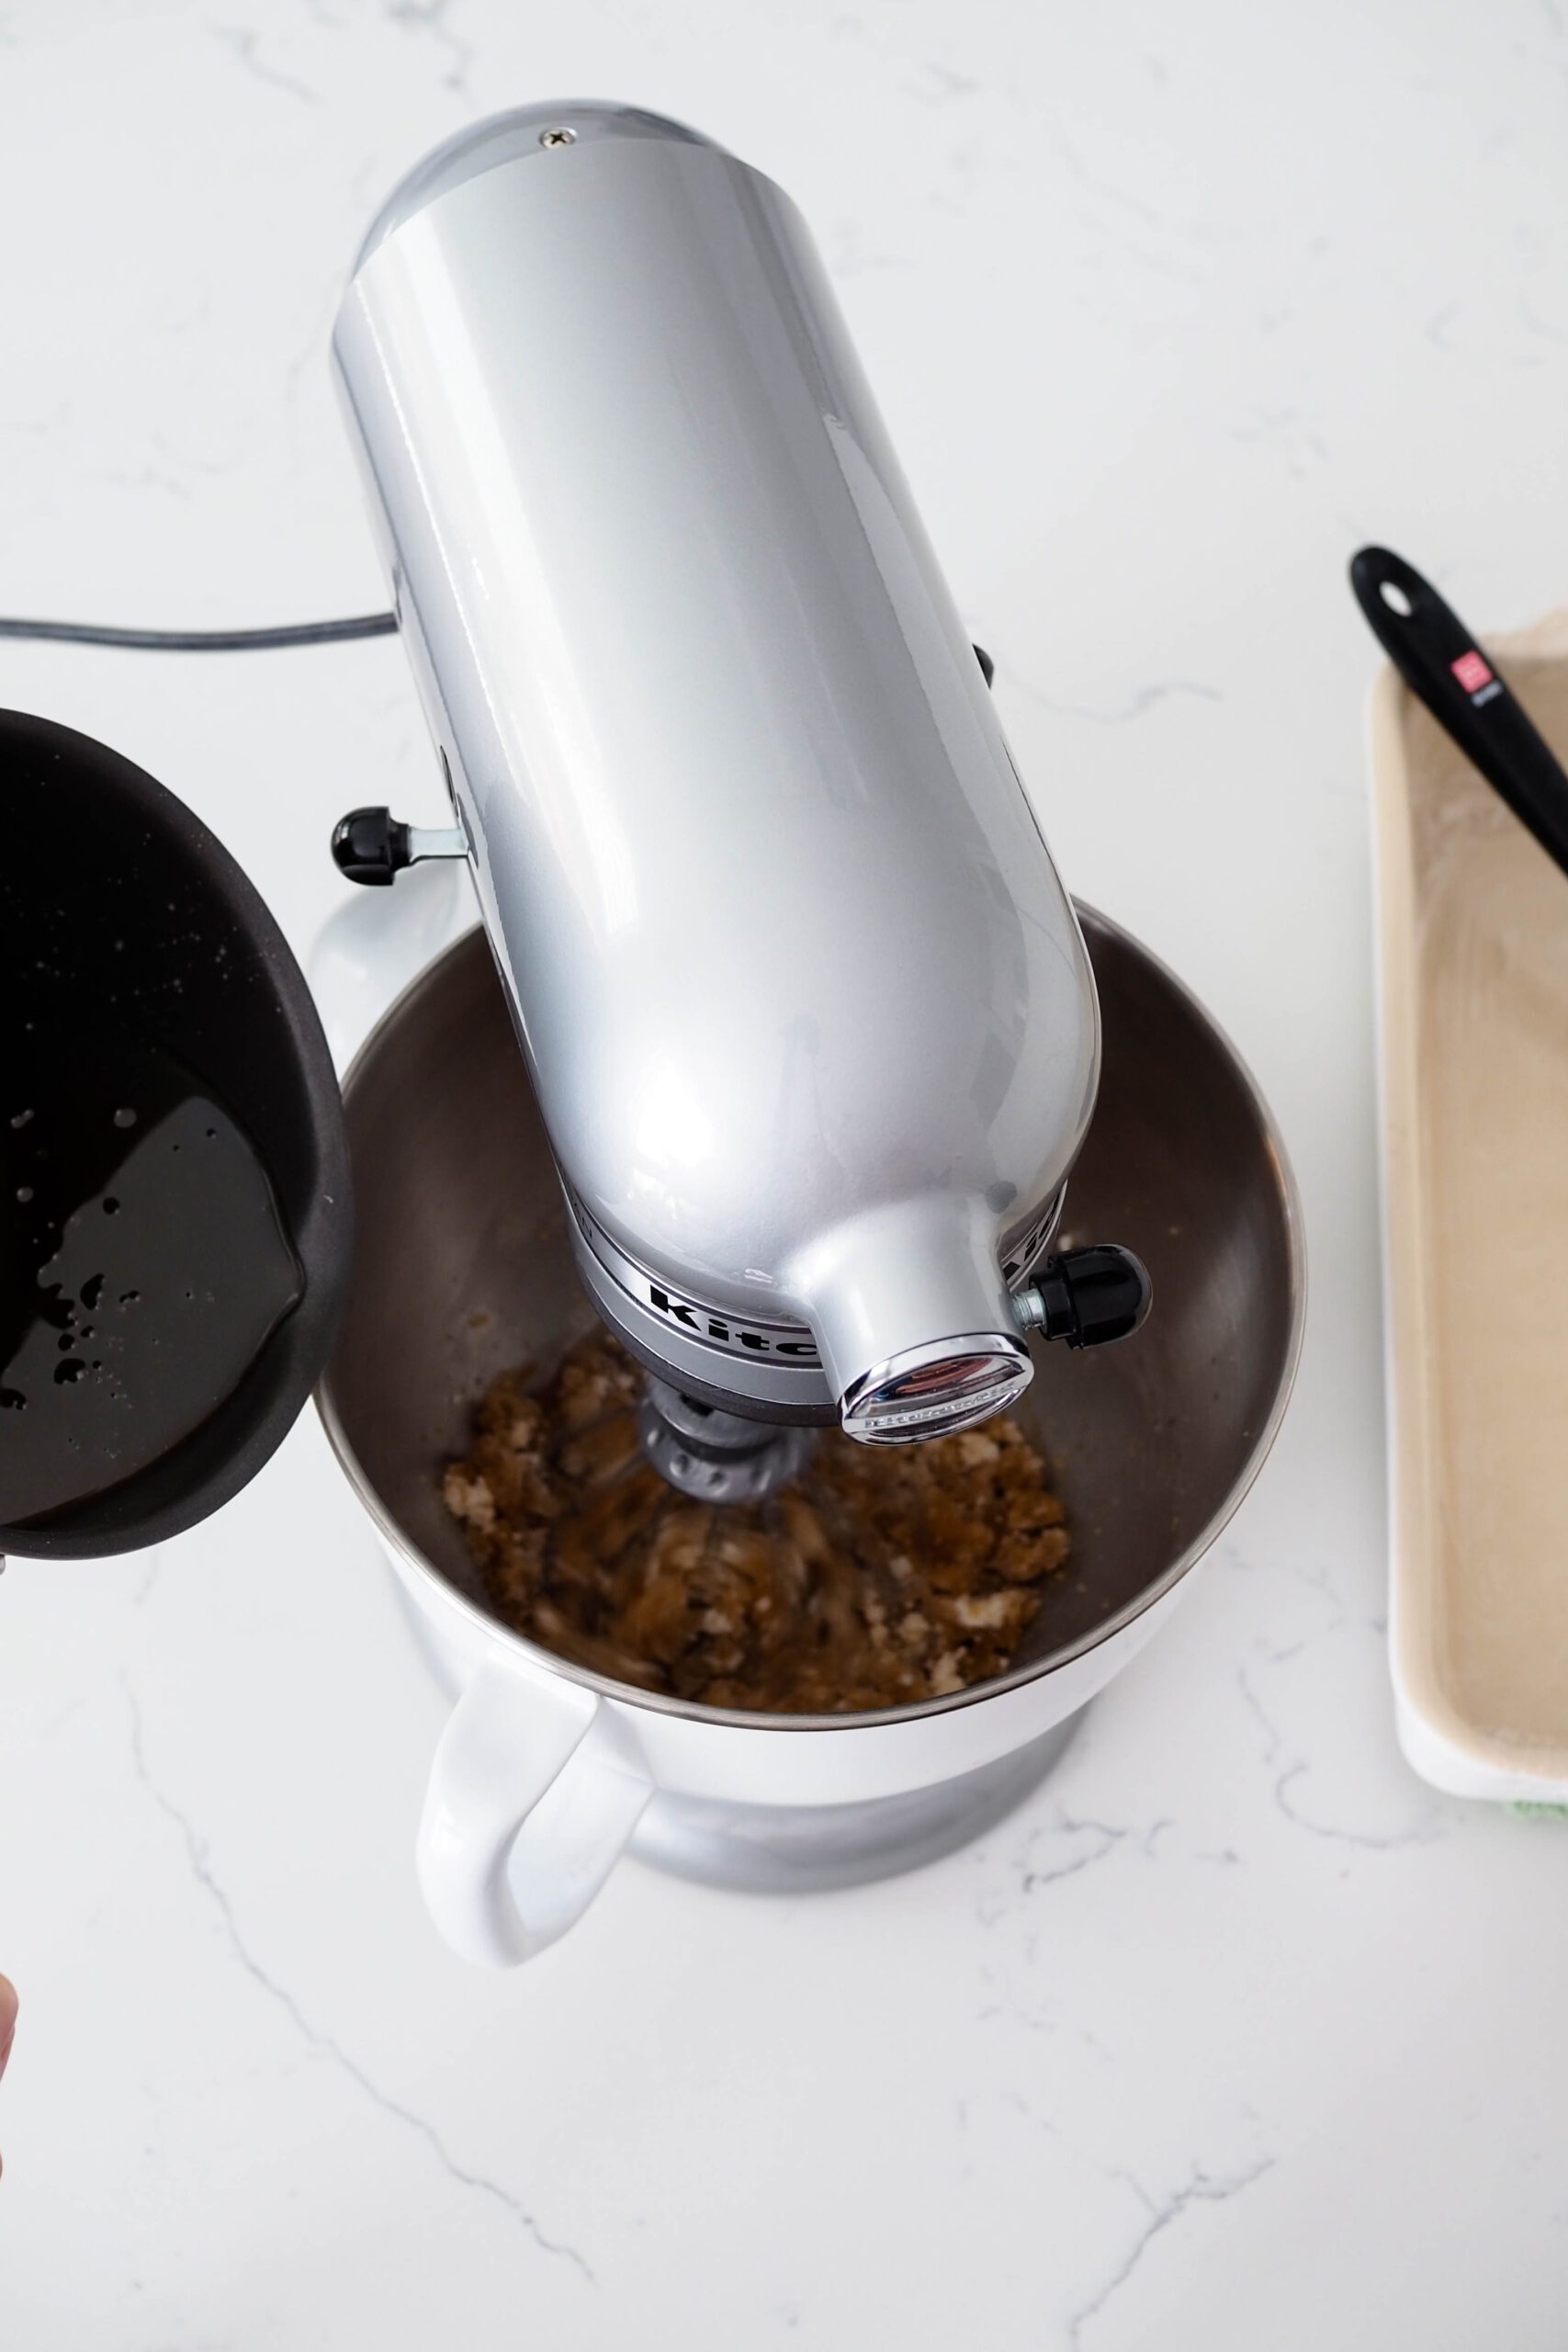
After all the sugar syrup is added, the bowl will be very warm, if not hot, to the touch. As you incorporate air into the marshmallow, two things happen: The marshmallow begins to aerate, and the bowl cools down.
The time it takes to whip the marshmallow can vary depending on the speed of your mixer, but it generally takes 5-10 minutes. For me, it takes closer to 10 minutes than five.
You’ll hear your mixer start to struggle or slow down a bit once the marshmallow starts thickening up.
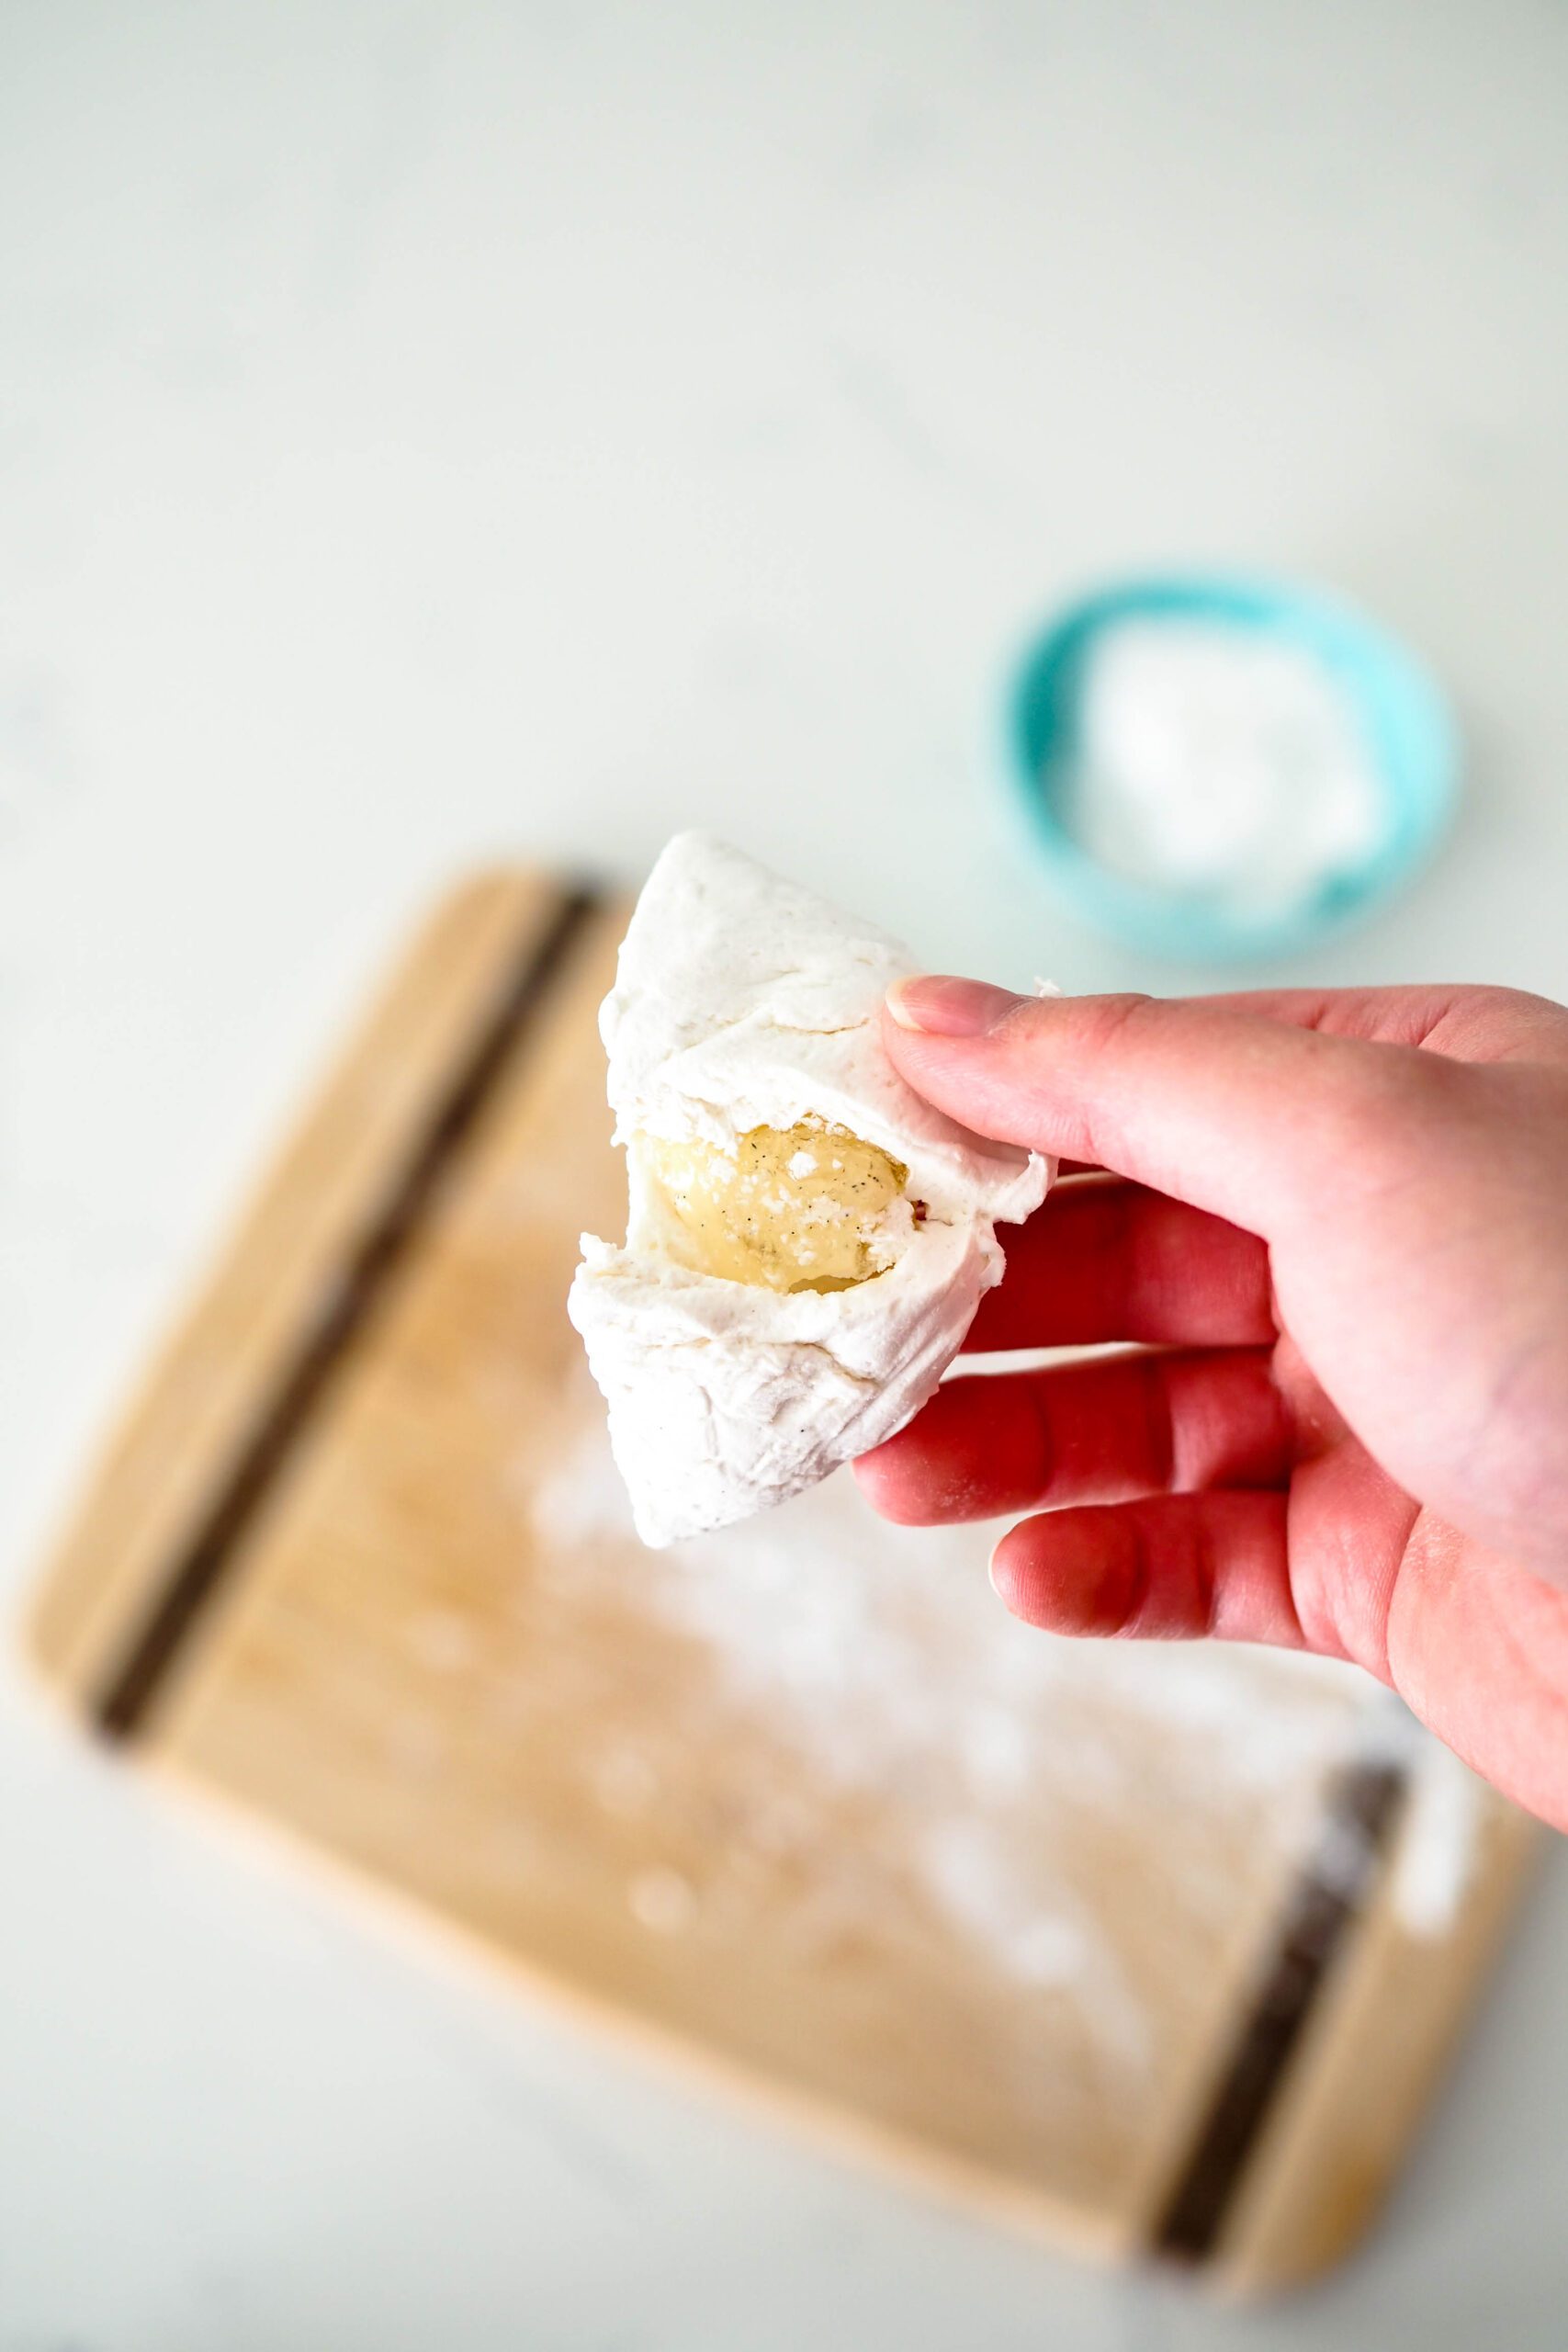
You’ll see small strands of marshmallow on the top of the mixture when the mixture is almost ready. The bowl will also be only slightly warm to the touch. Once it’s aerated enough, the marshmallow will clump up in the base of the whisk, much like a meringue (see the photo below).
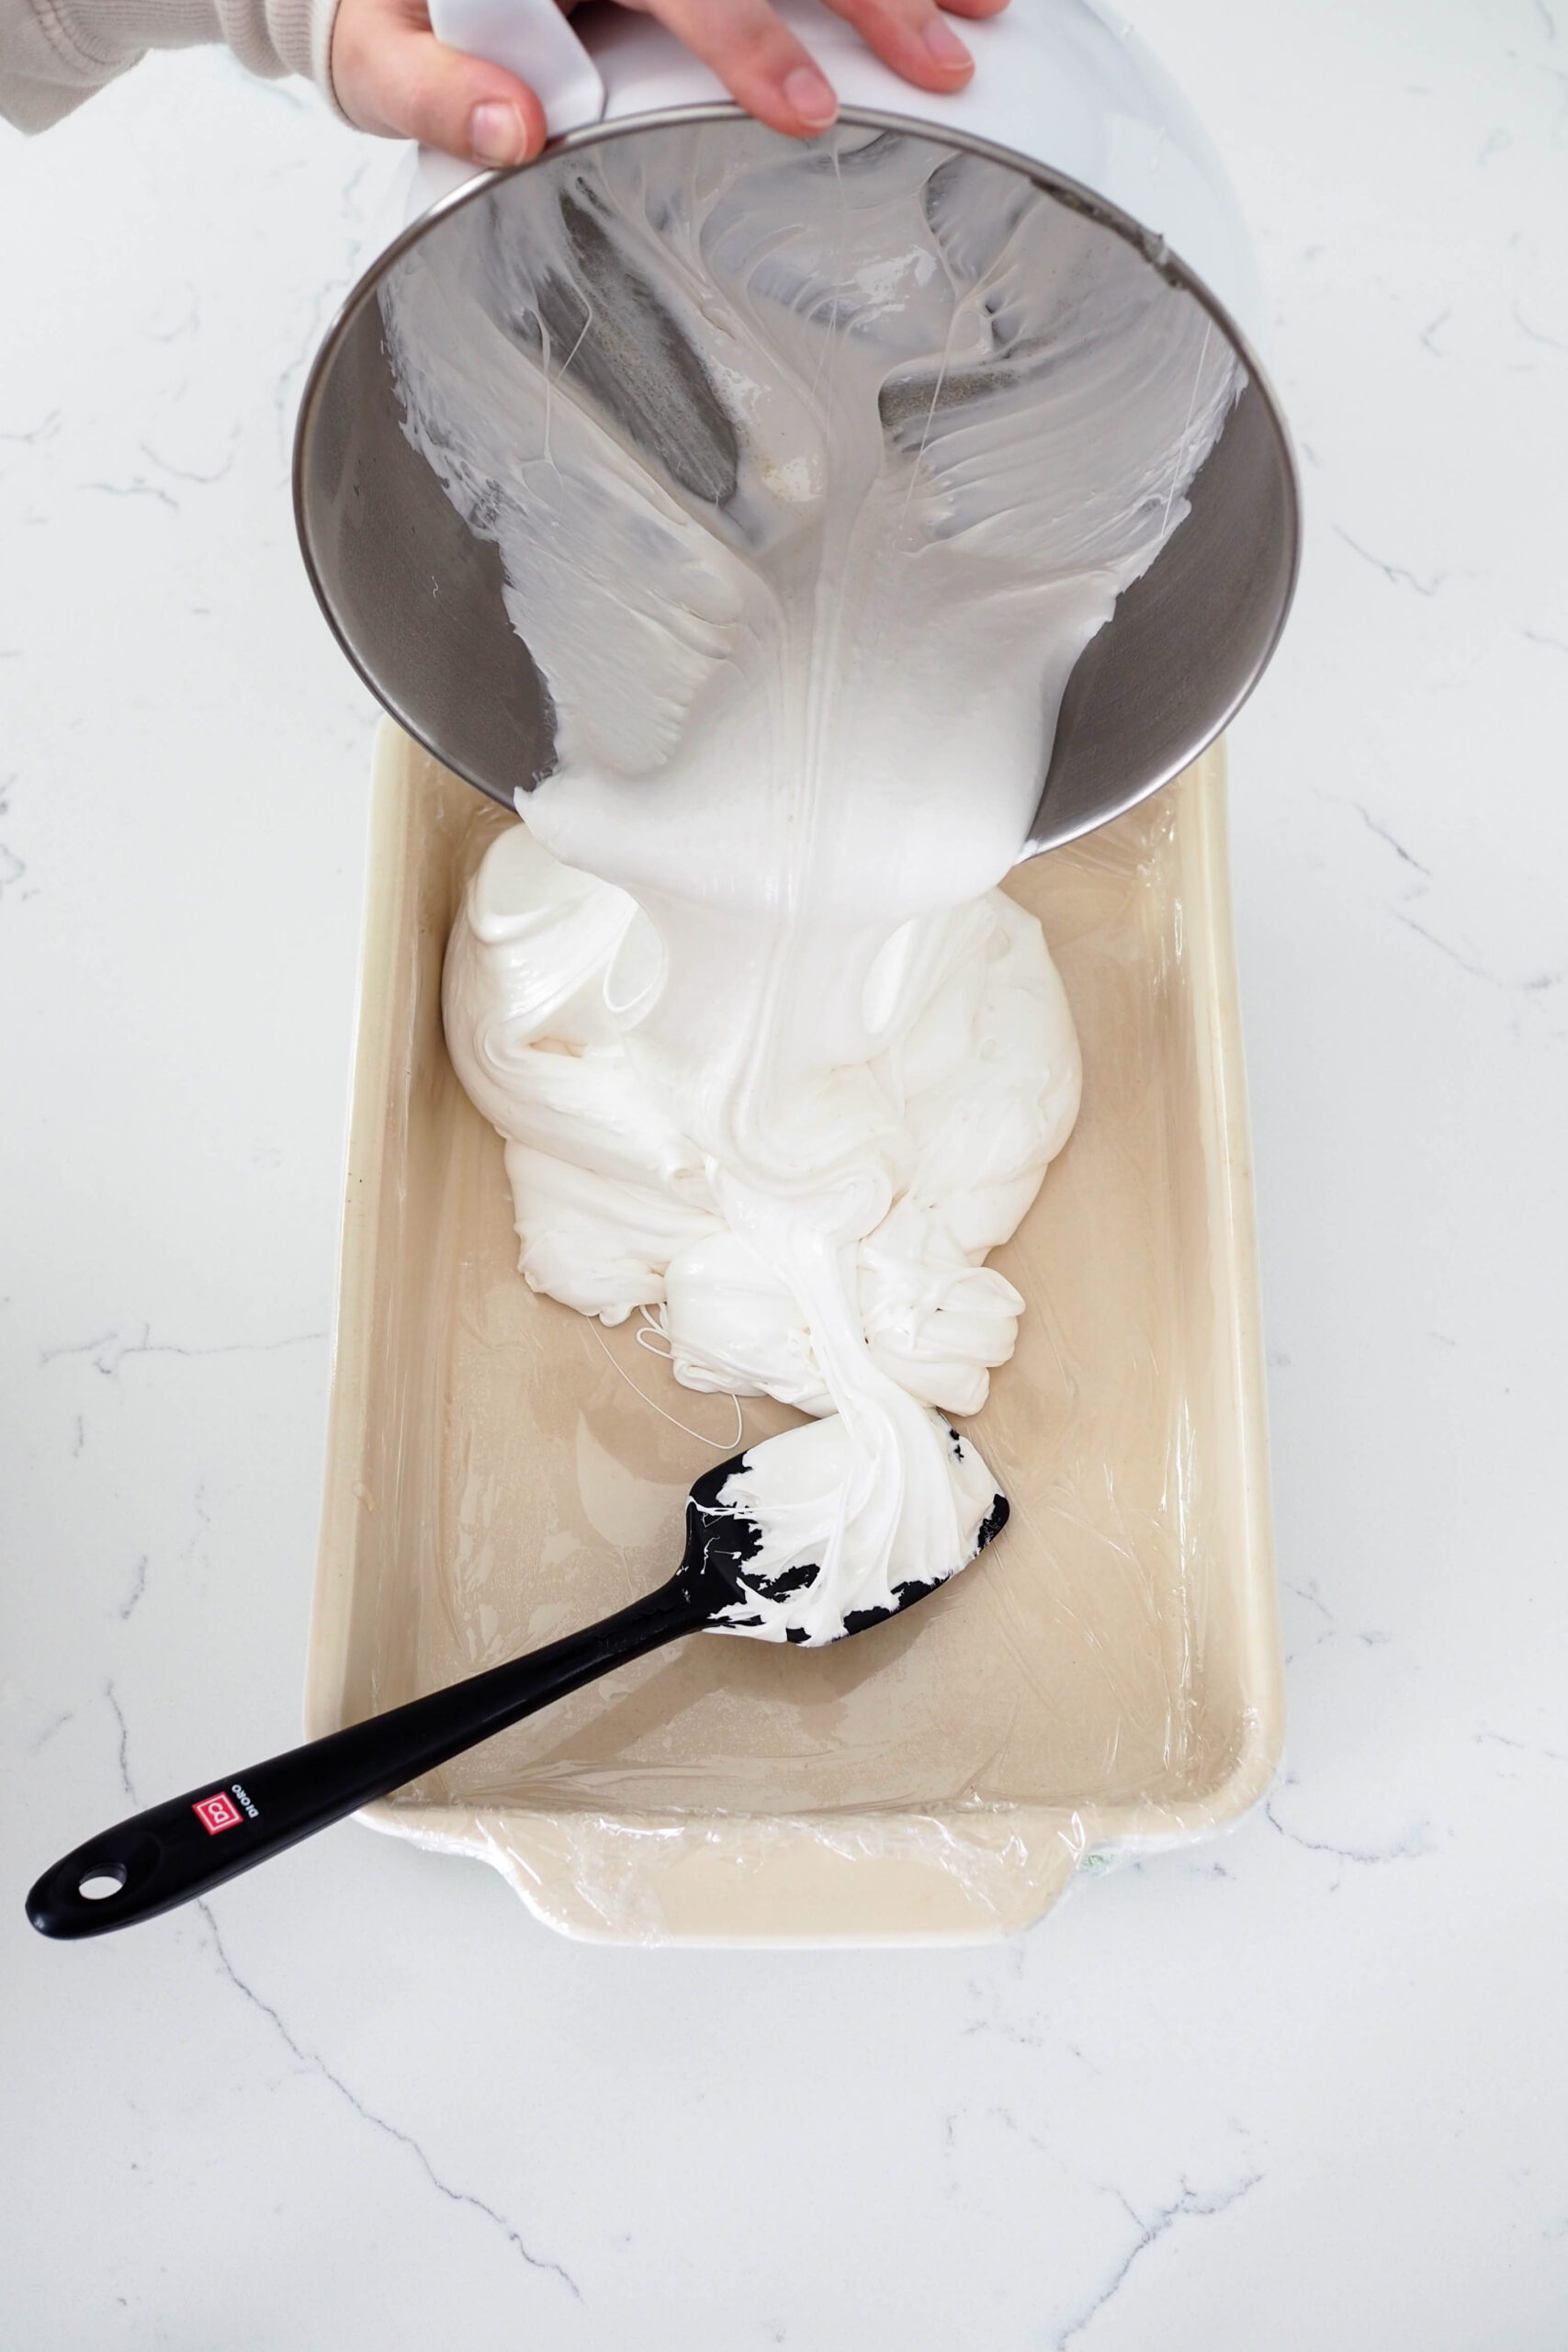
Pouring the Homemade Earl Grey Marshmallows in the Pan
Use an oiled spatula to immediately transfer the homemade marshmallow into your lined and greased pan. It should spread out some, but I always like to help it along into the corners.
Then, flatten down any large tufts or peaks with your oiled spatula. You may need to respray or reoil the spatula depending on how uneven the surface is.
If you find the spatula to be more sticky than helpful as you go, oil your clean hands and spread the marshmallows manually.
Then, set the pan aside for 1-2 hours until the marshmallows have set.
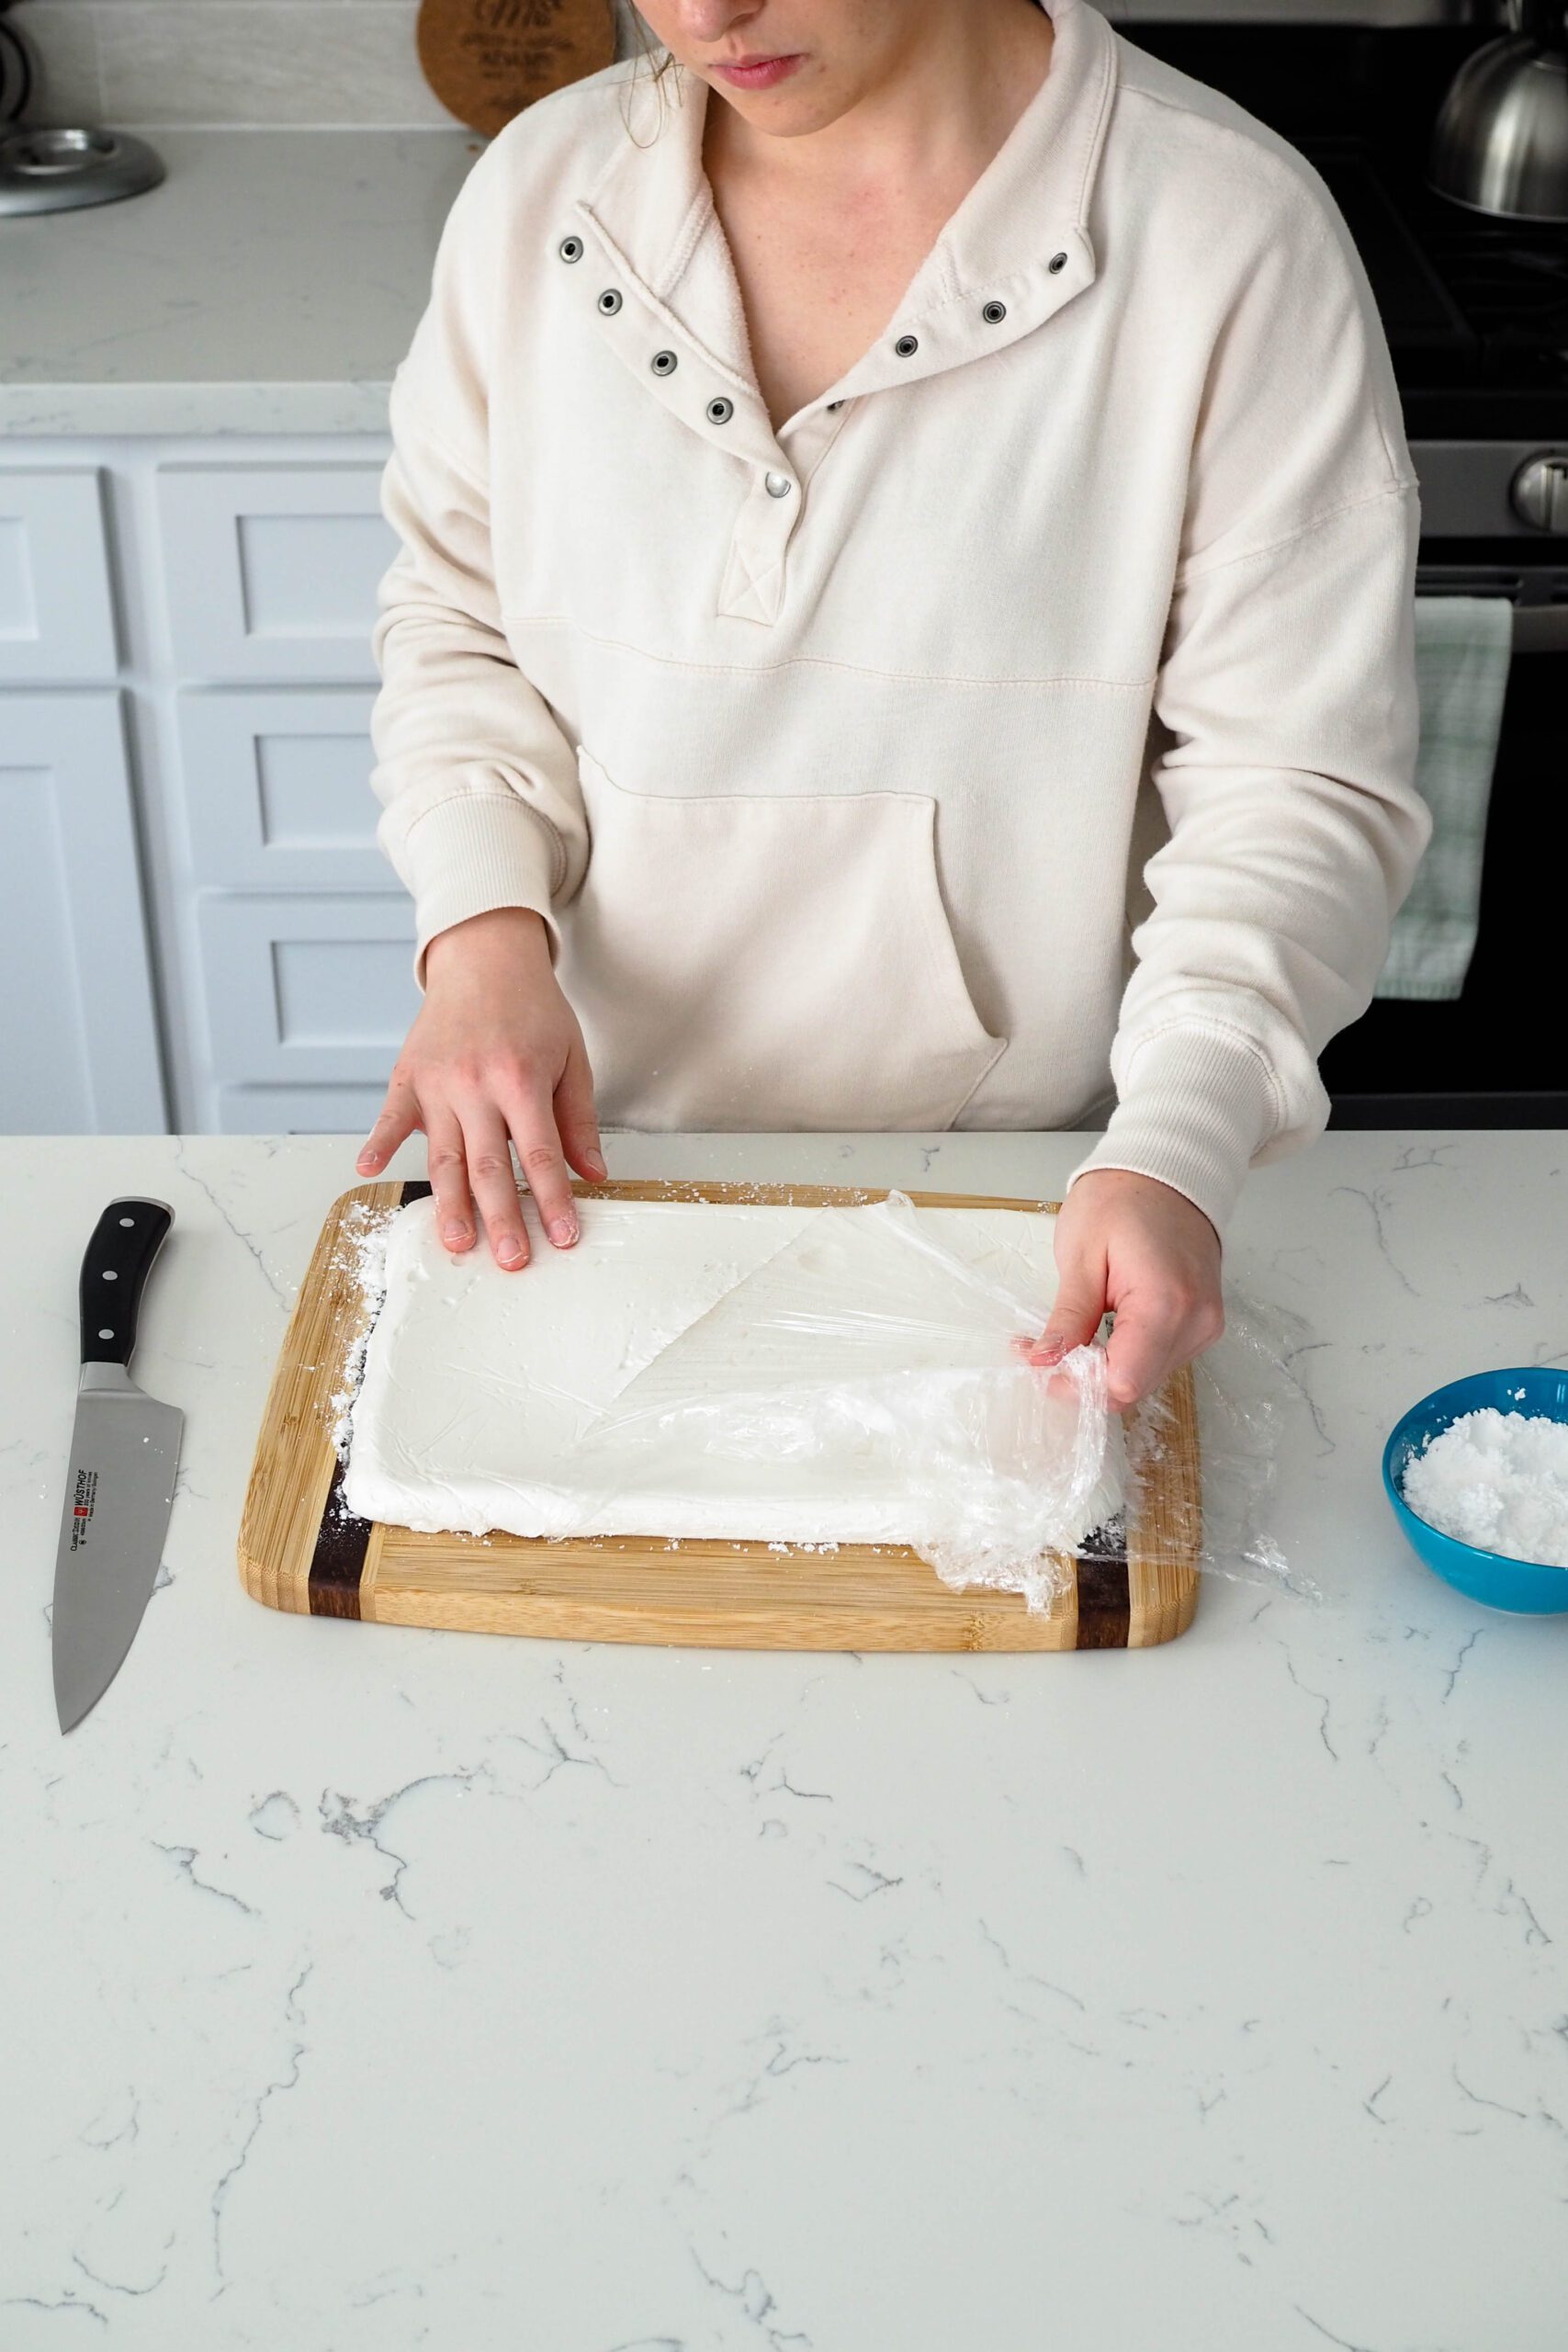
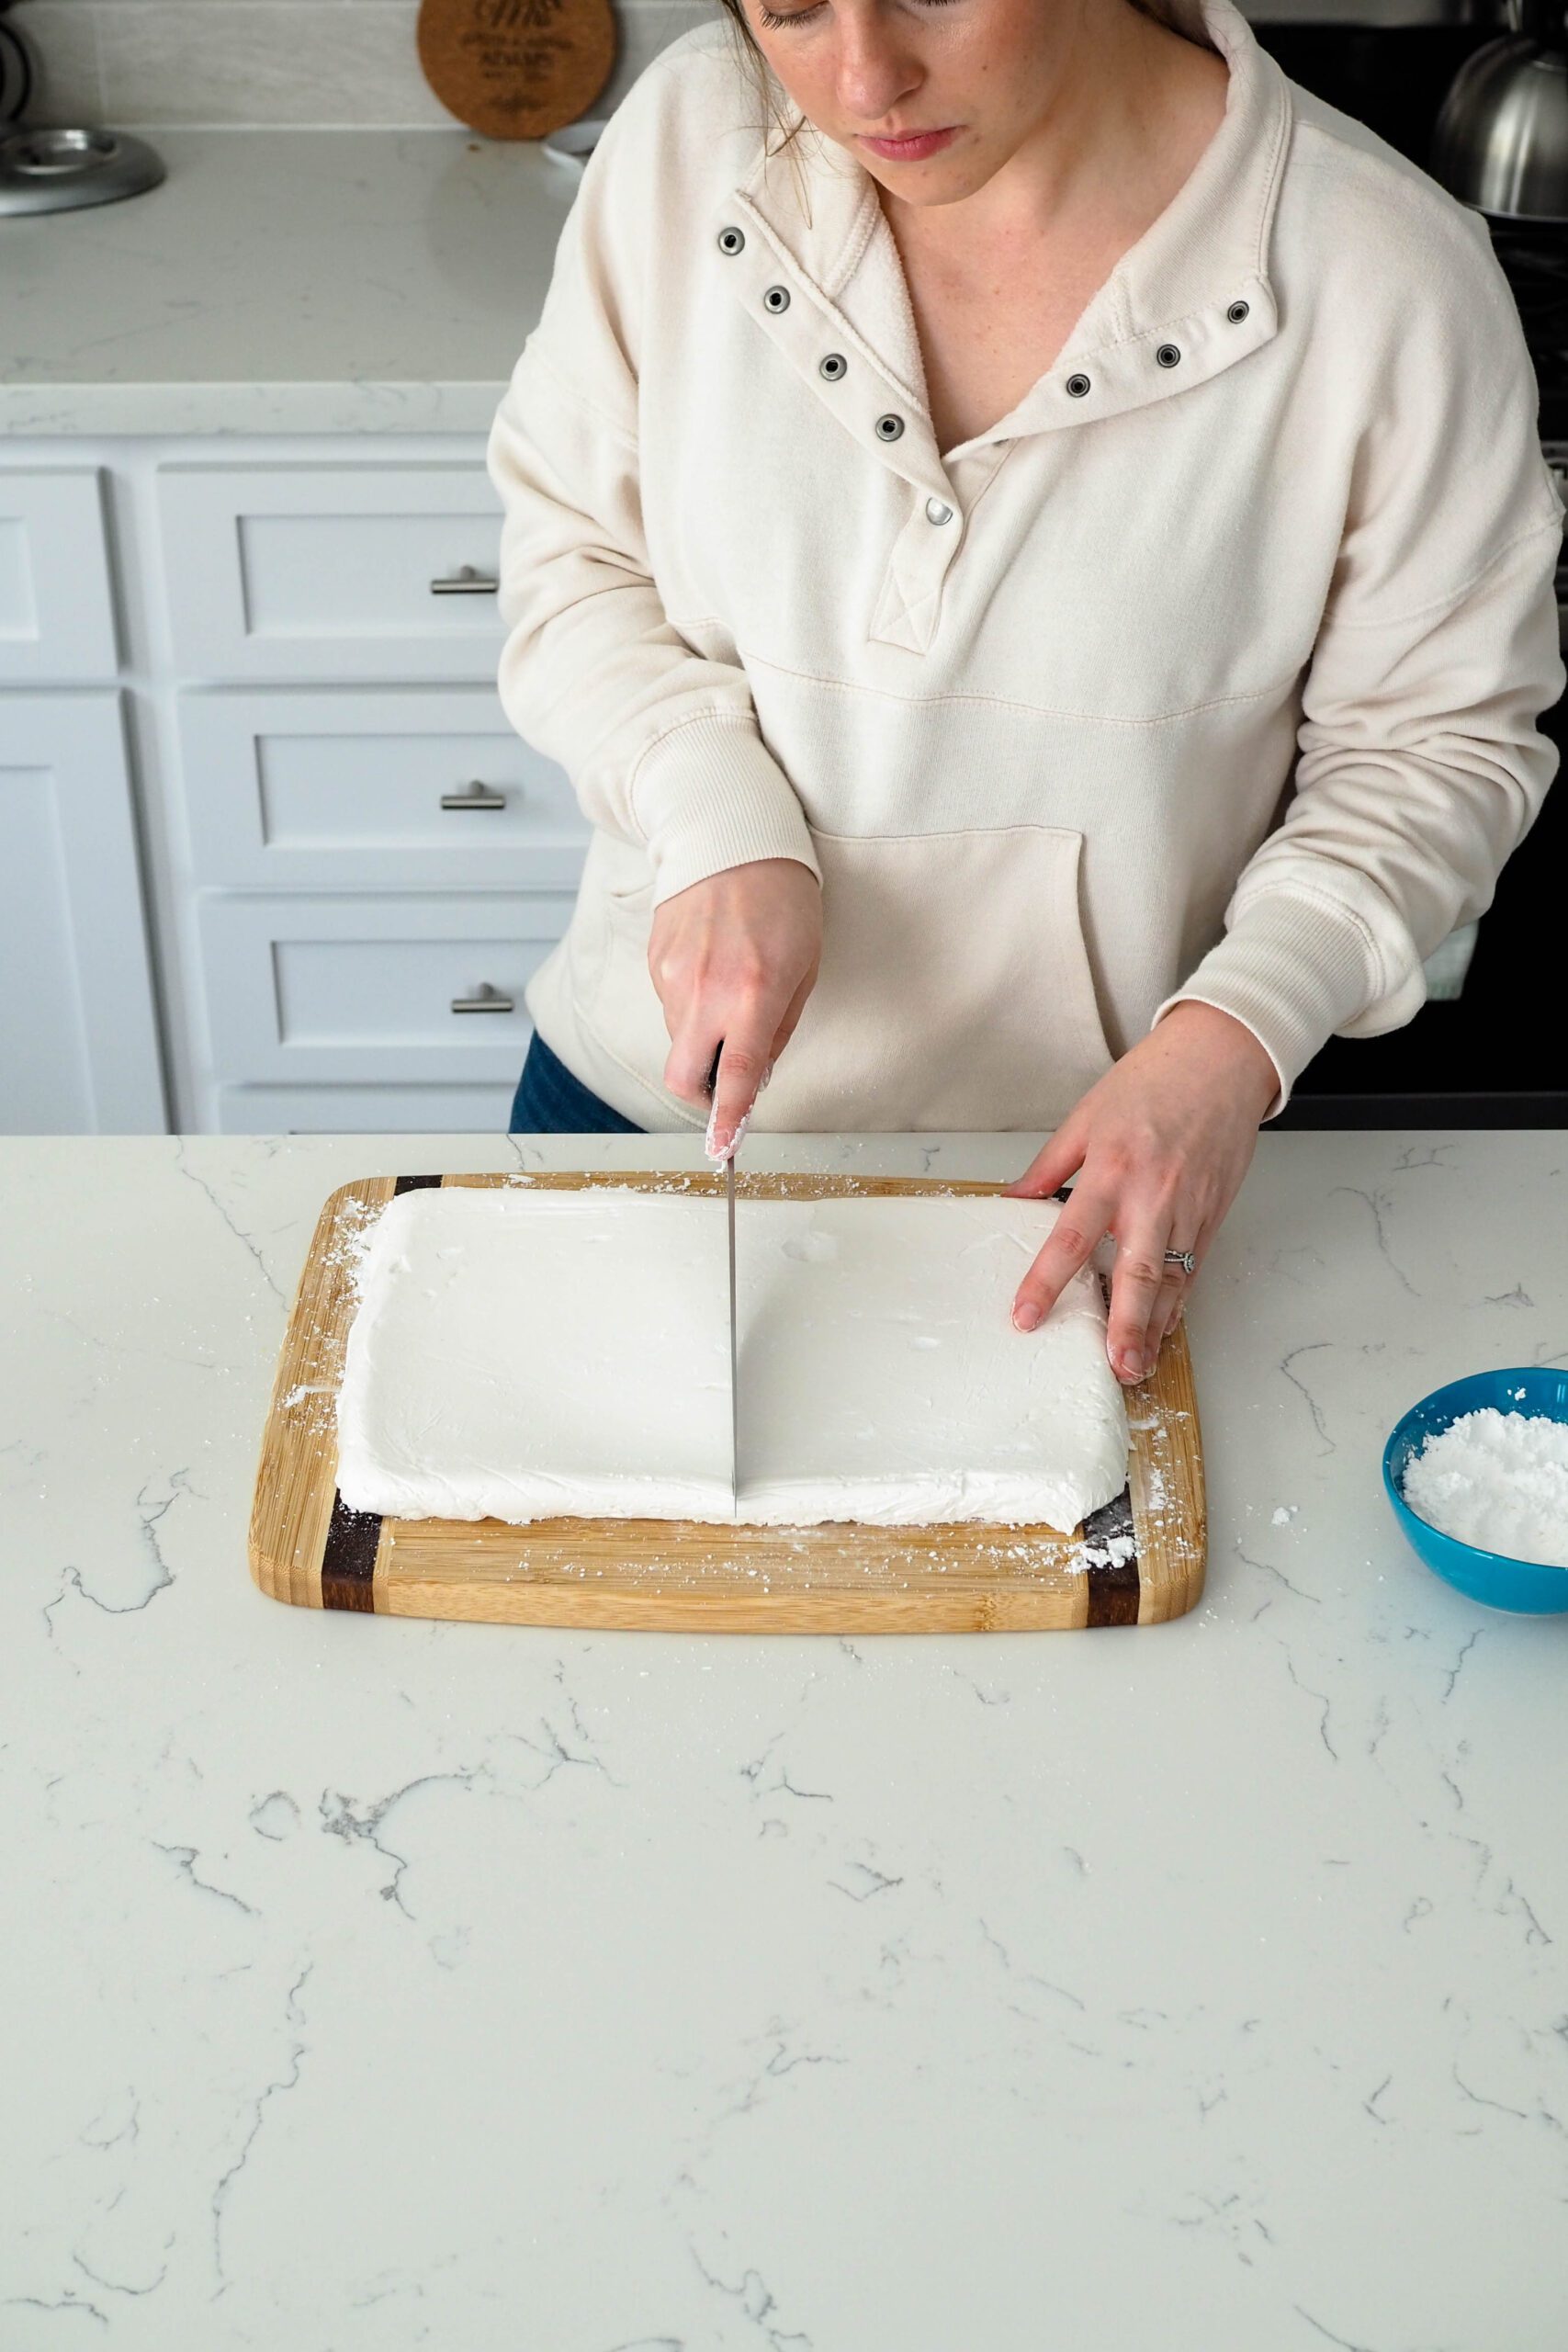
Cutting the Homemade Earl Grey Marshmallows
Test to check that the marshmallows have set before cutting into them. Poke at the top of the marshmallow loaf with finger. If the marshmallow has set, it won’t leave a permanent impression or stick to your finger.
Once the marshmallows have set, dust a cutting board with powdered sugar. Remove the plastic wrap from the pan and gently peel it off the back of the marshmallows.
Use a sharp knife (or cookie cutter for fun shapes!) to cut the marshmallows as desired. Tap each cut side with powdered sugar, then dust off the excess to prevent them from sticking to each other.
Store in an air-tight container. For best results, use a zipper-lock bag that you can squeeze excess air out of. That will help the marshmallows stay soft for longer!
Homemade Marshmallow Troubleshooting
Marshmallows aren’t technically difficult to make, but they do require a particular temperature in order to properly set up. They are nowhere near as difficult to make as macarons, though!
I’ve gathered these troubleshooting tips over the last couple of years of making marshmallows. Hopefully they can help you troubleshoot if you’re having issues getting your marshmallows to turn out.
Why Does My Homemade Marshmallow Have Hard Clumps of Sugar In It?
Clumpy marshmallows are no fun! This can happen for a few different reasons:
- The sugar syrup was not hot enough when it was introduced to the gelatin.
- Some of the sugar syrup was poured onto the tines of the whisk rather than all down the side of the mixing bowl.
- The sugar syrup was not incorporated into the gelatin fast enough, resulting in some of the syrup being too cold.
To prevent hard lumps of sugar in your homemade marshmallows, make sure that your sugar syrup is very close, if not at, 270°F/132°C.
Then, do your best to pour the syrup down the side of the mixing bowl and not directly onto the tines of the whisk. If you’ve never poured a hot syrup into a bowl with a mixer going, it can be stressful. It is hard to prevent any syrup from ending up on the tines of the whisk, but minimize the amount to prevent unpleasant sugar lumps in your marshmallows.
I Couldn’t Scrape Much Marshmallow out of the Bowl and into the Pan
If you have a hard time getting much marshmallow out of the bowl, it may be underwhipped or didn’t have enough of the sugar syrup incorporated into it. Try whipping the marshmallow for longer to increase the volume. The bowl should be only slightly warm to the touch by the time it is ready to be poured into a greased pan.
Marshmallow also begins to set very quickly, almost immediately after you turn off your mixer. If you did not begin to transfer the marshmallow into the pan right after you stopped whipping it, that will limit the amount of marshmallow you’ll be able to scrape out of the bowl.
I once forgot to line and grease my pan in advance, so I did that in a couple of minutes after turning off my mixer. I was only able to scrape out half of the marshmallow because the rest of it had started to set. That was a very sad and small batch of marshmallows.
There’s a Lot of Marshmallow Left Behind in the Bowl
There will be a good bit of marshmallow residue left behind in the bowl, because it’s just a really sticky confection. When you’re cleaning up, don’t waste time scrubbing it out. Simply let it soak in water for 10 minutes and then rinse out the bowl.
Other Recipes You May Enjoy
As mentioned above, these marshmallows go wonderfully in hot drinks. Try them in my salted caramel hot chocolate when it’s cold for a cozy drink to warm you up. Or add these ones to a London fog tea latte!
If you’re a big fan of teas (and especially Earl Grey) with chocolate, try my recipe for rosy Earl Grey truffles. Each truffle is infused with rose petals and Earl Grey tea for an easy to make, gluten-free, and vegan/dairy-free dessert.
Marshmallows and meringue are really similar! If you liked making these homemade marshmallows, you would also probably enjoy making these lifelike robin’s egg macarons, made with two kinds of meringues.
Dish Cleanup: A Lil Messy
I rate my recipe cleanups on a scale of 1 to 5. 1 is only a handful of dishes, and 5 is everything including the kitchen sink.
These homemade Earl Grey marshmallows have a cleanup rating of a 3 out of 5. Marshmallow dissolves in water easily. Soak your mixing bowl, spatula, and whisk attachment for about 10 minutes before starting on the dishes in earnest. Most of the marshmallow will rinse down the sink with little effort!
Homemade Earl Grey Marshmallows Recipe
Homemade Earl Grey Marshmallows
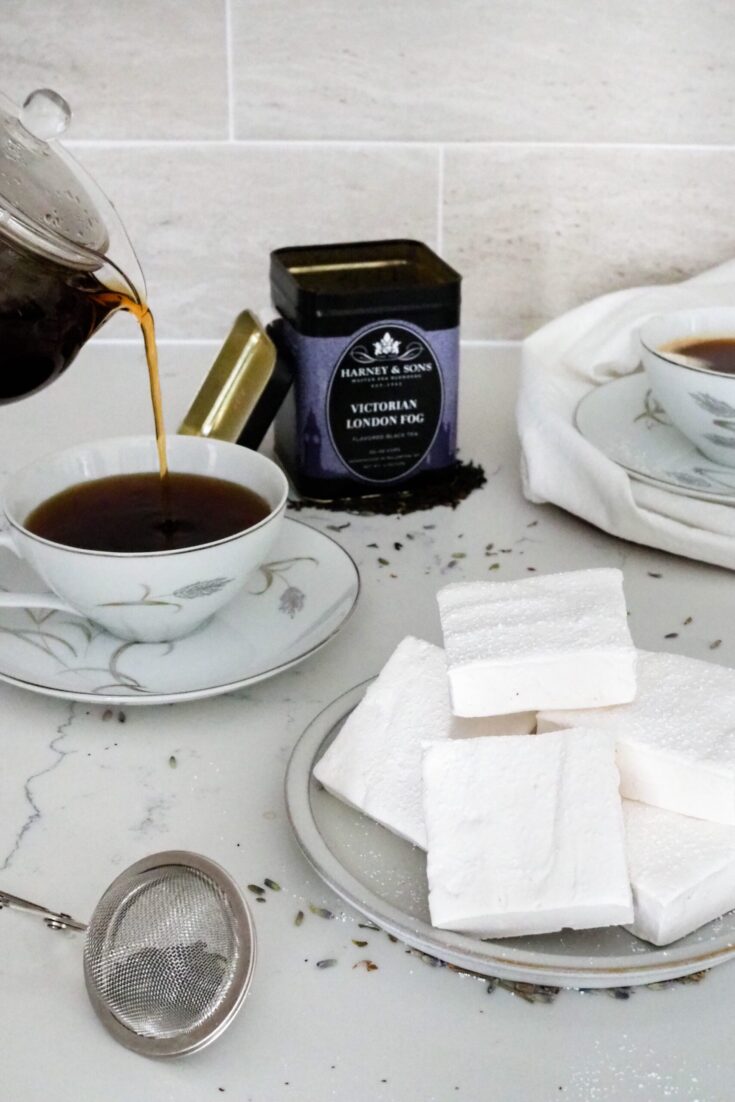
Earl Grey marshmallows are made with brewed Earl Grey tea for a soft and fluffy marshmallow that has hints of bergamot. Eat them plain or sip them on top of a London fog tea latte!
Ingredients
- 1 teaspoon loose leaf Earl Grey tea, or one Earl Grey tea bag
- 1 cup water, divided (250 ml)
- 4 packets unflavored gelatin (1 oz or 28g total)
- 2 cups granulated sugar (400g)
- ½ cup light corn syrup or golden syrup (250 ml)
- ⅔ cup powdered sugar (80g)
Instructions
Brewing the Tea
- Boil half a cup (125 ml) of water. Add your tea bag or loose leaf tea in a tea infuser. Let it brew for at least five minutes, then place in the fridge or freezer to chill.
- It's important to use room temperature or slightly chilled tea for this recipe to bloom the gelatin. Using hot tea can ruin the gelatin's ability to gel, so let the tea come to room temperature before using. Make the tea the night before and keep it overnight in the fridge, if you'd like.
Preparation
- Prepare a 16x9" (33x23 cm) baking dish: Line it with plastic wrap and spray it with a nonstick spray or spread a drizzle of oil around the bottom and sides. If your plastic wrap moves around in the pan a lot, tape the corners to prevent it from moving too much. It is key to do this step early, as the marshmallow will set quickly! Oil a spatula, as well.
- In a large bowl or the bowl of a stand mixer fitted with the whisk attachment, add your room temperature tea. Sprinkle the gelatin on top. Let the gelatin absorb the liquid while you cook the syrup in the next step.
Making Homemade Marshmallows
- In a medium saucepan over medium heat, add the sugar, corn syrup or golden syrup, and remaining ½ cup or 250 ml of water. Stir the mixture until it's mostly combined, then cook the syrup until it reaches 270°F/132°C, swirling occasionally to even the temperature. Remove from heat. A candy thermometer is helpful here to determine when your syrup reaches the soft crack stage.
- Whisk the gelatin mixture on low, then, still whisking, carefully pour the syrup down the side of the mixer bowl. Do your best to slowly pour the syrup in the same path on the side of the bowl and not pour the syrup onto the tines of the whisk. (The syrup will cool quickly on the metal tines and form hard lumps of syrup that won't incorporate into the marshmallow.)
- Increase the speed to medium high and continue whisking the mixture for 5-10 minutes, until the mixture is an opaque white, thick, and sticky. You'll hear the mixer start to work a bit harder once the mixture becomes really stringy; that's your sign to turn off the mixer and begin spreading it into the lined pan.
- Use an oiled spatula to scrape the marshmallow out of the bowl and into the greased pan. The marshmallow will slowly spread to the edges of the pan, but it's much faster and more certain if you guide the marshmallow with your oiled spatula. Flatten out any peaks with the spatula, re-oiling as necessary to prevent sticking.
- Let the marshmallow set for 1-2 hours until firm before cutting.
Cutting the Marshmallows
- Spread a thin layer of powdered sugar on top of a cutting board. Remove the marshmallow loaf from the pan and flip it to rest the exposed side on top of the powdered sugar. Peel away the plastic wrap from the marshmallow.
- Use a sharp chef's knife to cut the marshmallow, dusting each side with powdered sugar after cutting. Brush off any excess powdered sugar, then store in an air-tight container.
Notes
Store in an air-tight container for up two weeks. (A zipper-sealed bag works best to limit extra air from drying the marshmallows out.)
These marshmallows can be used like store-bought marshmallows: Use in Rice Krispy treats, toast over an open flame, or mix into ice cream!
Nutrition Information:
Yield:
24Serving Size:
1 marshmallow squareAmount Per Serving: Calories: 110Total Fat: 0gSaturated Fat: 0gTrans Fat: 0gUnsaturated Fat: 0gCholesterol: 0mgSodium: 9mgCarbohydrates: 28gFiber: 0gSugar: 27gProtein: 1g
The nutrition facts are estimated and may vary based on specific ingredients used.
Thanks for trying out my recipe! Please consider rating this recipe so others find it, too.
I’d love to see how your recipe turns out: Take a photo and tag me on Instagram @floralapronblog to share with me, or use the hashtag #floralapronbakes.
This post contains affiliate links. If you click through and make a purchase, I may receive a small commission at no cost to you. Thank you for helping to support The Floral Apron!