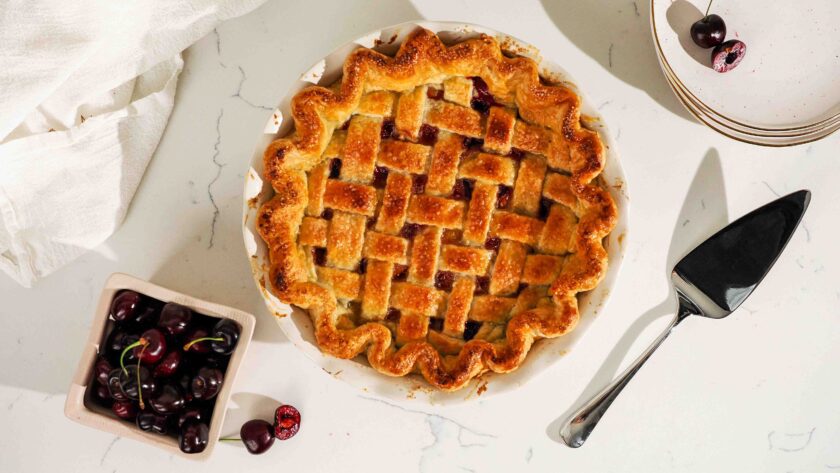
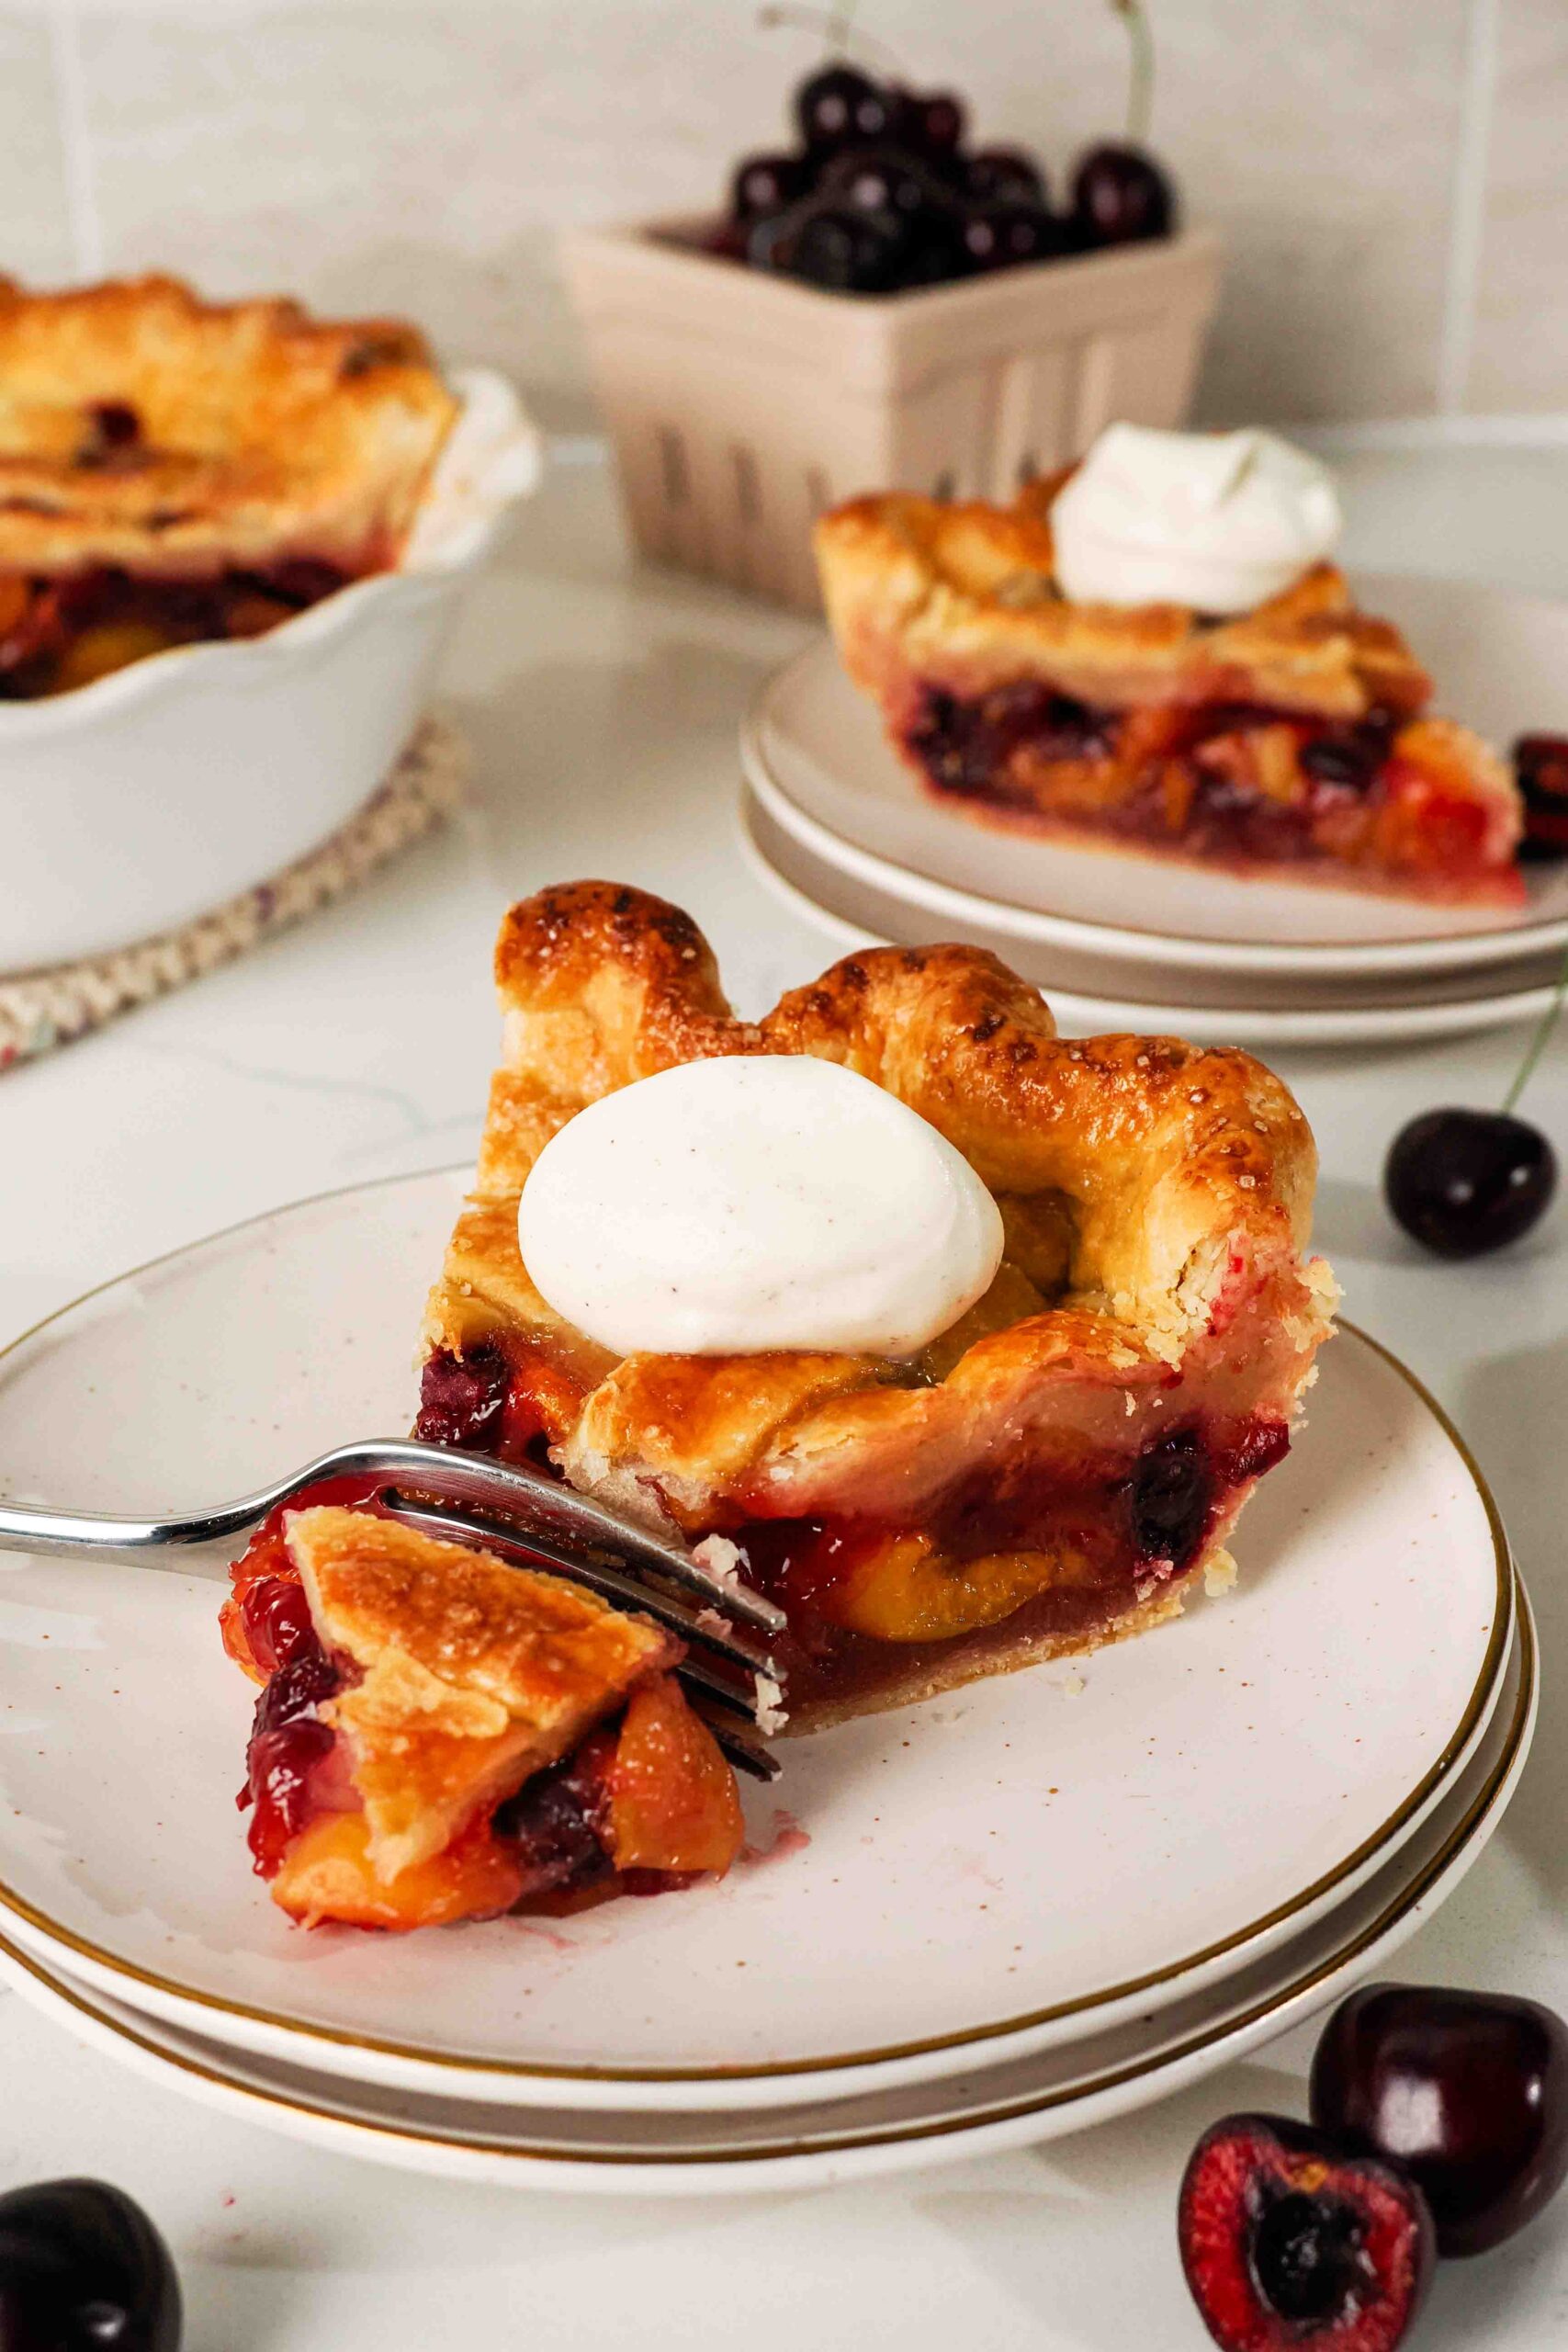
Use up those fresh sweet cherries this summer in a homemade cherry pie with almond extract! This recipe uses vanilla and almond extracts to bring out the cherry flavor for what all my friends have said is their favorite kind of cherry pie with a buttery, flaky crust. I use my all-butter, vanilla pie crust, but you’re welcome to use another double pie crust recipe if you have a favorite!
This is the full-size version of my mini cherry pies, which are made in a muffin pan. Both are great to take to summer gatherings and share with loved ones, along with my homemade cherry breakfast pastries for an easy take on the classic cherry hand pie.
This post contains affiliate links. If you click through and make a purchase, I may receive a small commission at no cost to you. Thank you for helping to support The Floral Apron!
Ingredients for Homemade Cherry Pie with Almond Extract
You’ll need only a handful of common ingredients to make this cherry pie from scratch with almond extract! Read on for clarifications and substitutions for each ingredient below:
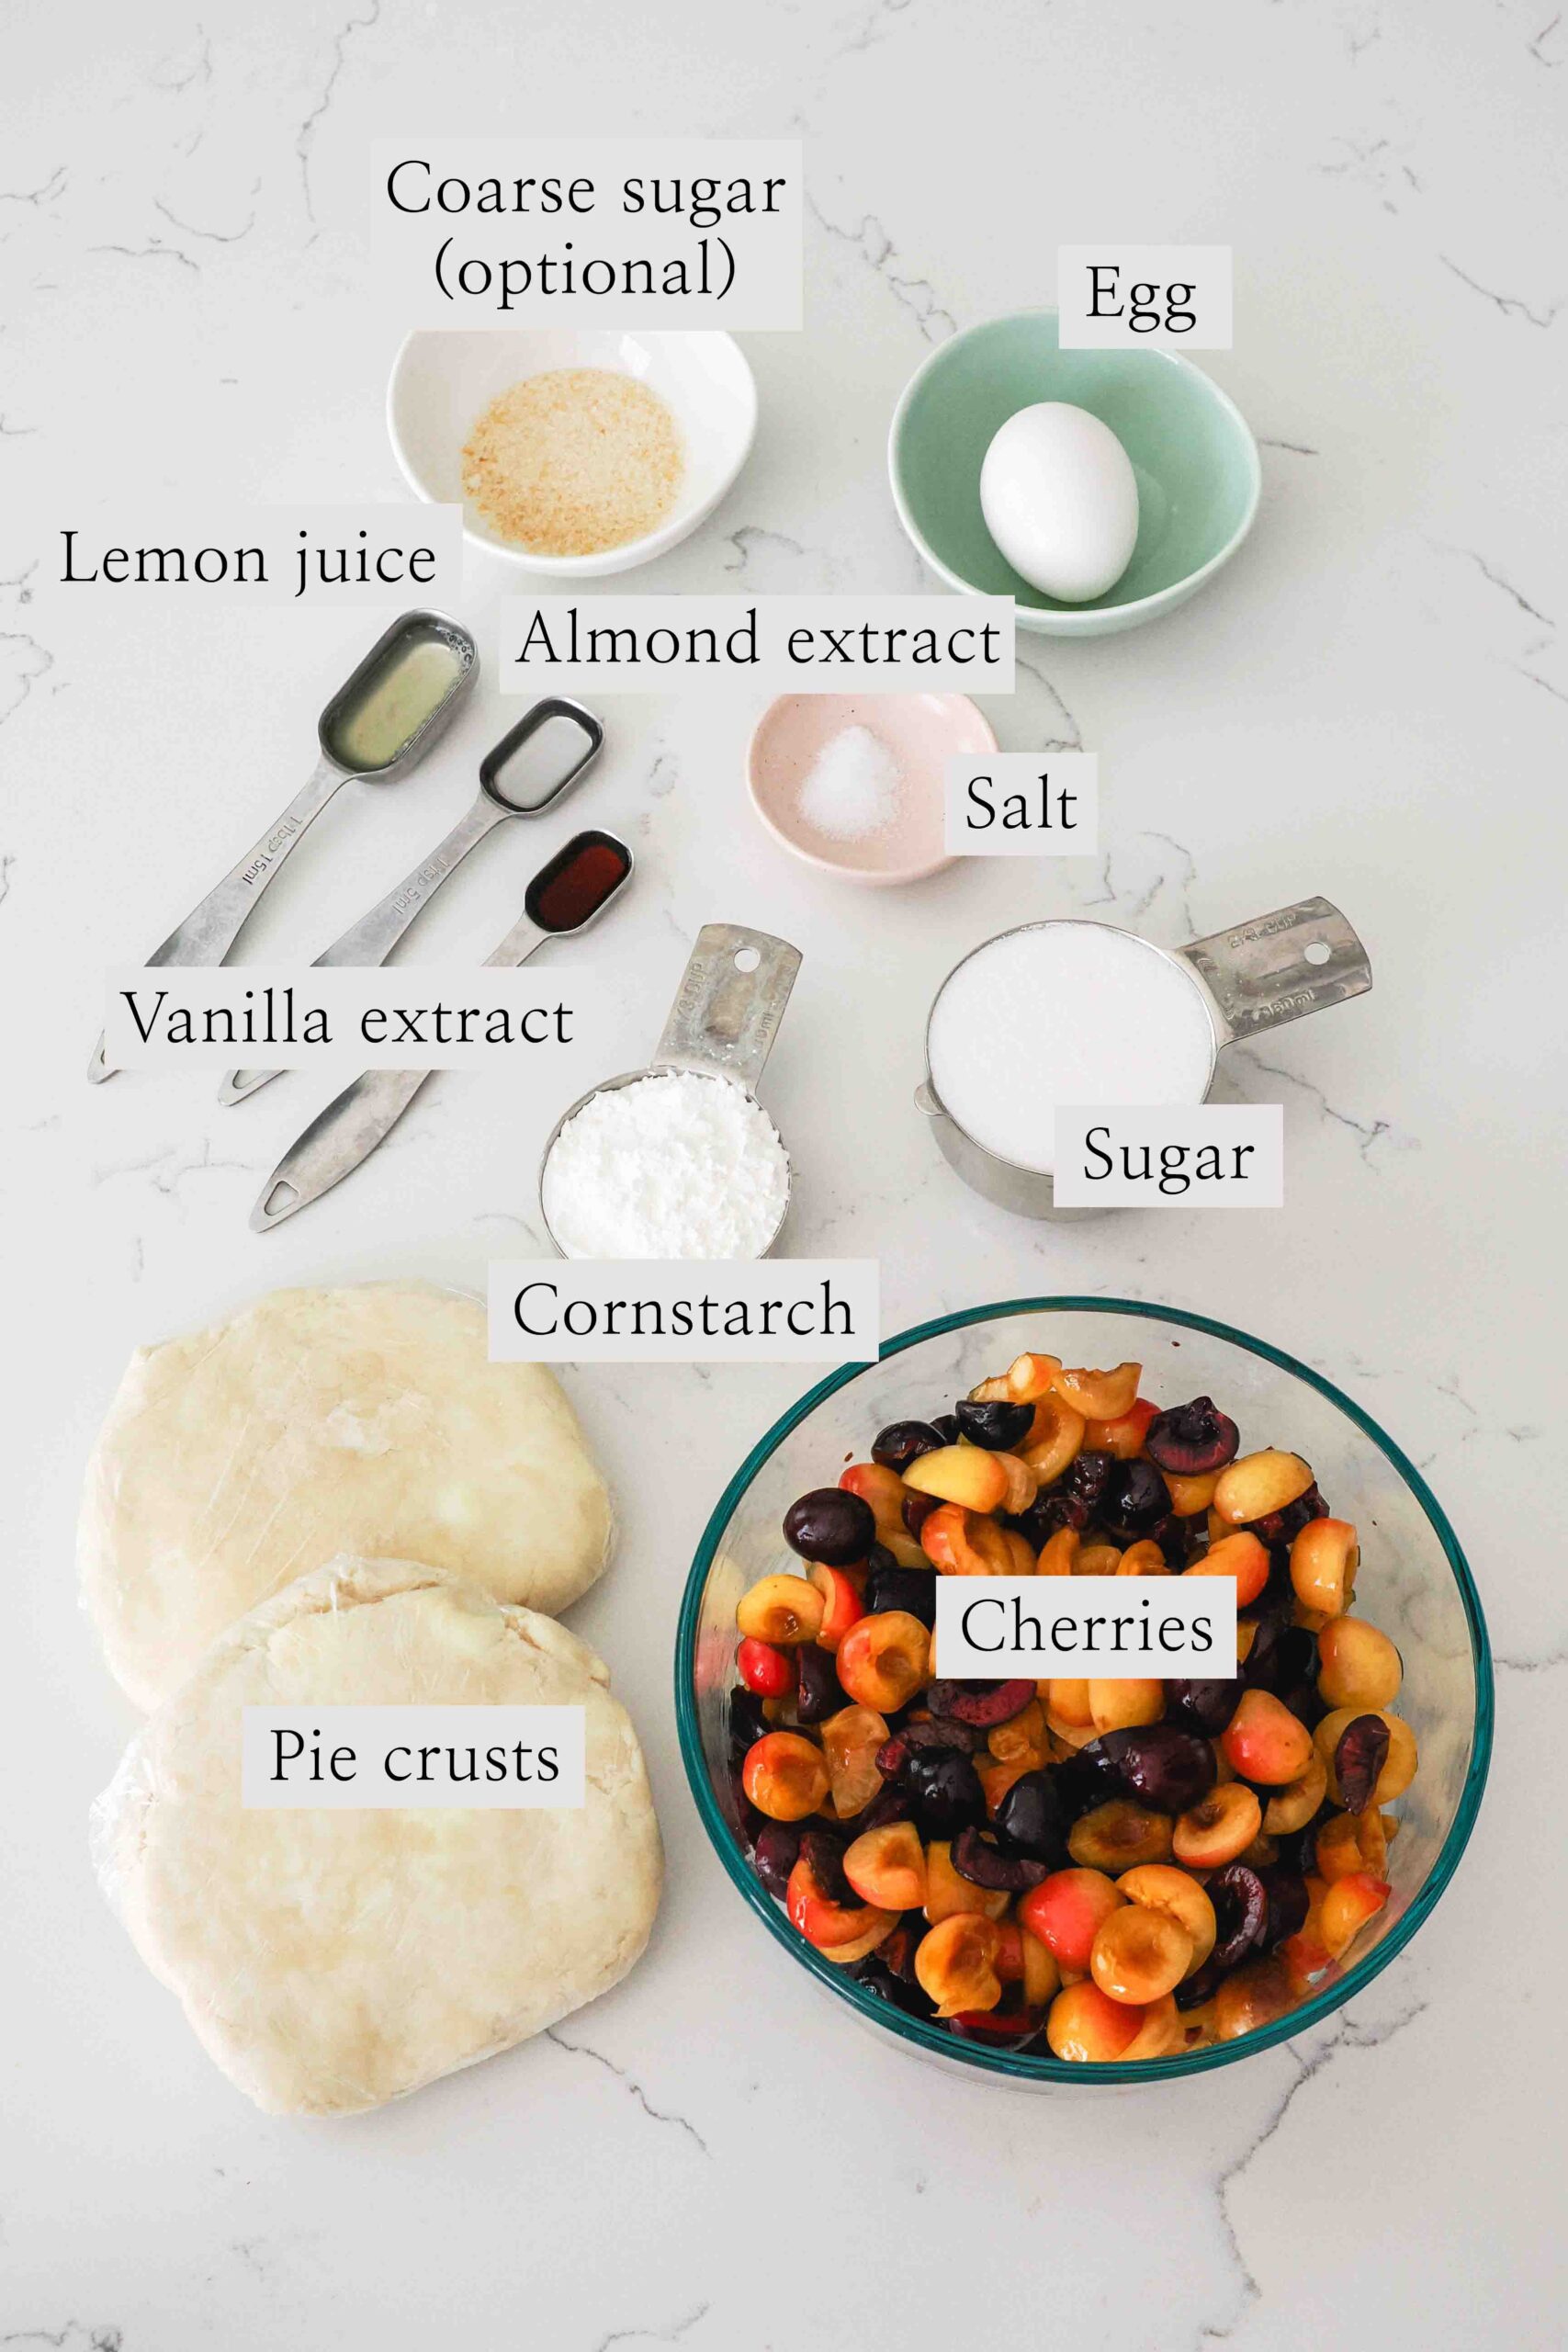
- Pie crusts. Use any pie crust you like (homemade, store bought, vegan, etc)—it doesn’t have to be my all butter vanilla pie crust, though it’s perfect to help even beginners get a super flaky crust!
- Sweet cherries. I use a mix of fresh sweet cherries here, but frozen will work, provided you allow them to thaw overnight in the fridge. My personal favorite combination is about 75% Rainier (yellow) and 25% Bing (dark).
- Cornstarch. This is the primary thickener in the filling. By heating it over the stove early in the recipe, you help ensure that the filling sets up nicely rather than turning into cherry soup.
- Granulated sugar. In addition to sweetening the cherry pie filling, sugar also acts as a thickener.
- Lemon juice. I find that the little bit of acidity helps to balance out the sweetness.
- Salt. Just a pinch helps to enhance all the flavors.
- Vanilla and almond extracts. These are the secret ingredients to getting homemade cherry pie to taste so good. A hint of vanilla and almond complement and intensify the cherry flavor.
- Egg. Adding an egg wash helps turn the pie crust a deep golden brown in the oven. You could also substitute heavy cream or milk.
- Coarse sugar (optional). If you don’t have coarse sugar, you don’t need to go out and buy it just for this recipe! But, if you have some on hand, I like the look and extra crunch of a sprinkle on top.
How to Make Cherry Pie with Almond Extract
Even if you’ve never made a pie before, you’re in good hands. I tell you everything you need for success in the recipe card at the bottom of this page, but if you want a little more guidance, you’re welcome to read this blog post for extra tips. You can also watch me make this cherry almond pie on my YouTube channel in a few days!
Making the Cherry Almond Pie Filling
First up, you’ll want to cut all your cherries in half, and even the really large cherries into quarters. This will help reduce the chance of air pockets in the filling, which can cause unsightly gaps in your slices.
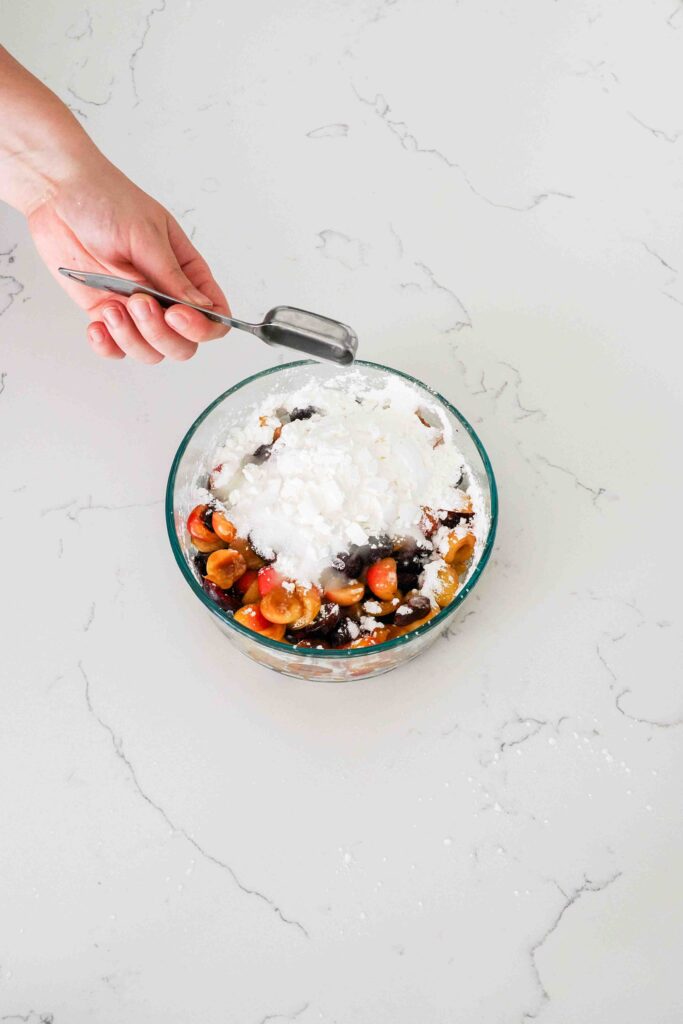
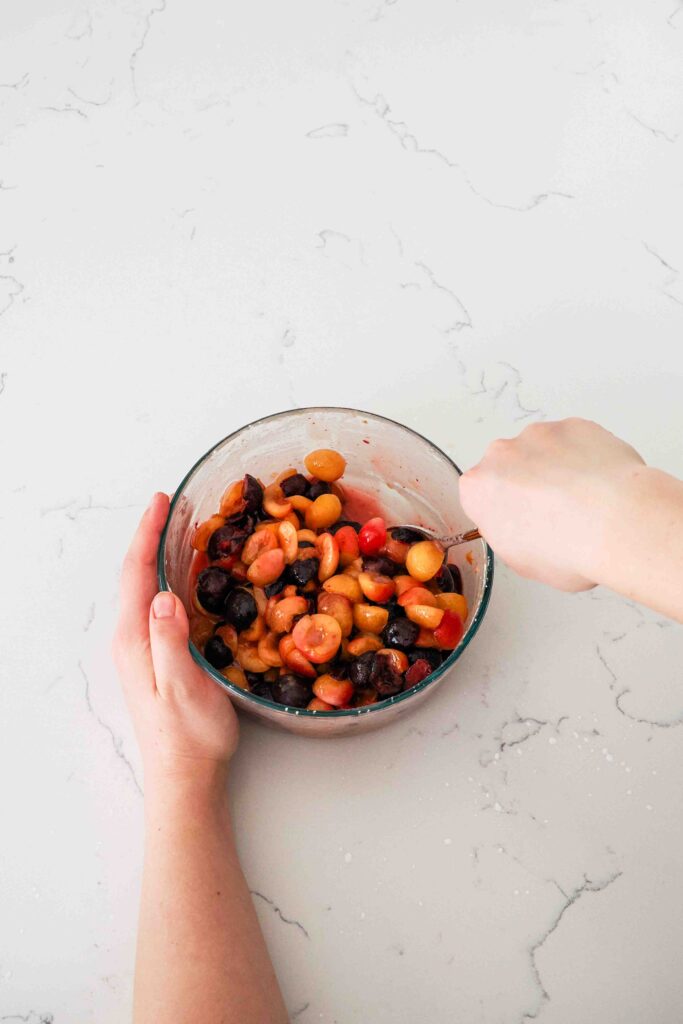
The next step is to macerate your cherries. It sounds gross, I know, but macerating is the process of steeping fruit in sugar to draw out their juices. Add the sugar, cornstarch, lemon juice, and salt, to the your chopped cherries, and stir together.
Let the cherries sit for at least 10 minutes while you roll out the first pie crust. This is ample time to draw out excess moisture.
Rolling Out the Pie Crust
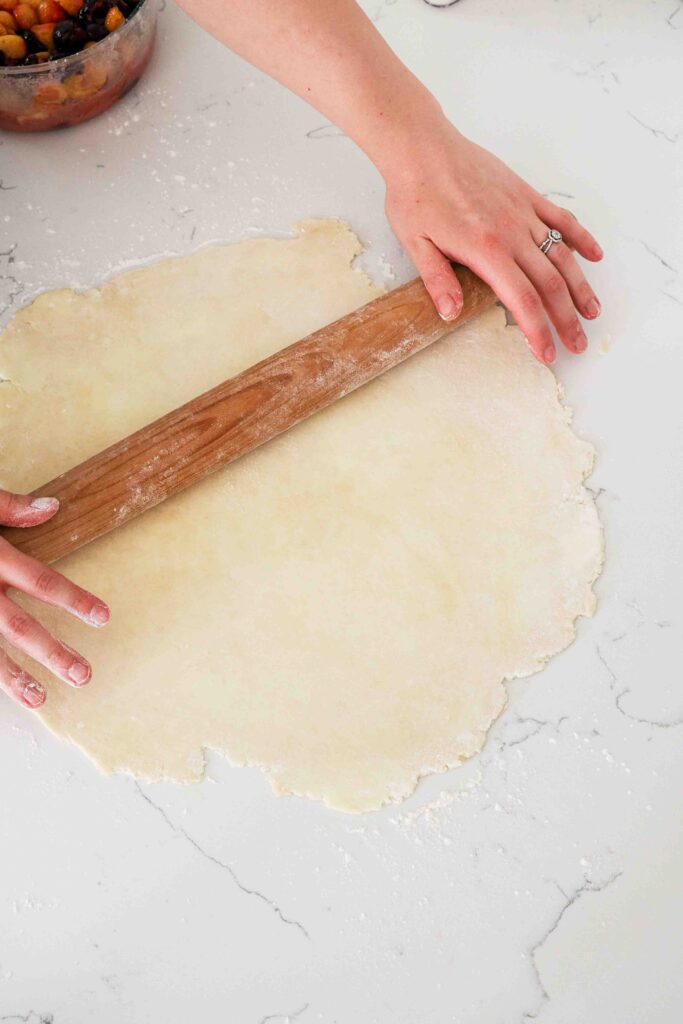
My number one tip for rolling out pie crust is to keep the dough cold. Second, keep it lightly dusted with flour to prevent it from sticking.
You’ll also want to only roll the rolling pin outwards from the center of the dough. This helps the dough stay in a circular shape and evenly rolls out the thickest section of dough to the thinnest. I love using a French-style rolling pin to do this.
Lastly, I recommend rotating the dough a quarter turn after every roll. This ensures that you stay on top of any dough that is starting to stick. It’s much easier to stop and correct a little stickiness with a light sprinkle of flour than it is to peel off a dough round that’s fully stuck to the counter without ripping it into layers.
You may notice sections that stick to the rolling pin on top of the dough. If that happens, dip your fingertips in flour and lightly pat the sticky section. The flour from your fingers will transfer to the dough and prevent the rolling pin from sticking it it on its next pass.
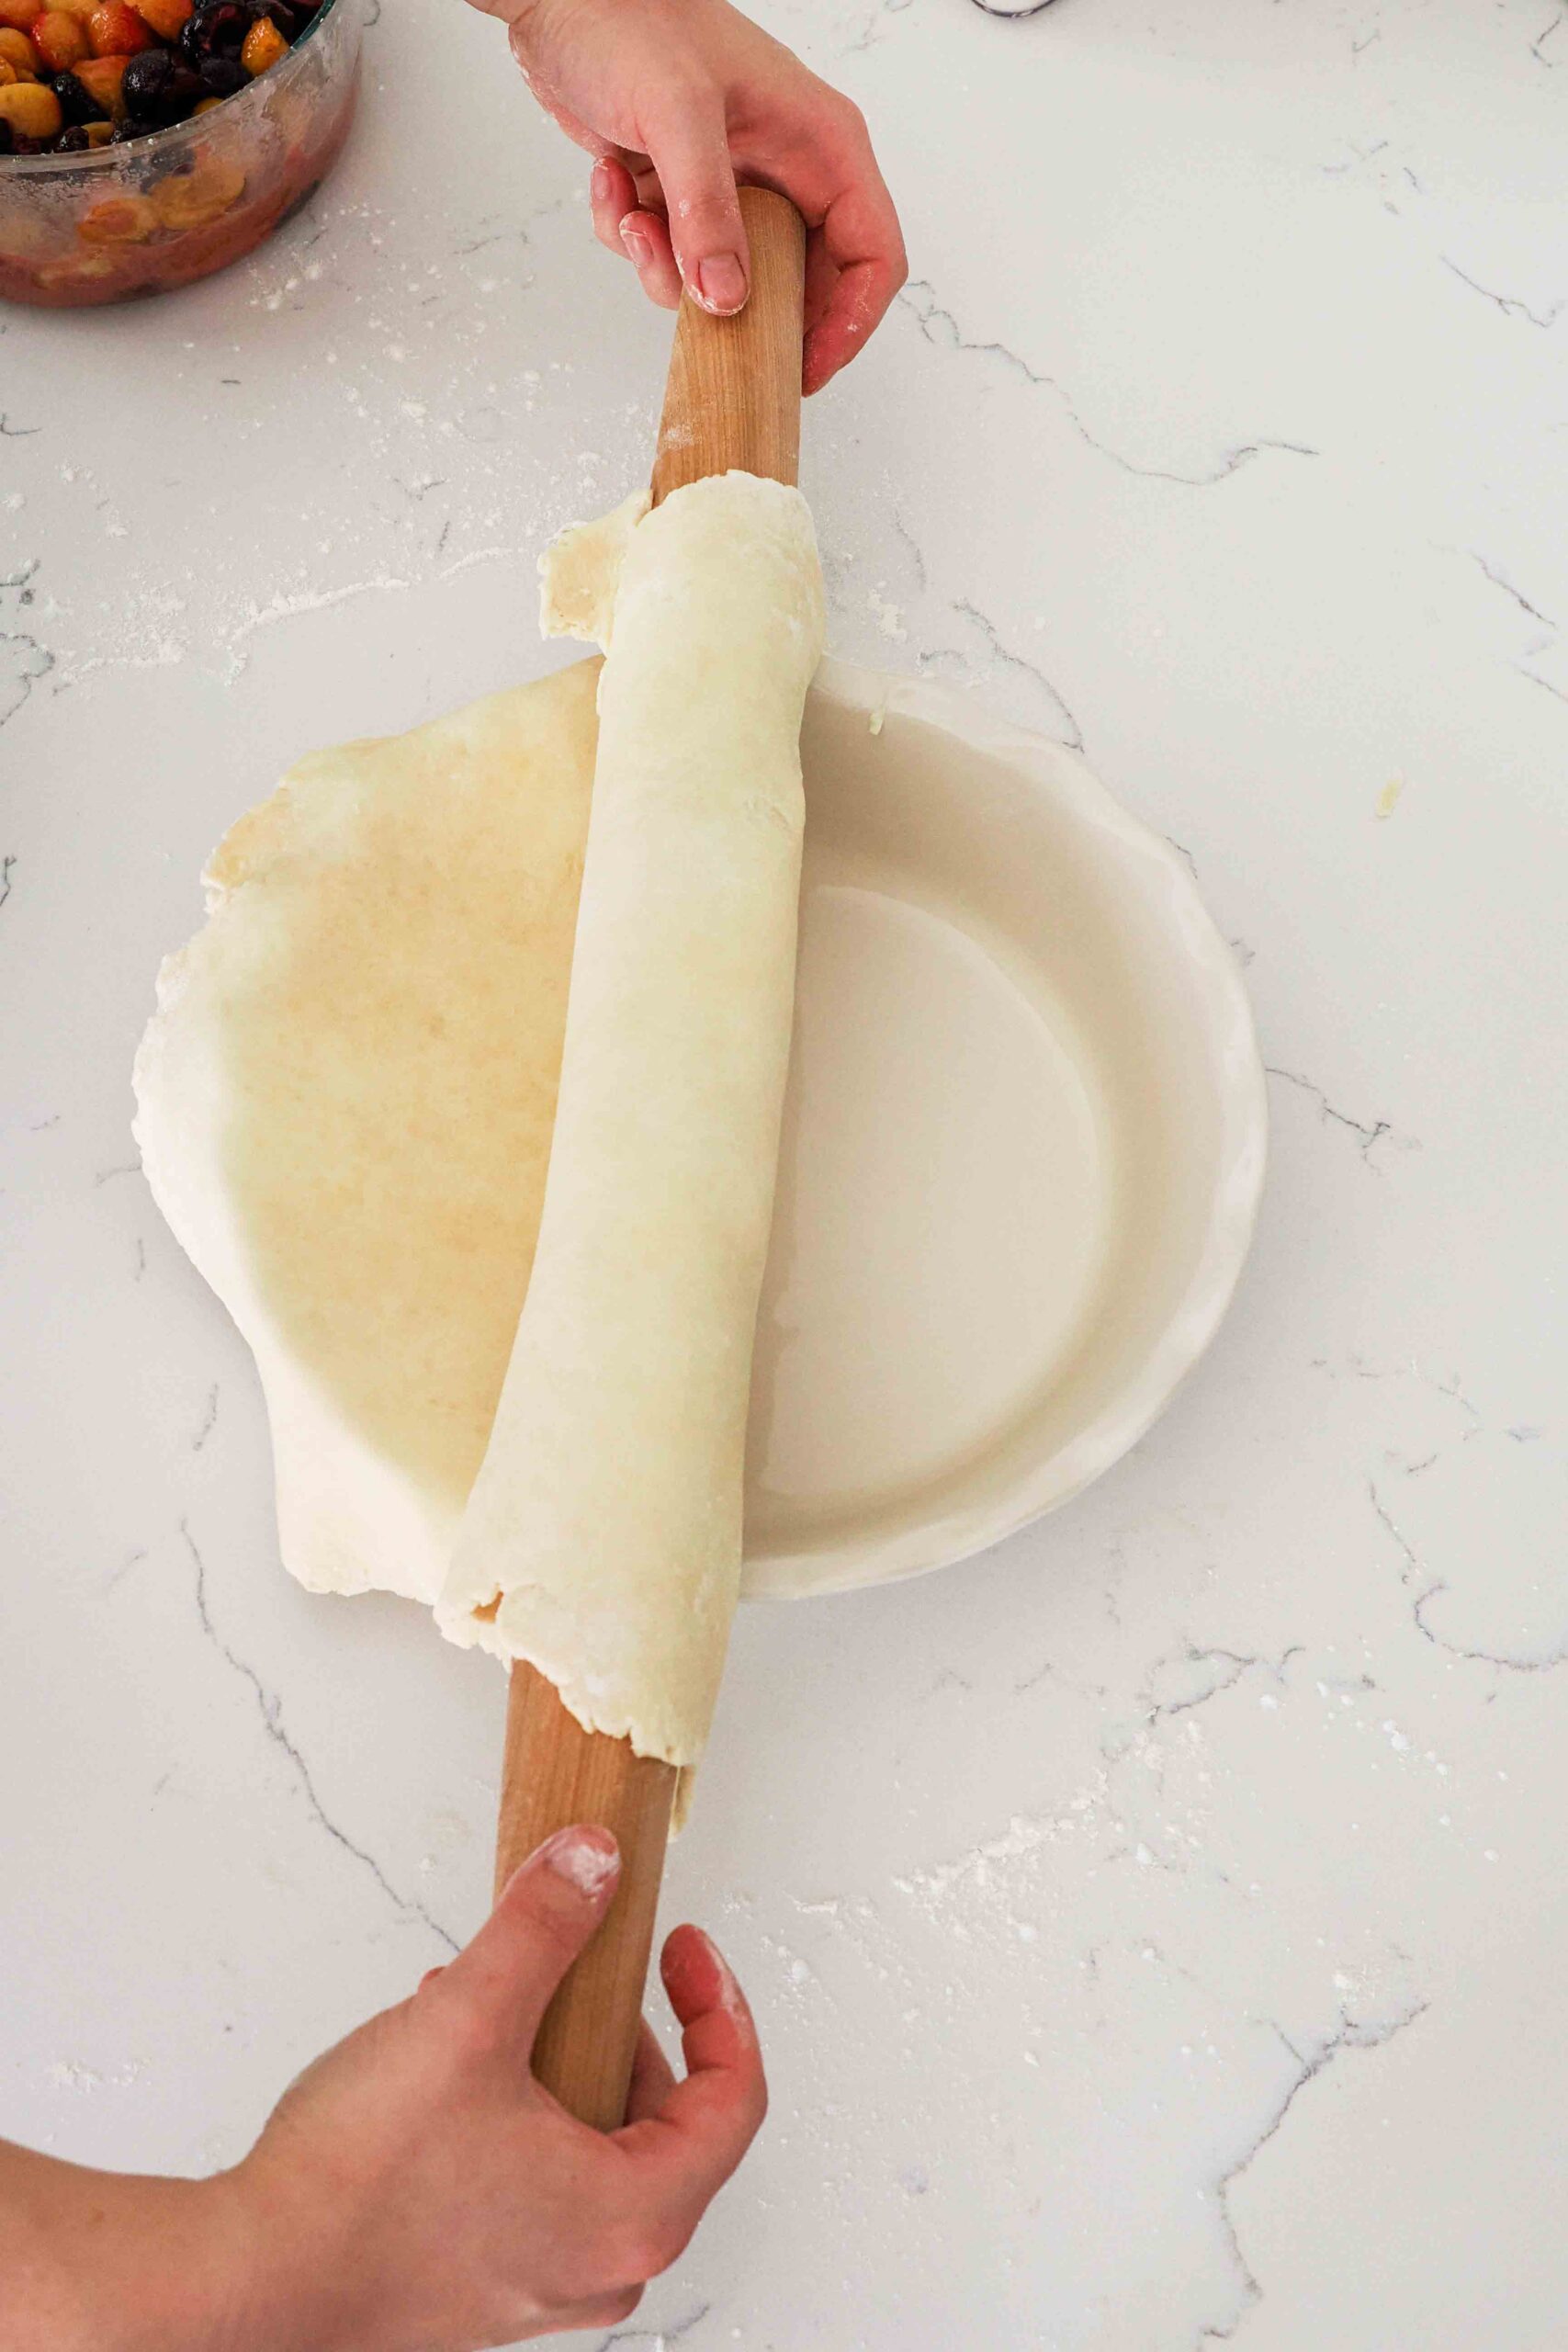
Then, transfer the dough to a pie pan. I like to roll the dough onto my rolling pin and unroll it over the pie pan, but you can also fold it into quarters.
Assembling the Cherry Pie with Almond Extract
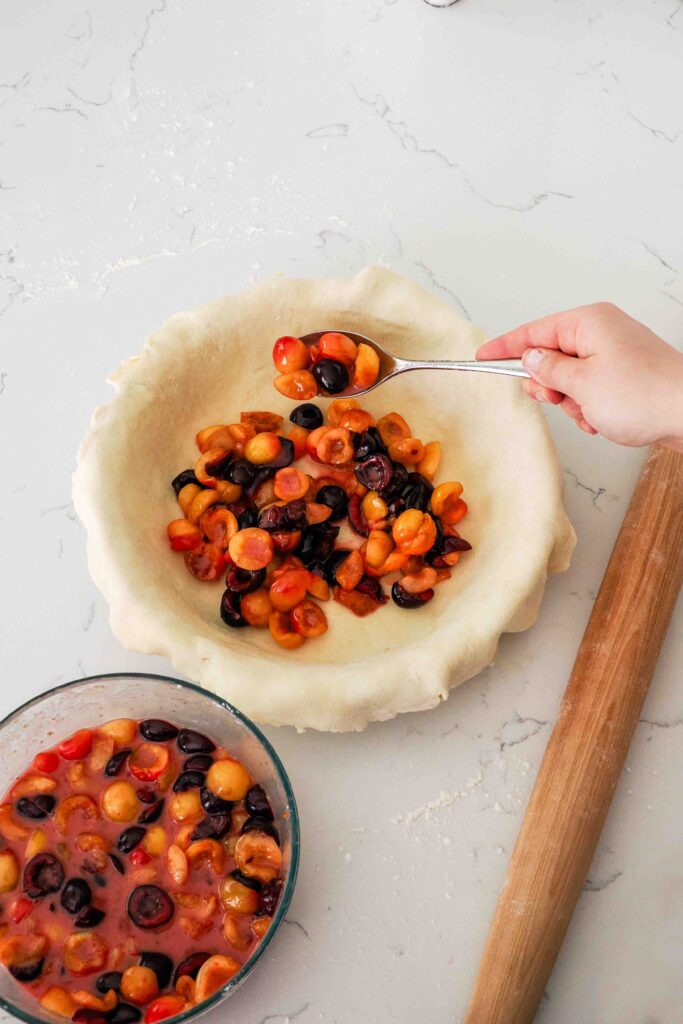
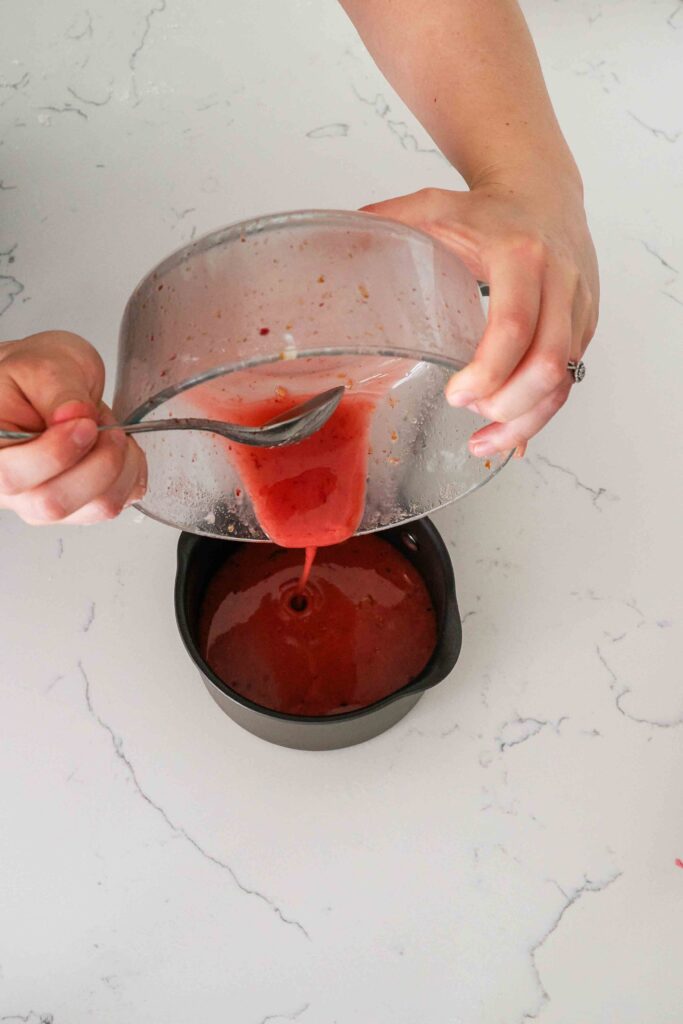
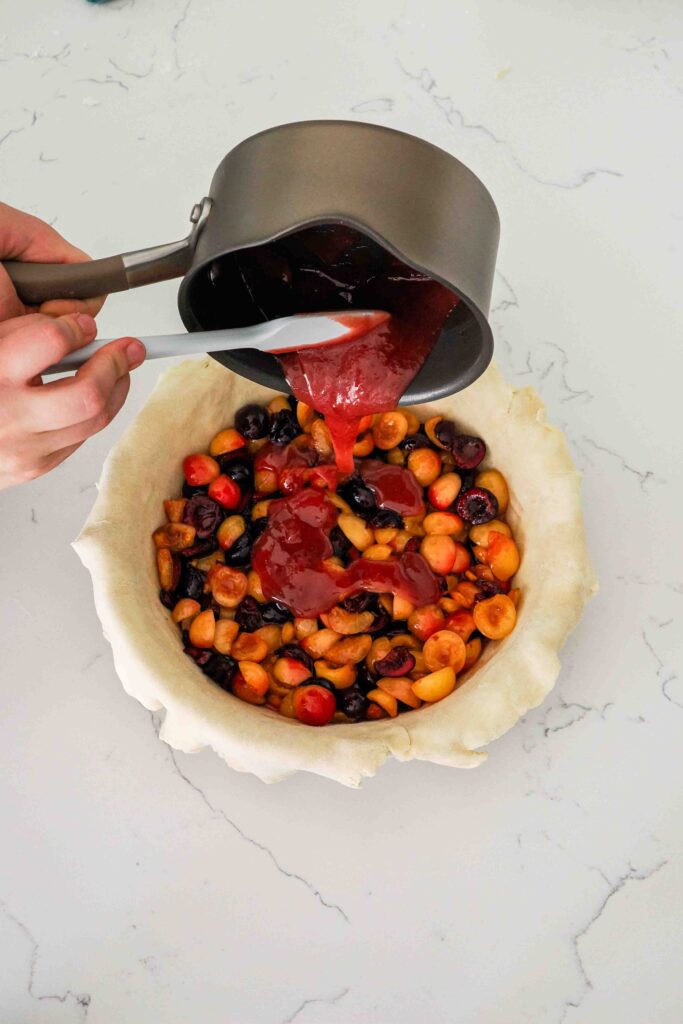
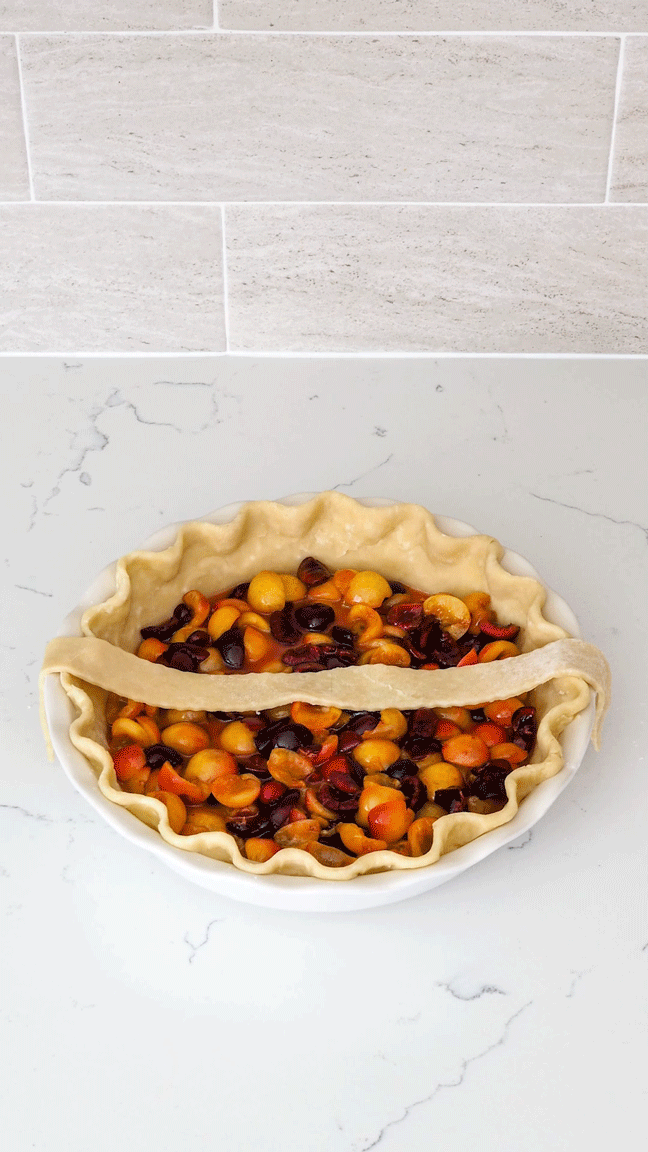
Once the cherries look like they’re swimming in cherry liquid, move the cherries to the dough-lined pie pan. When you’ve removed all the cherries from the bowl, reserve the liquid and transfer it to a small saucepan. Place the pie in the fridge, uncovered, for up to 20 minutes. If you think it will take you longer than that, cover it.
You could likely do this next step in the microwave, but I haven’t tested it, and I’m sticking with tried and true methods!
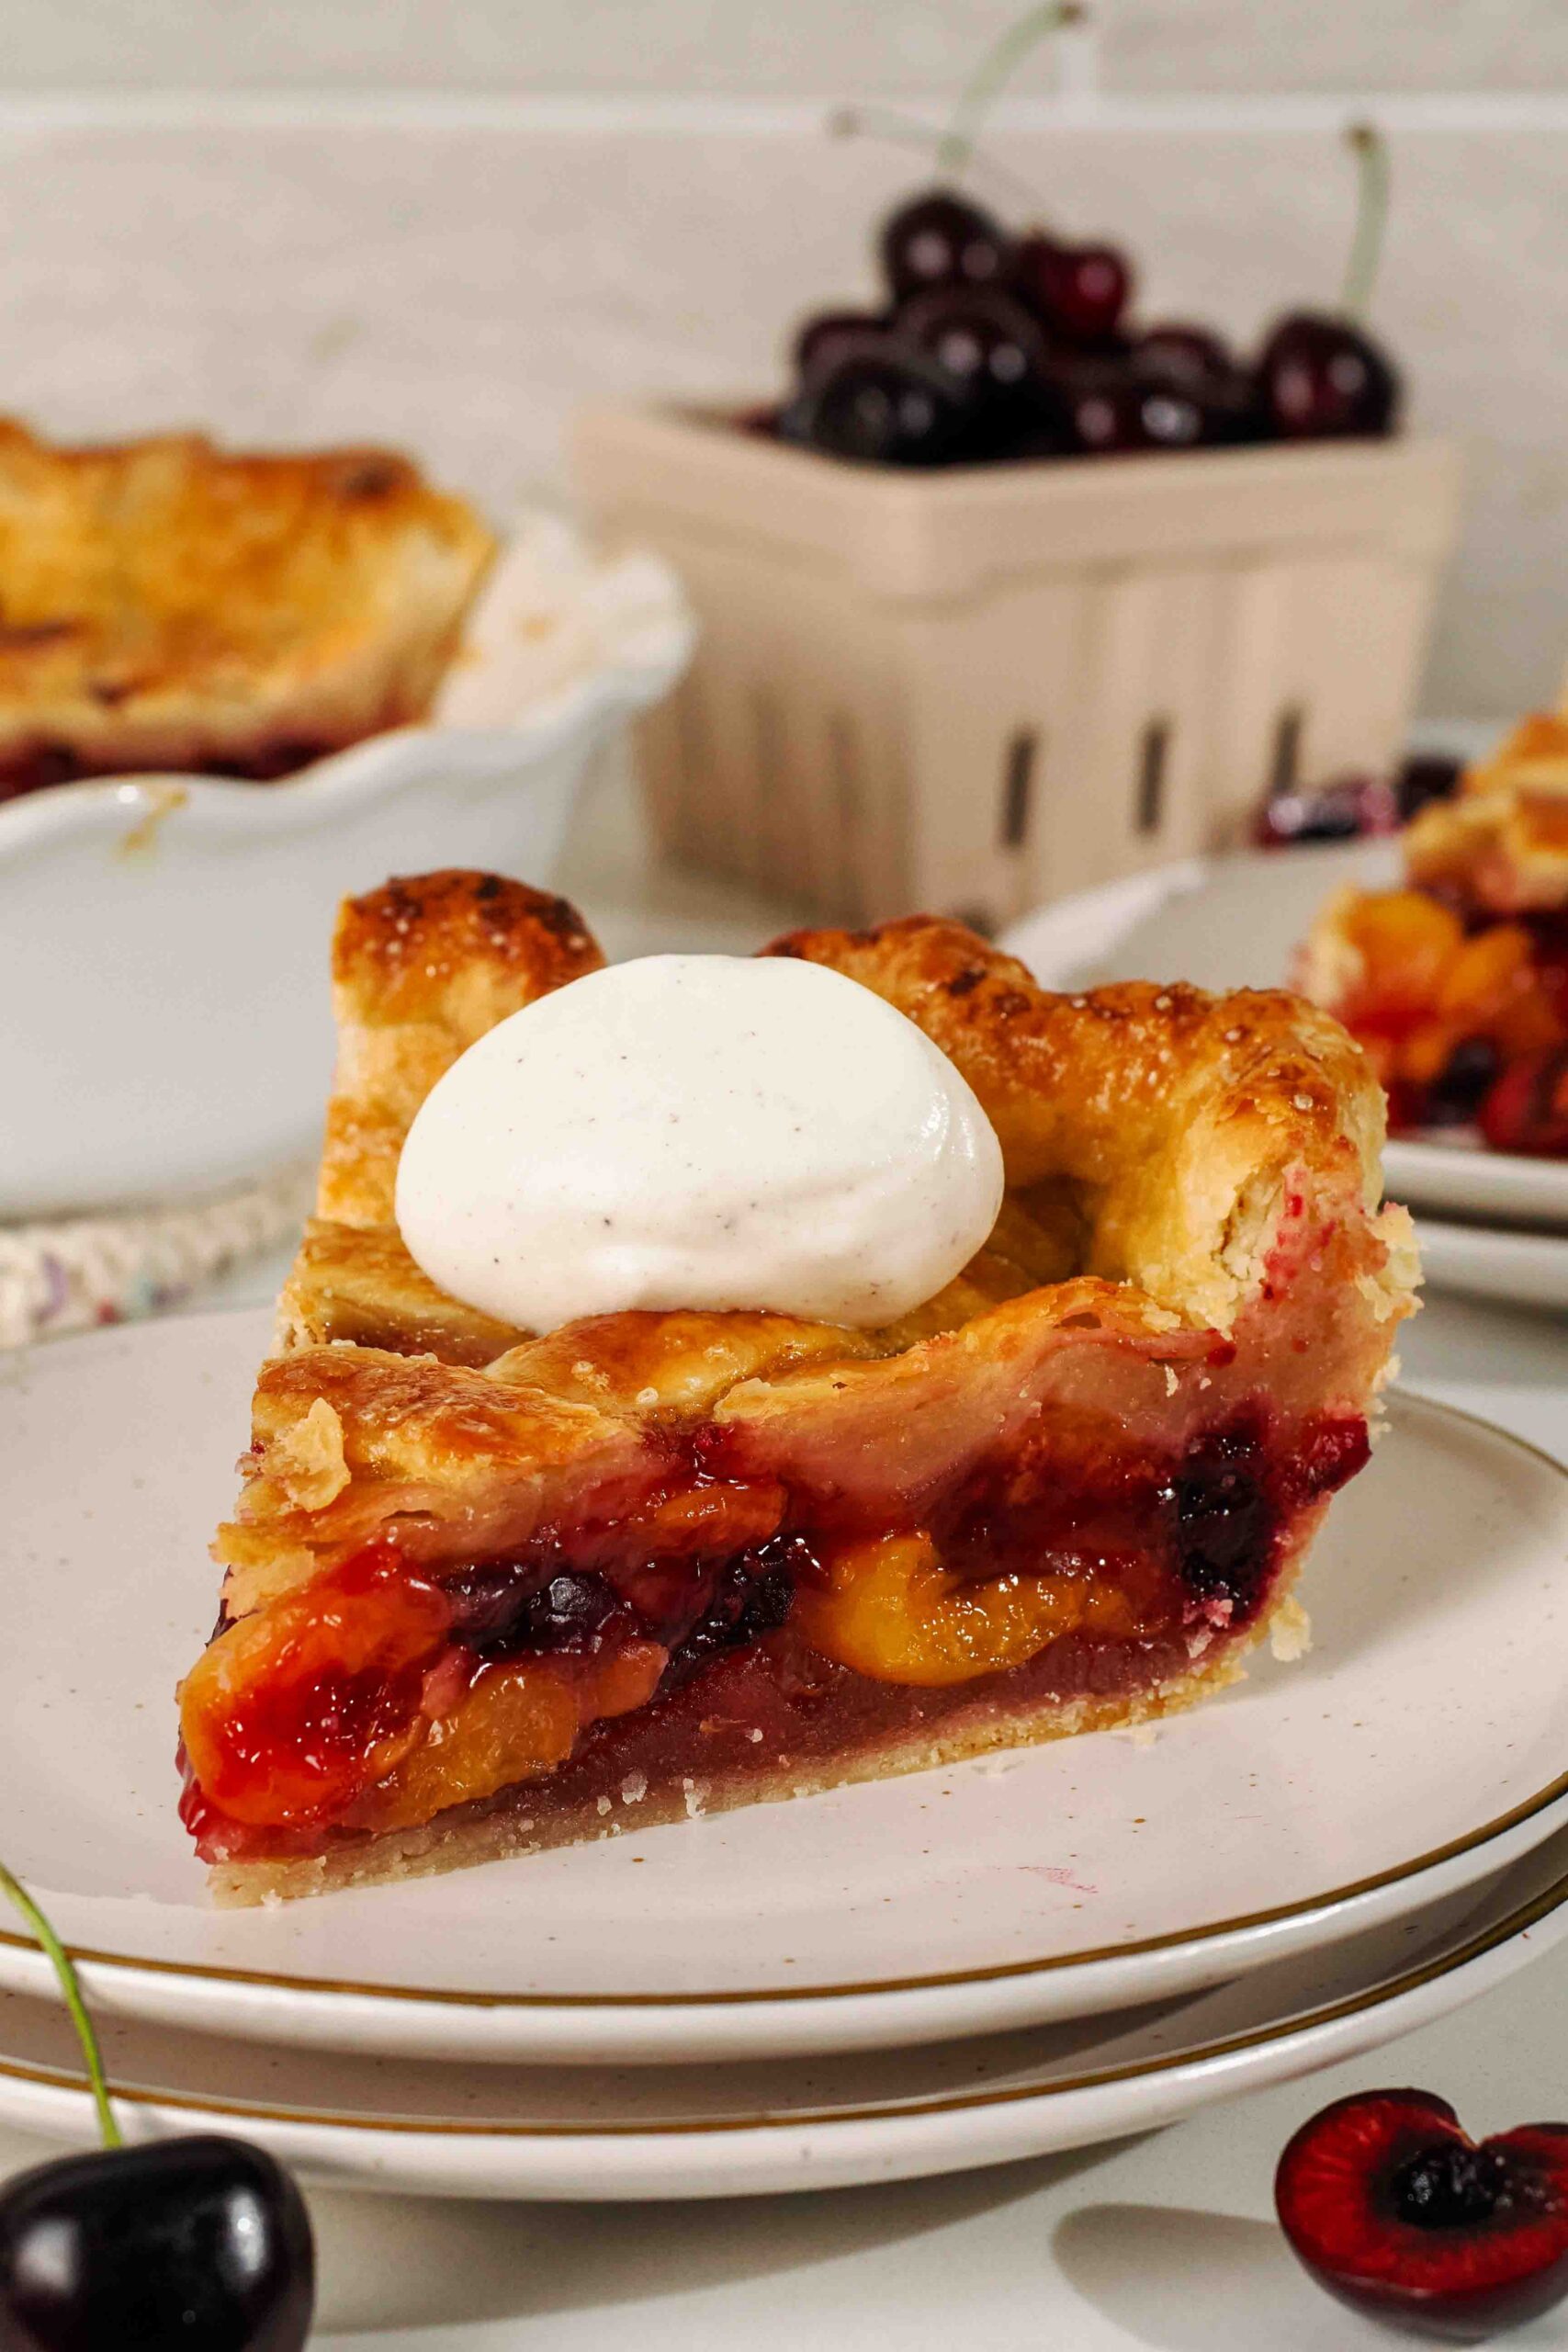
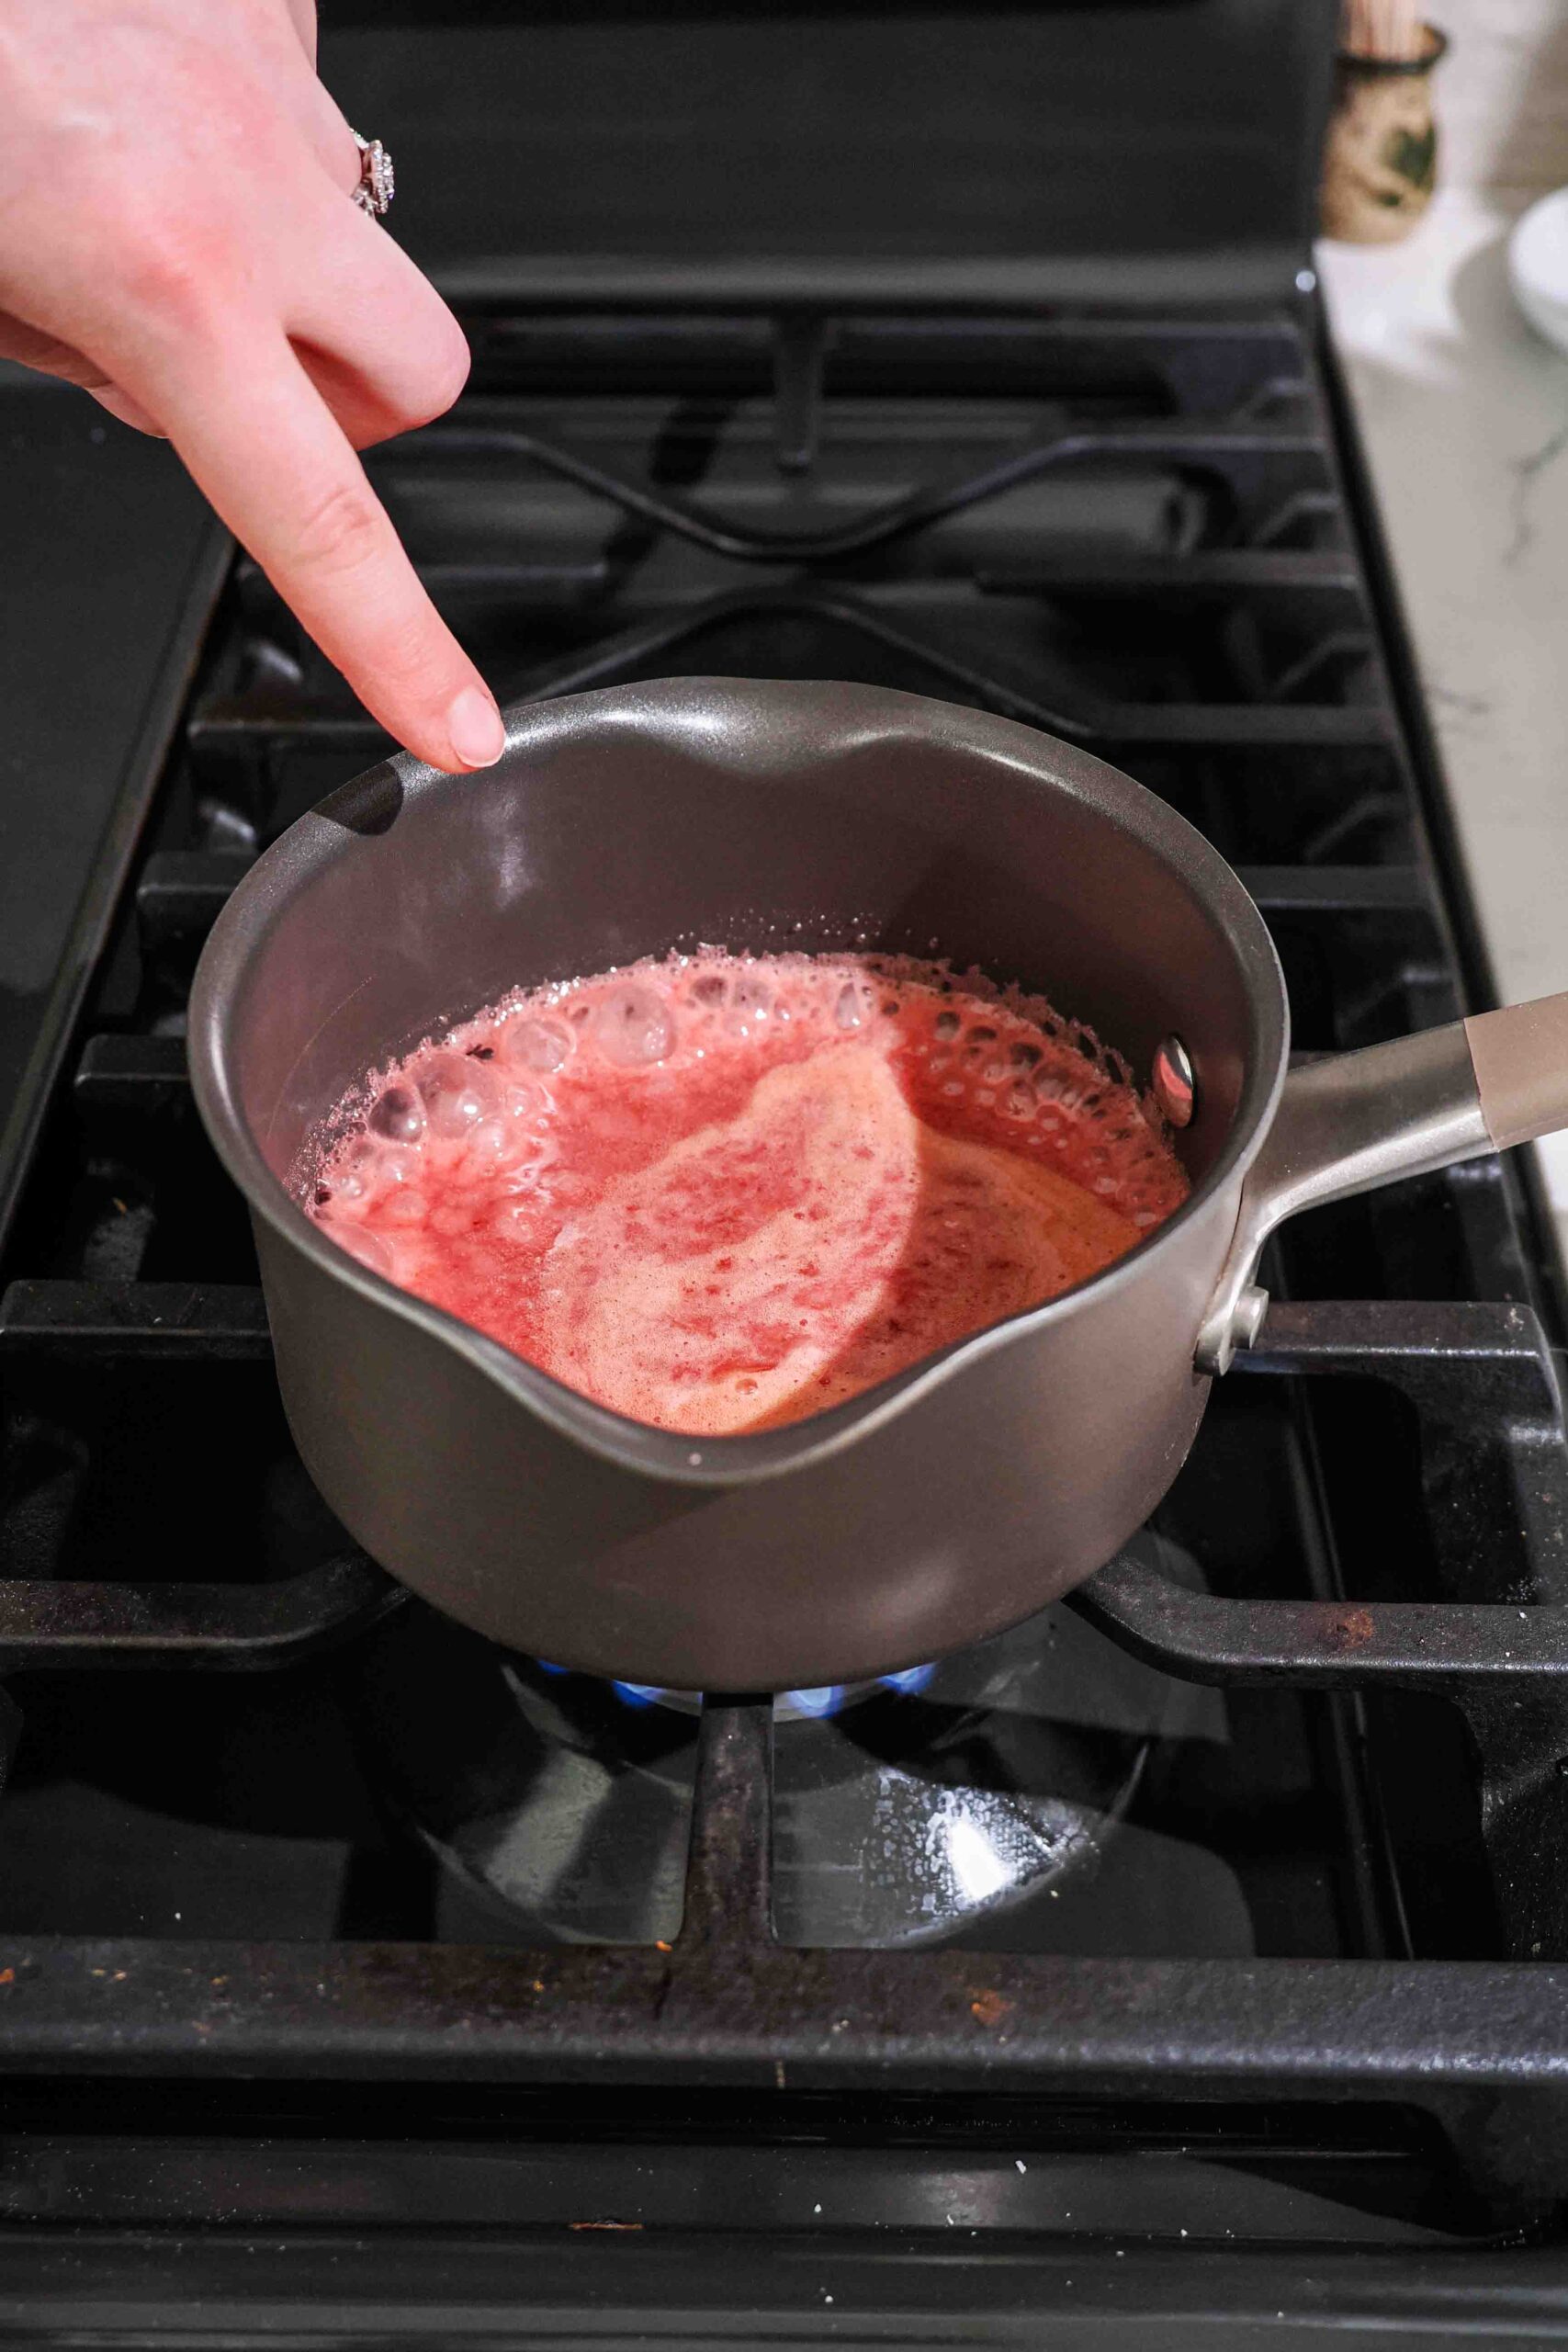
Cook the remaining cherry liquid over low medium heat for just a few minutes, until it starts to boil along the edges. Remove from heat immediately to prevent it from thickening too much. The mixture should be thick enough to stick to your spatula but still fall off in ribbons. If it thickens too much and closely resembles a solid, stir in a splash of water at a time until it thins back out to this consistency.
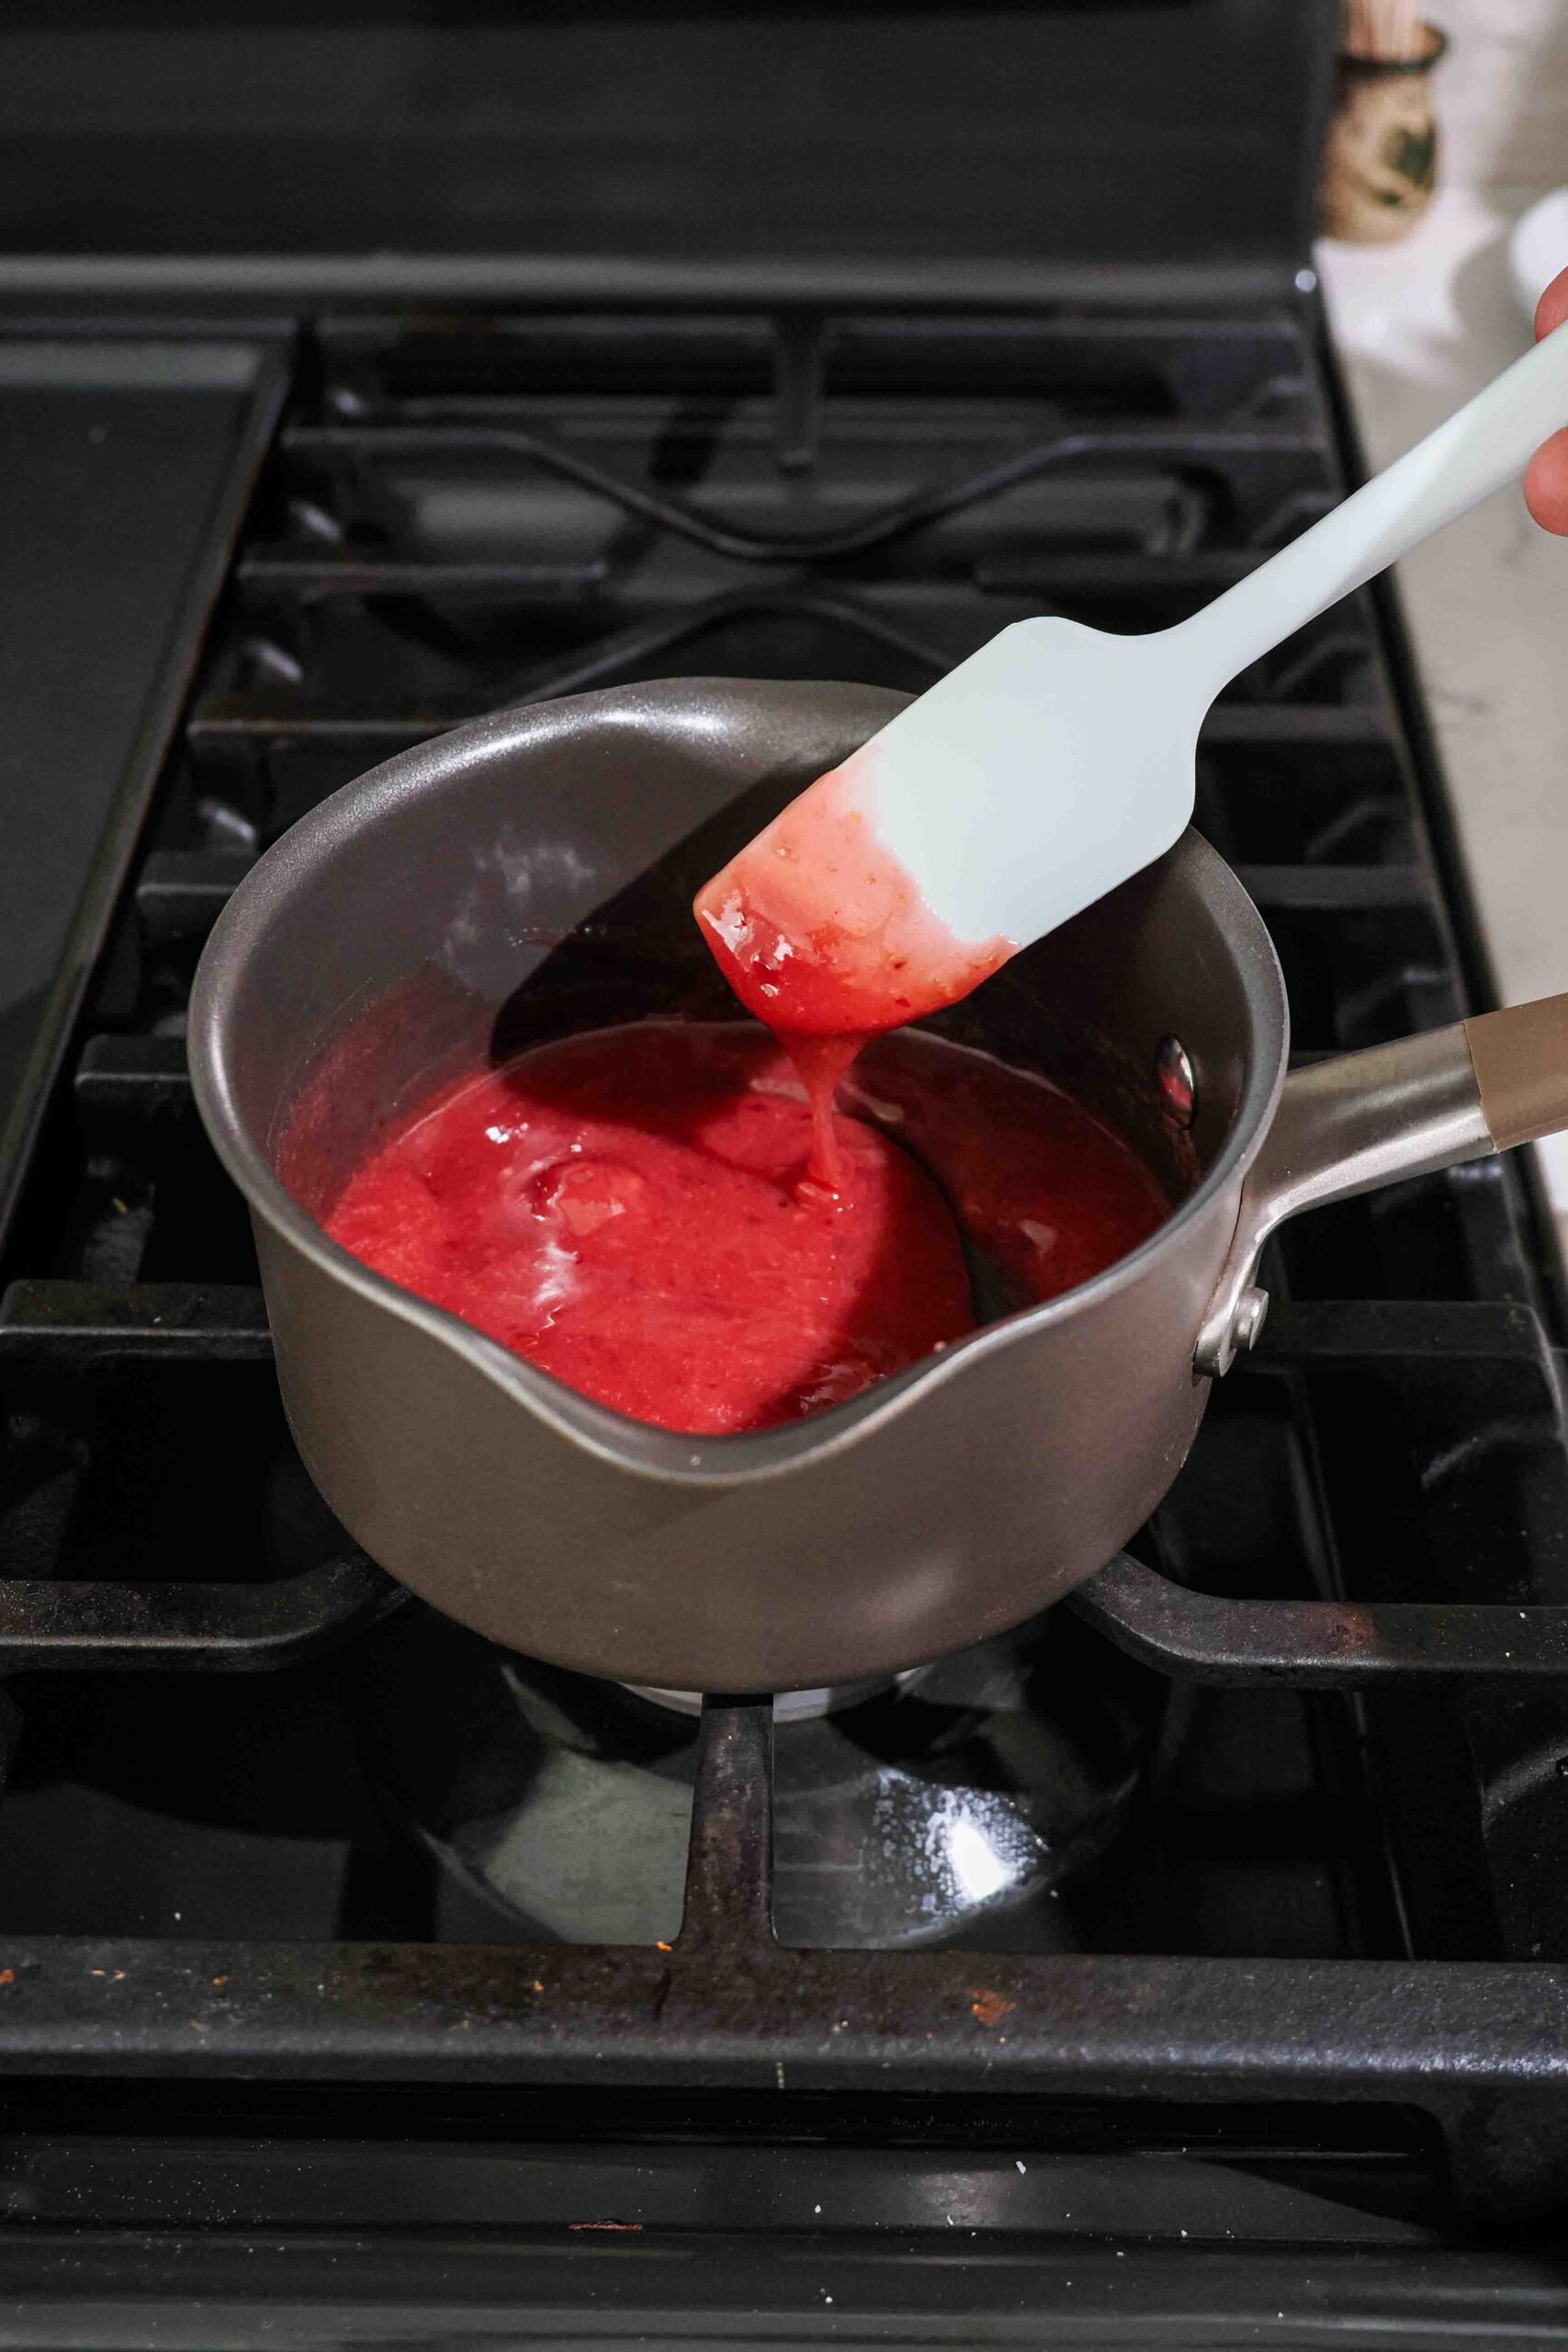
Then, stir in the vanilla and almond extracts once the liquid has cooled down a bit. I have forgotten this step more than once, so don’t forget it! It’s worth adding them at this odd time, because it keeps the flavor more intense.
Take out the pie from the fridge, then pour the filling over the cherries in the pie pan. Use the same spoon to stir the reduction well into the cherries, then place the pie back into the fridge while you roll out the second pie crust.
How to Make a Cherry Lattice Pie Top
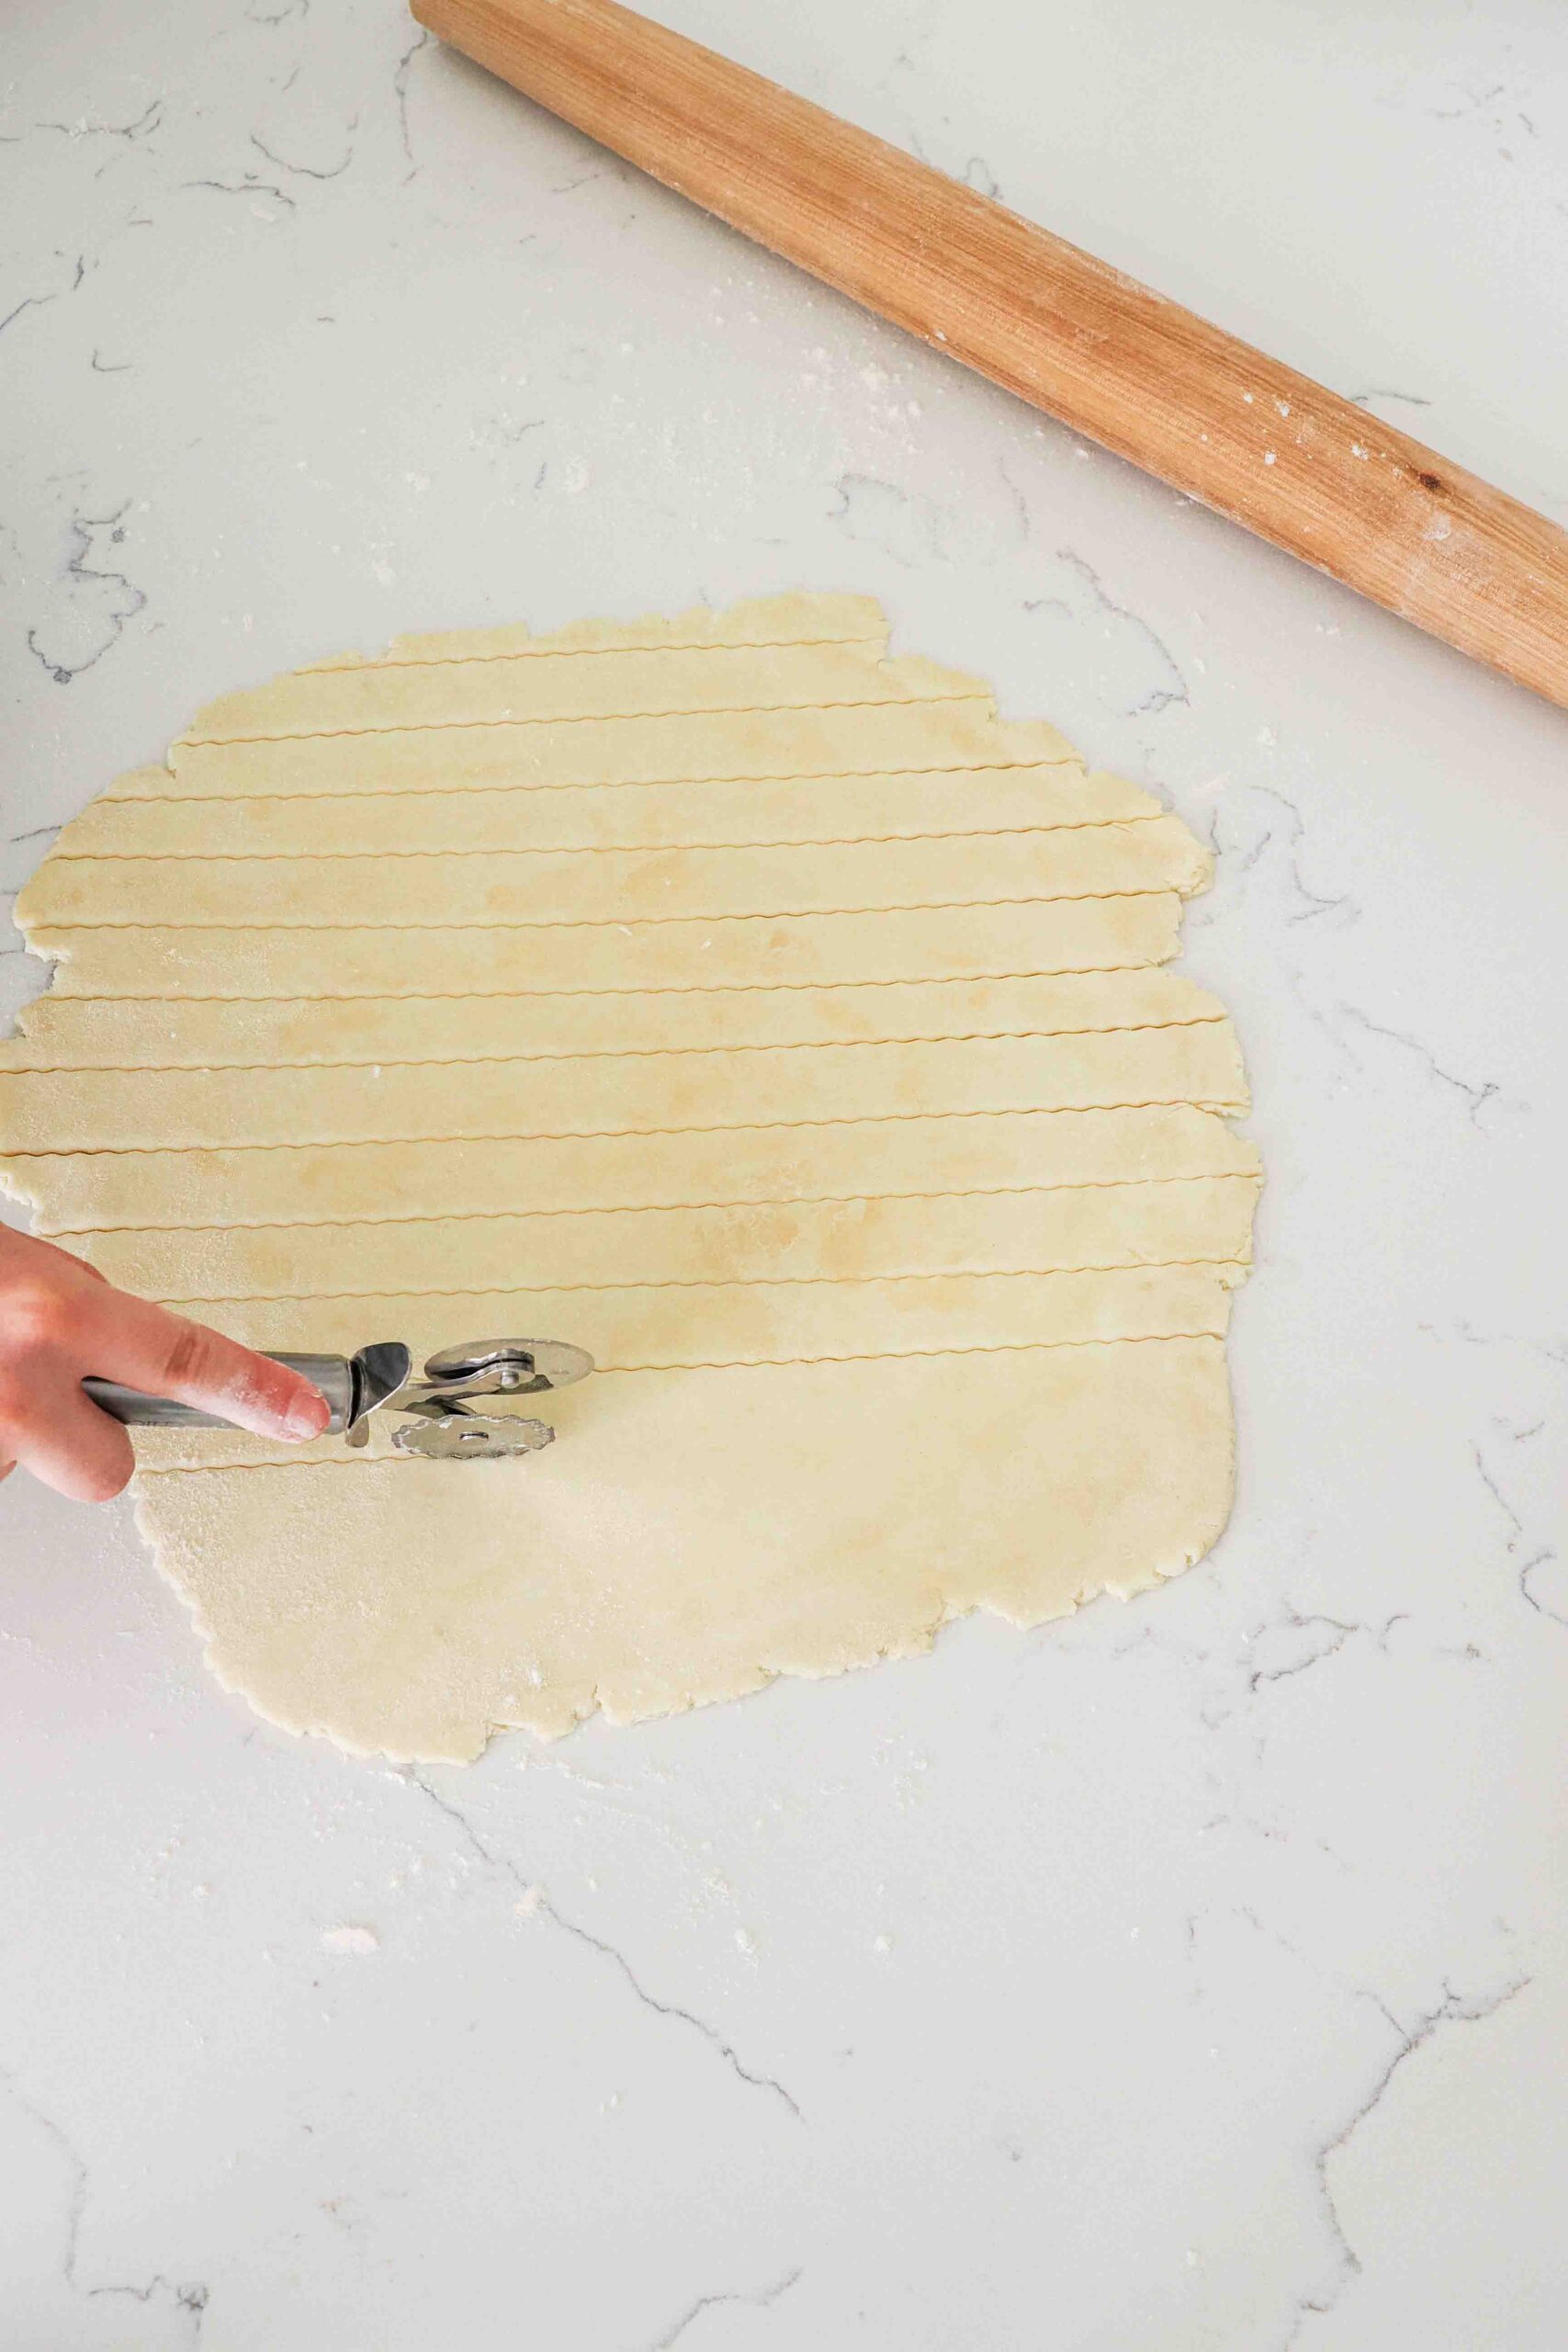
Roll out the second disc of pie dough to a circle about 10″ (25 cm) wide. It’ll be a bit thicker than your bottom crust, which is what we want. Then, cut the dough into strips 1″ wide (25 mm) with a sharp knife or pastry wheel.
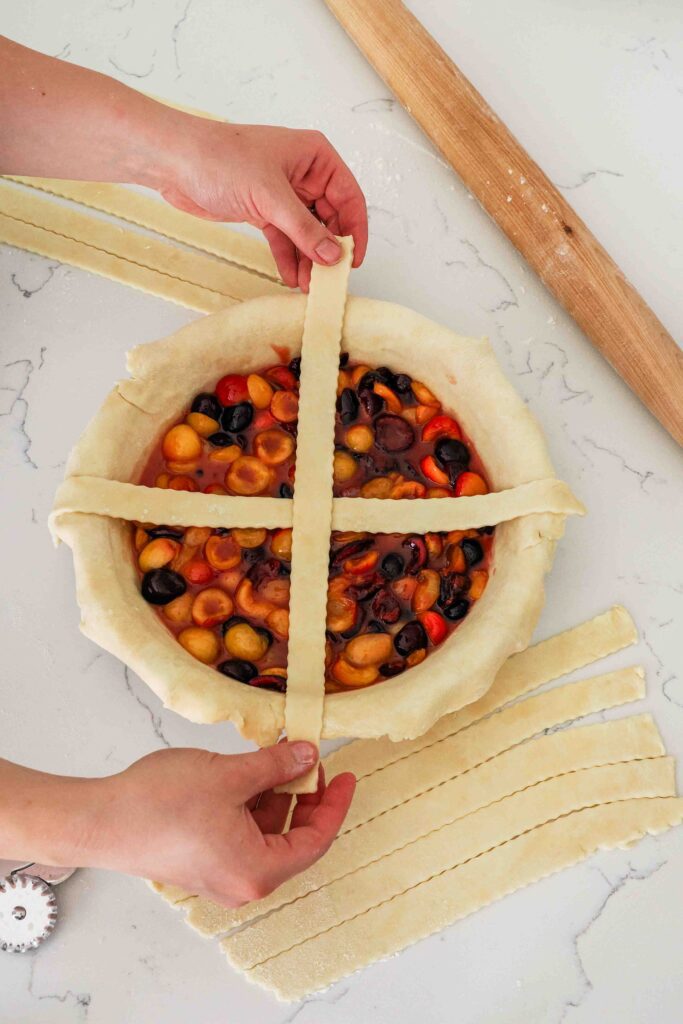
Place the two longest strips in the center of the pie in the shape of an “x.” Fold the bottom-most strip back over the top-most strip, and place another strip parallel to it. Fold the bottom-most strip over the newest strip, and voila, you have your first lattice!
Continue weaving the dough strips together, alternating over and under for each strip, until you’ve covered the top of the pie with your lattice.
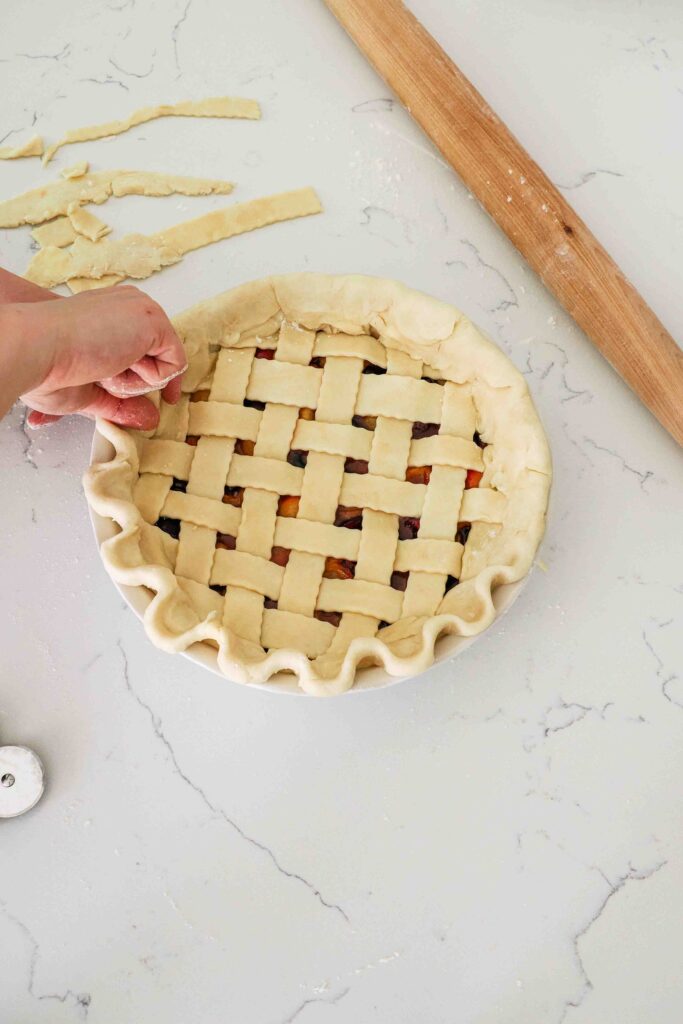
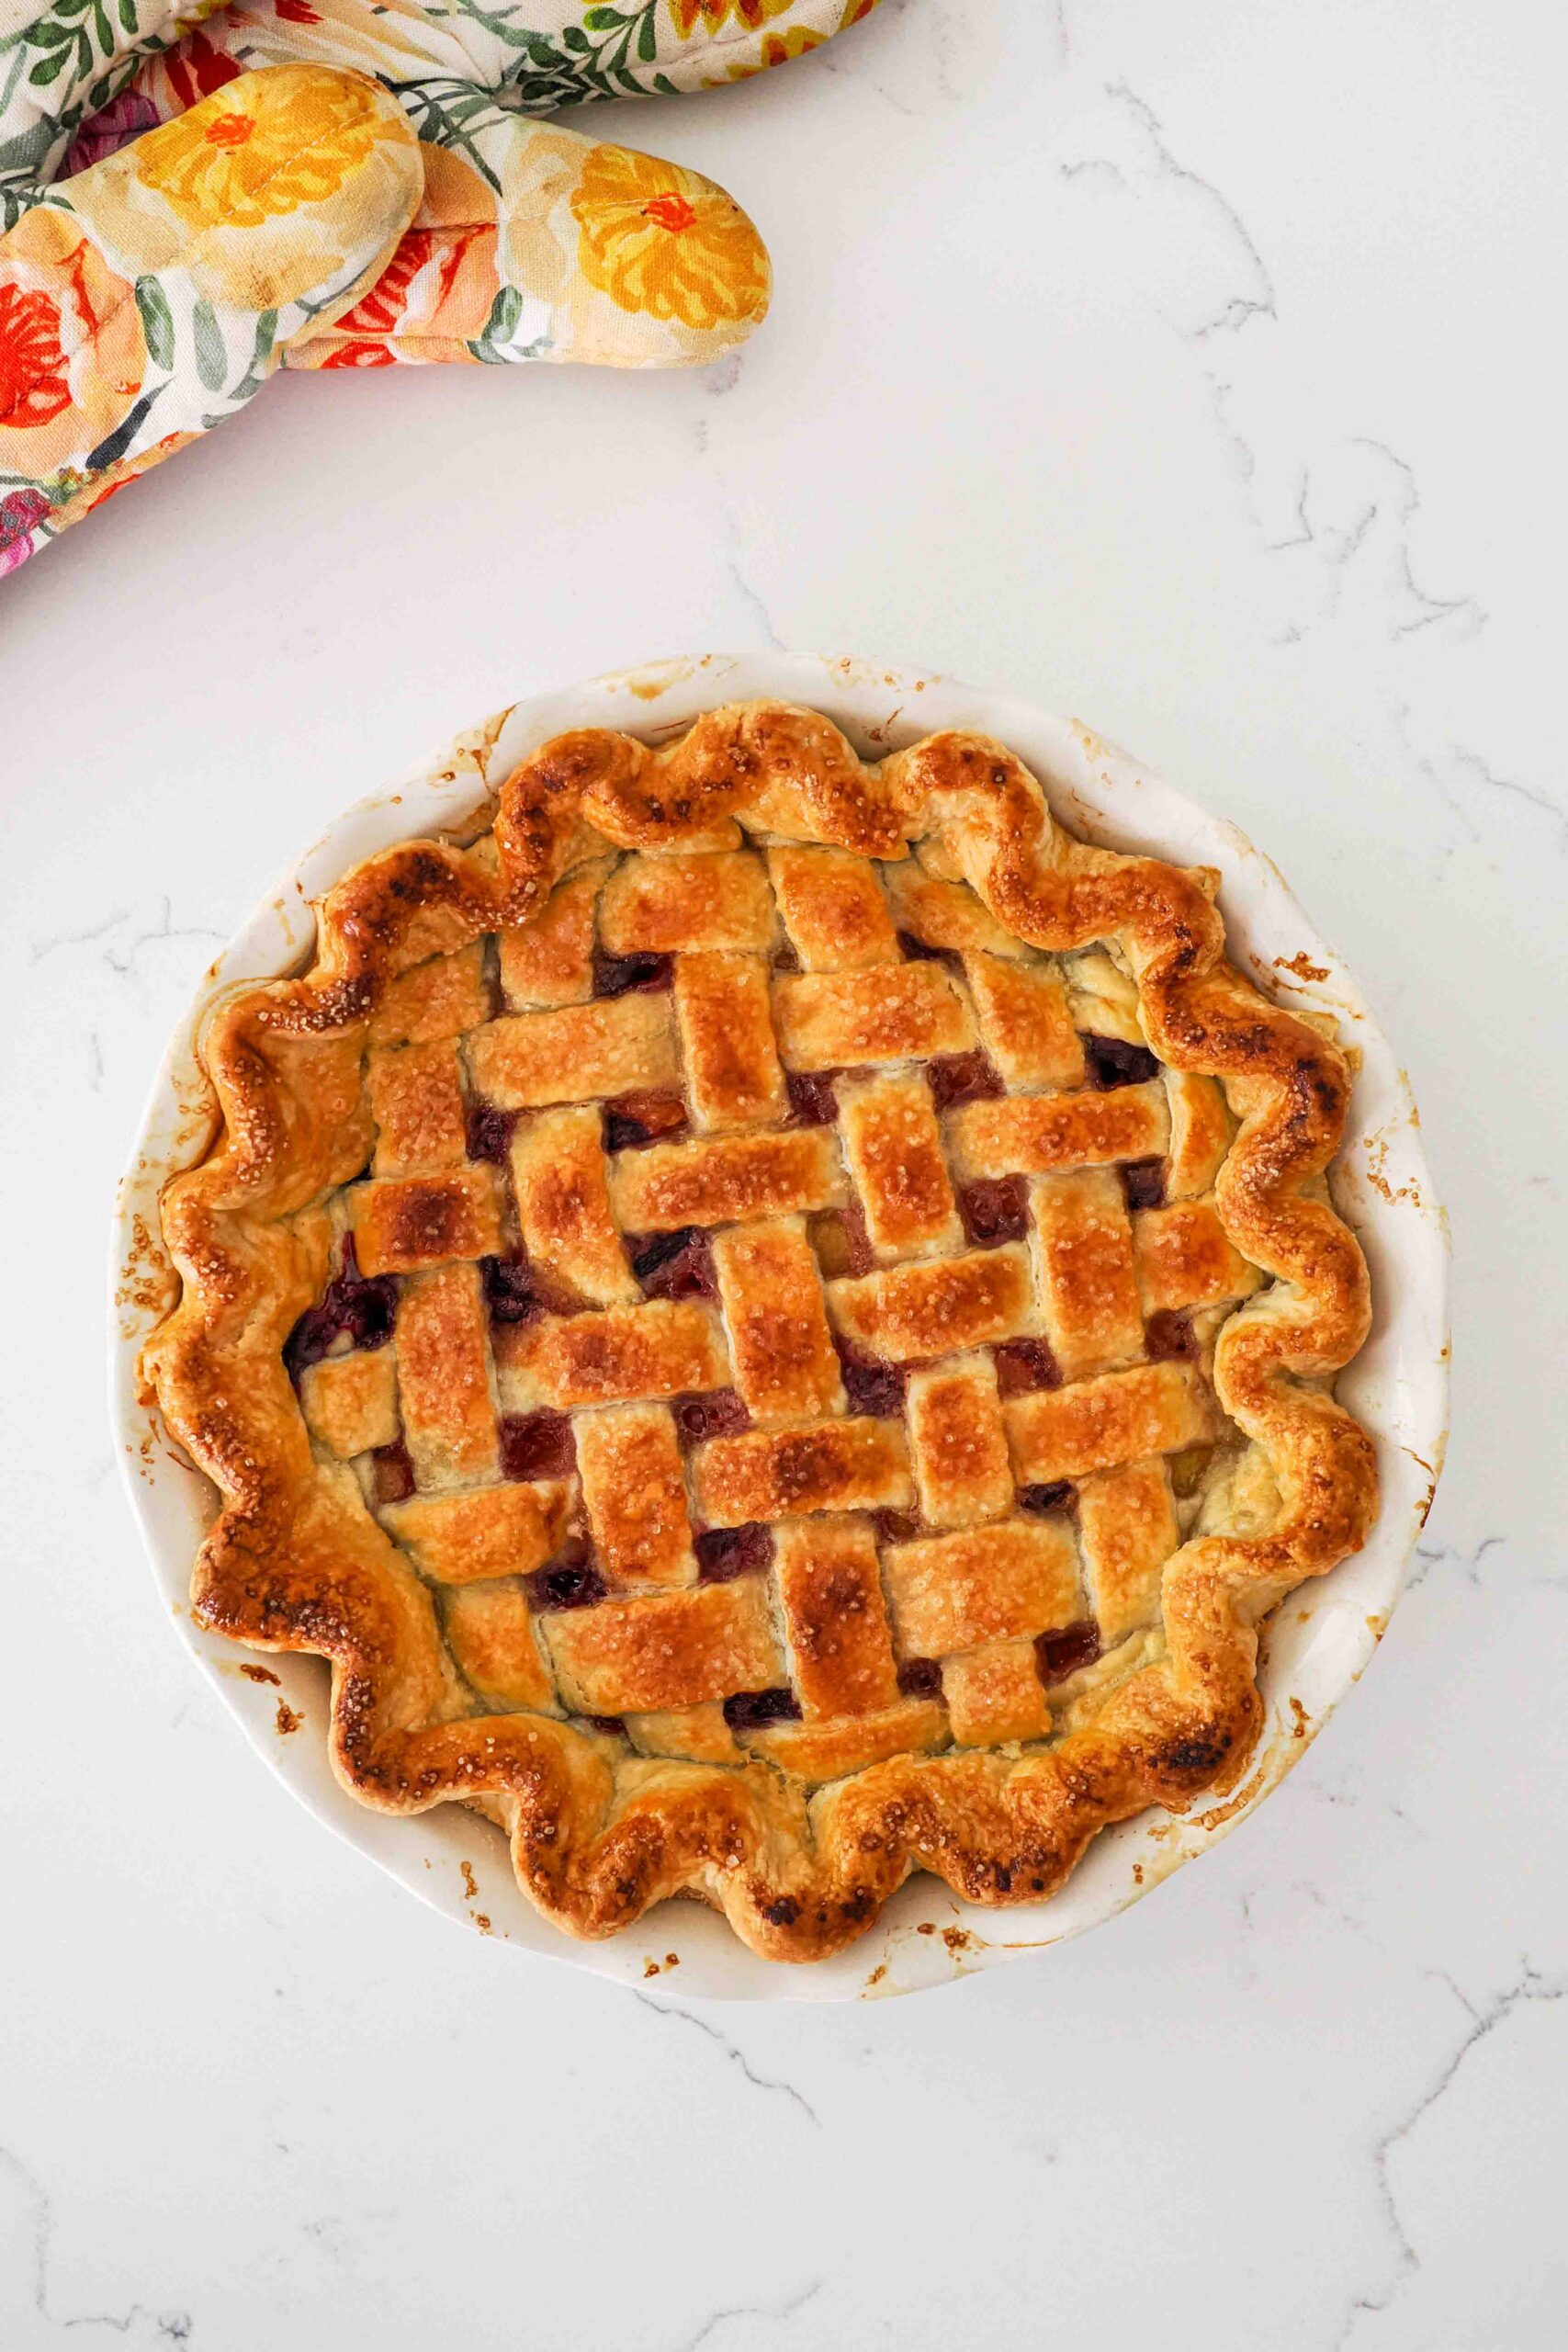
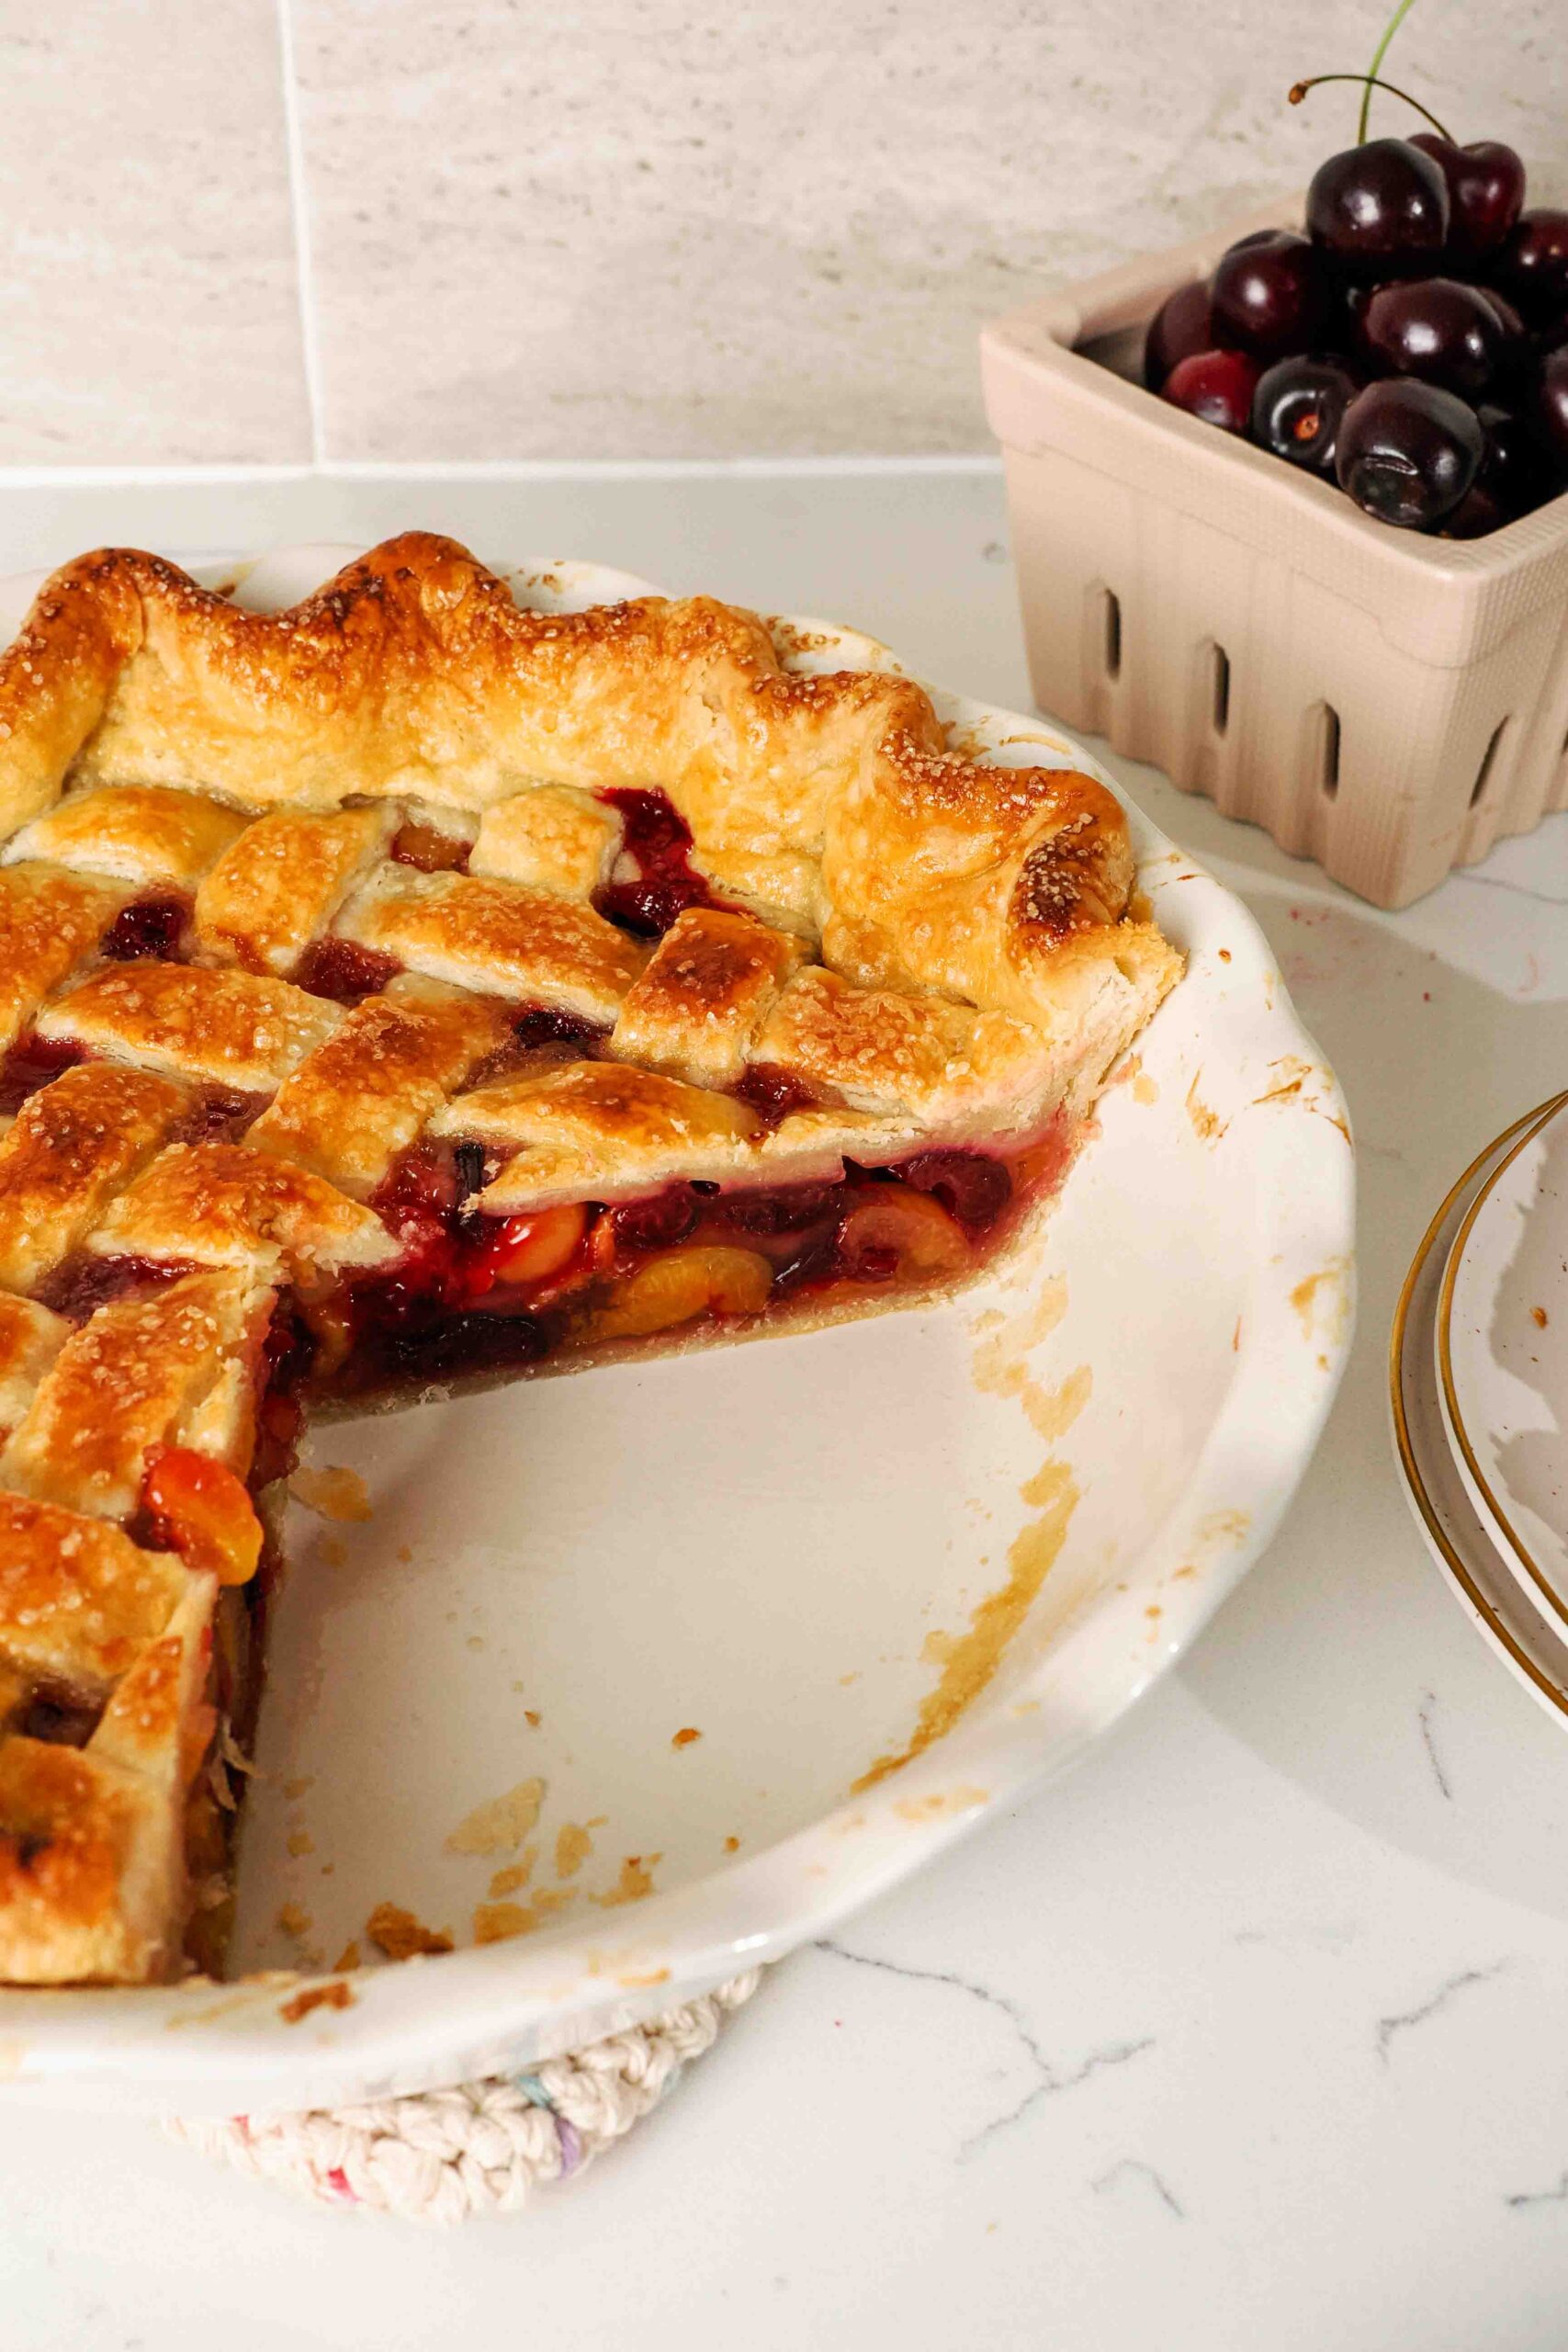
Once the whole top is woven together, trim off any long pieces from your lattice. Fold the dough edges over to hide the seams and create a nice, thick crust.
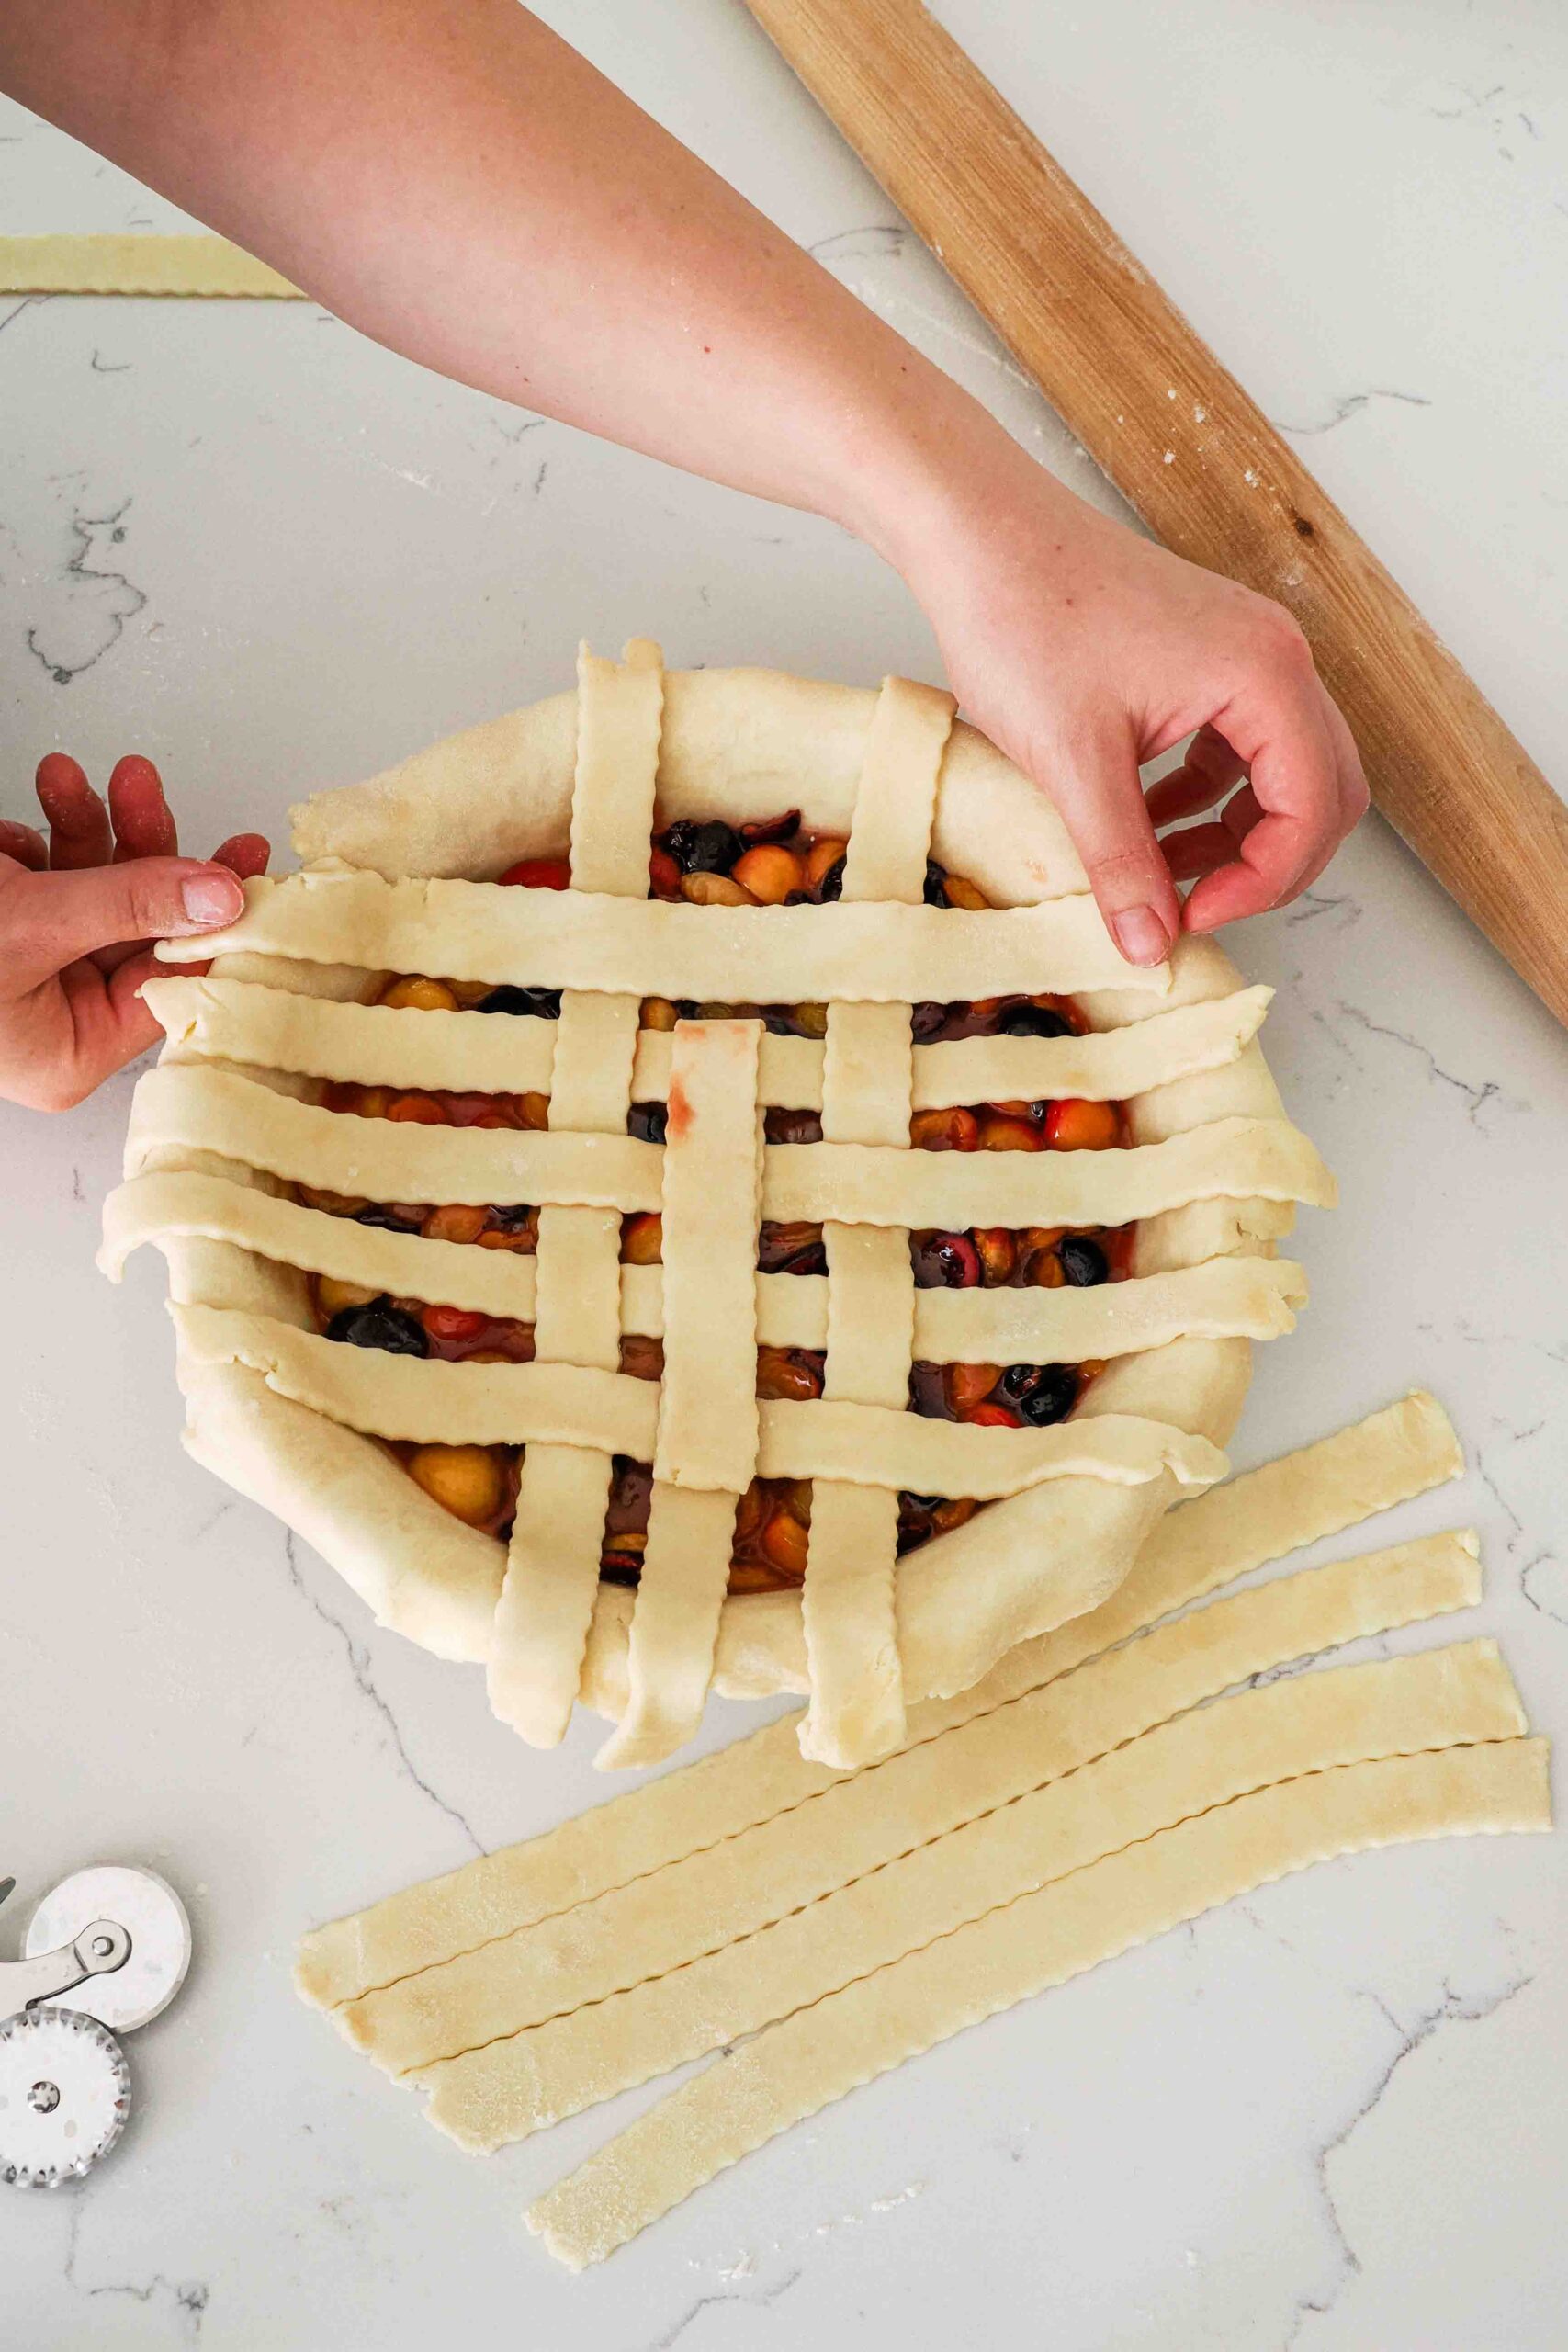
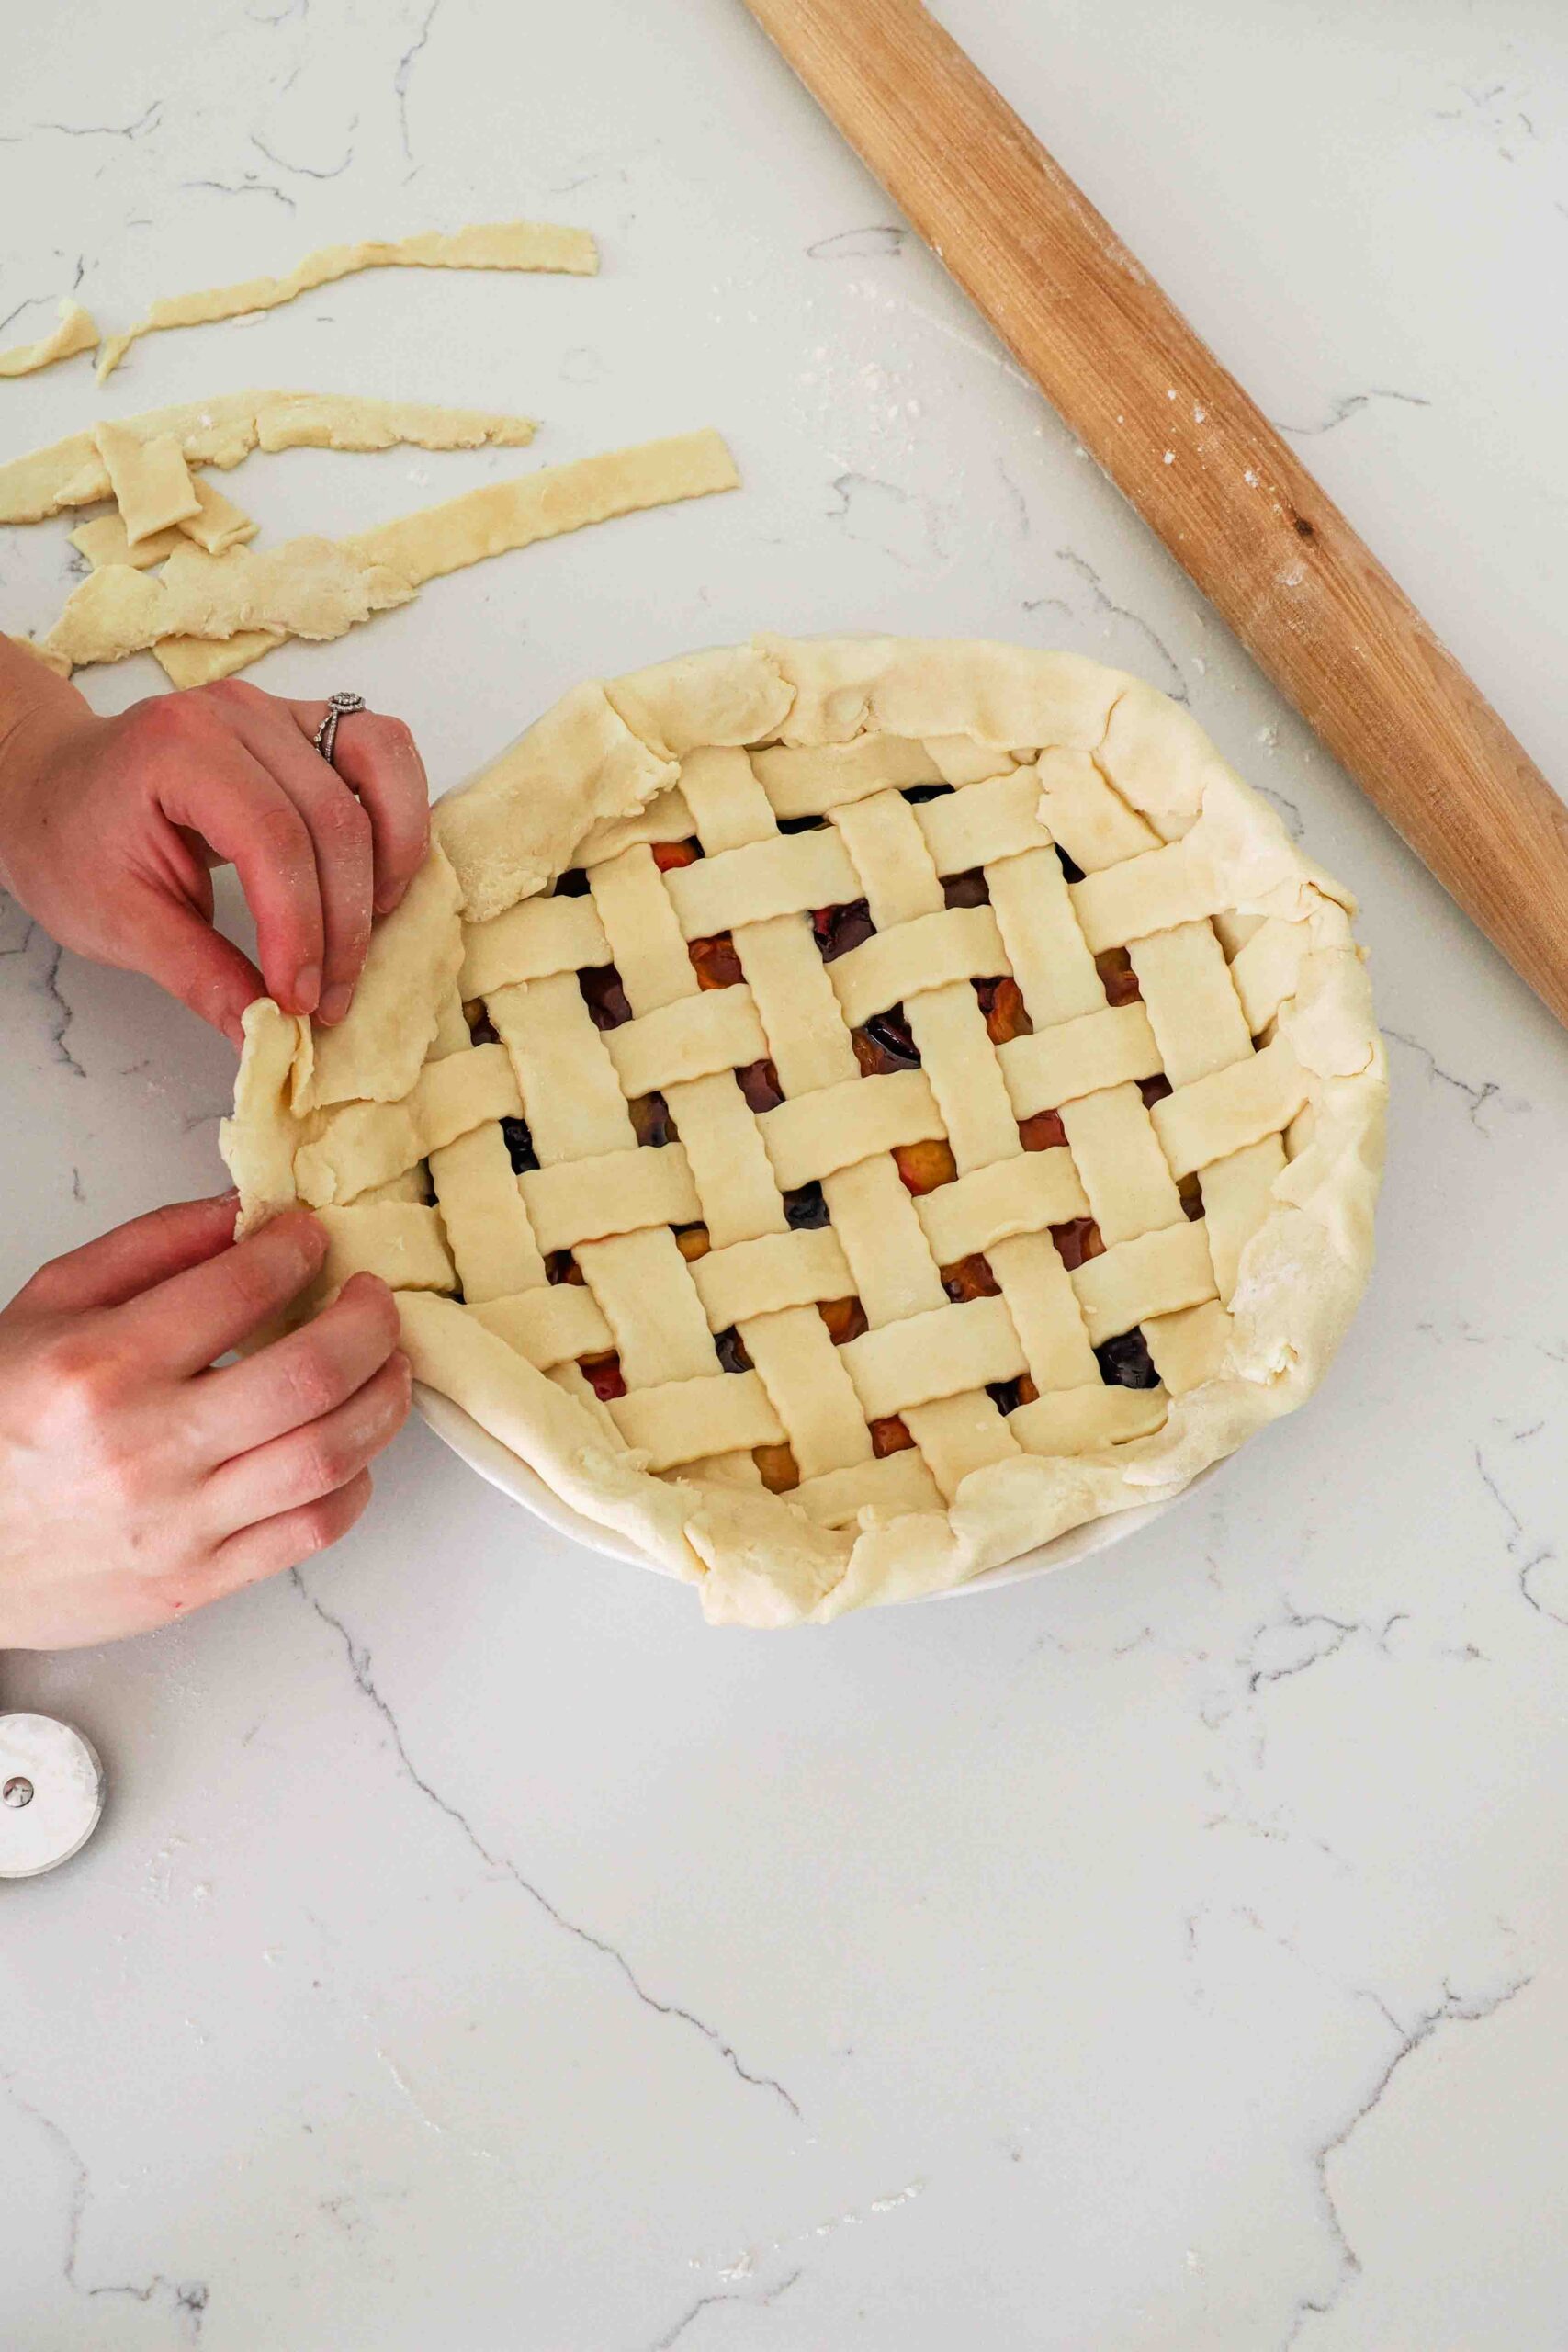
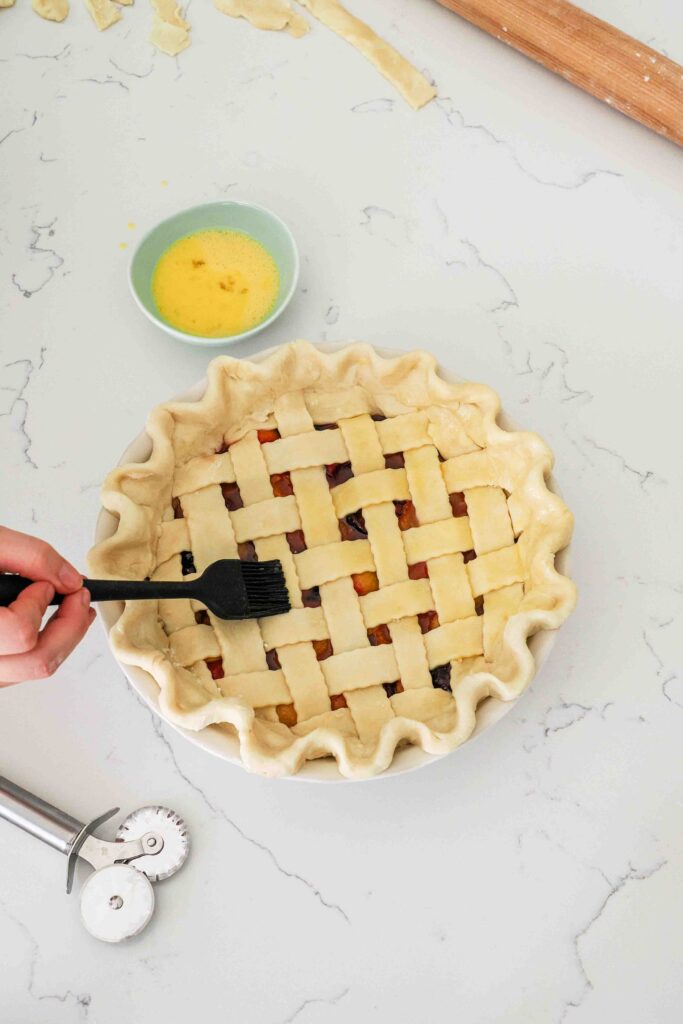
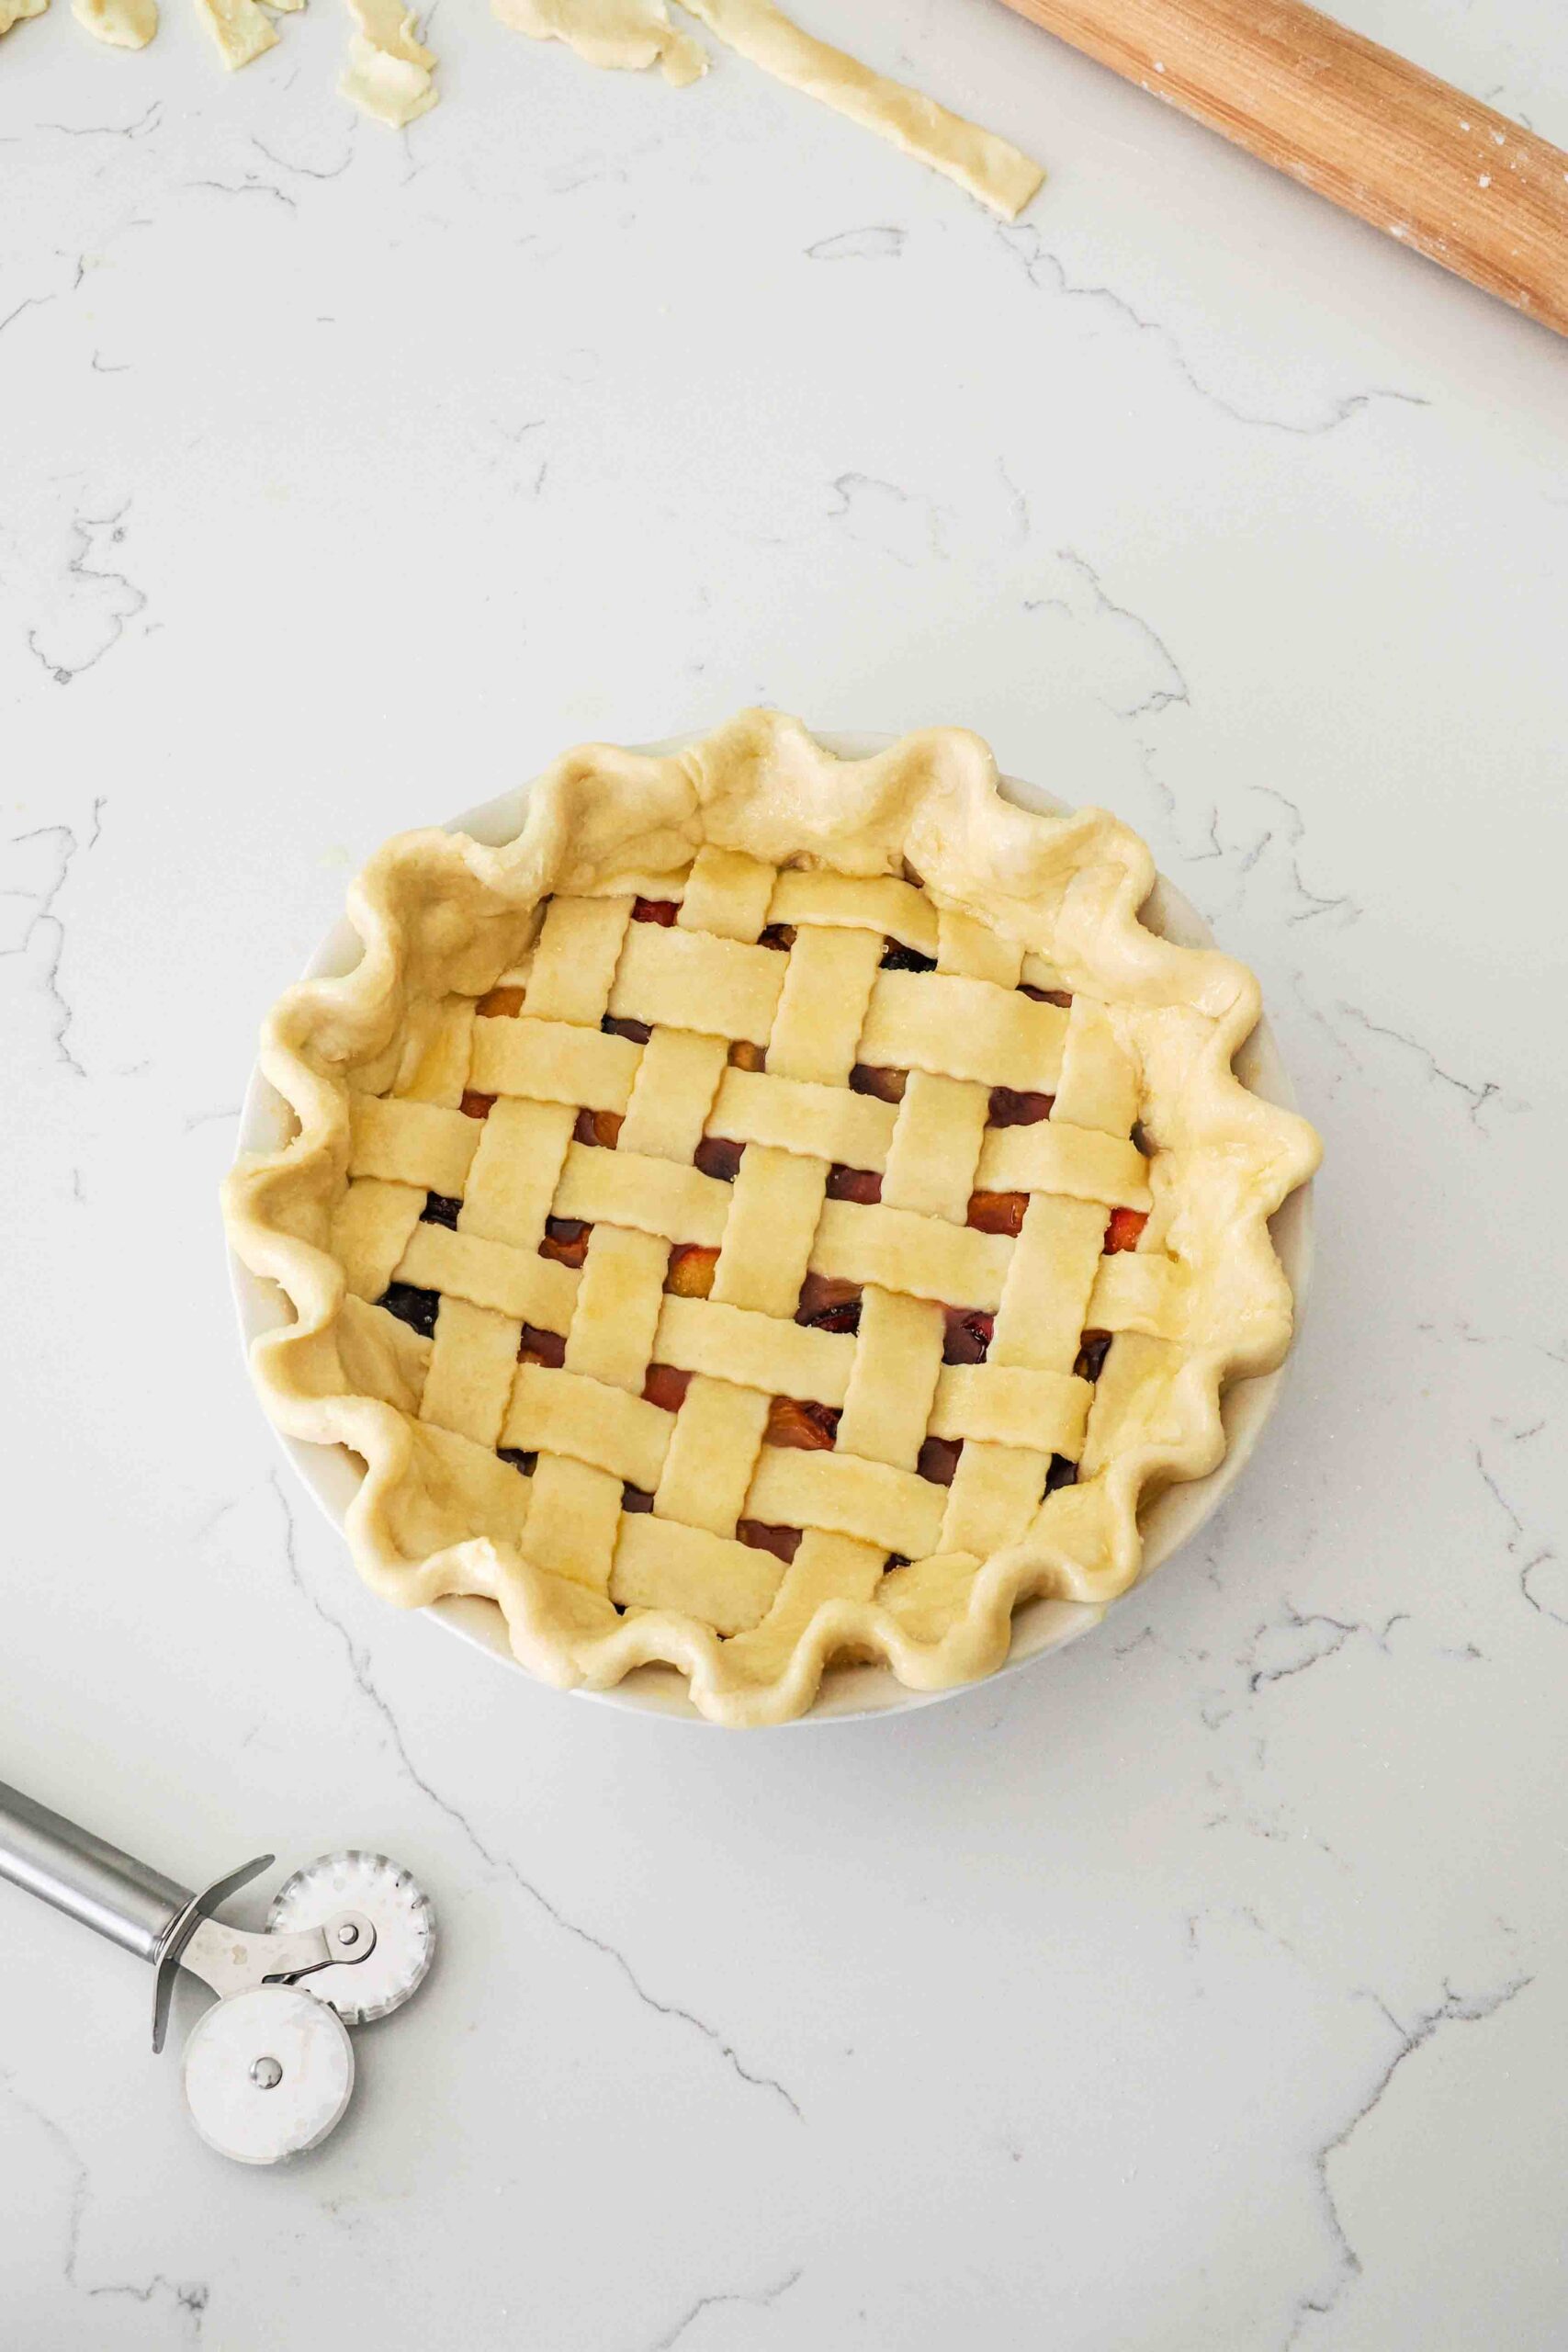
Lastly, crimp the edges with the flesh between your thumb and forefinger and the thumb from your opposite hand for a decorative edge. Brush lightly with egg wash over all visible parts of pie dough—the lattice, the edges, and the edges closest to the pie pan, too! Sprinkle lightly with coarse sugar, if using, then bake!
How to Bake Cherry Pie with Almond Extract
Very wet fruit pies tend to bake better at a high temperature at the very start. I like to bake my cherry pie at 400°F (205°C) for the first 15 minutes or so, then lower the temperature to 375°F (190°C) to finish baking. Depending on your oven, this can take anywhere from 35-45 minutes, so check on it towards the end.
You may also need to cover the edges with aluminum foil if they start to get too dark in the first 20-25 minutes. I ended up needing to cover this pie for part of the bake time because it was a little too close to my upper heating element, but it still turned out beautifully!
FAQs about Cherry Pie with Almond Extract
Yes, this pie can be made with fresh or frozen cherries! I recommend thawing the cherries overnight in the fridge before so that they are easy to cut the day you plan to bake the pie.
Alcohol evaporates quickly compared to water, and the evaporation process is sped up with high temperatures. For the strongest almond and vanilla flavor, I recommend adding your extracts after reducing the leftover cherry liquid and before you add that liquid to the pie shell.
No, not exactly. Its only purpose is to brown the pastry, so you’re welcome to use substitutes like heavy cream or milk instead of an egg wash. You can also omit a wash entirely if you don’t want your crust to be a dark golden brown.
You’re welcome to add more if you like, but I find that any more is too strong and almost overpowering. This amount gives the pie a subtle flavor that complements the cherries.
We all start somewhere! I think you could do it with enough guidance, which is why I have a step-by-step gif showing how to make a lattice in the blog post. But if you’d rather not, you can totally roll out your second pie crust like the bottom one and just cut a couple holes in it to allow the filling to vent properly.
Over time, and with practice, you’ll find out what lattice method works best for you. I have adapted my process a little bit since first sharing this recipe. You can see how I used to make my top lattice crust in this gif from June 2022.
Other Recipes You May Enjoy
Cherries are one of my husband’s favorite flavors, and we live near a wonderful cherry orchard, so I have quite a few cherry recipes here on the blog! If you love this recipe, here are some similar recipes:
- Similar to this cherry pie, my mini cherry pies are individually-sized cherry pies with a little almond extract. They’re perfect for outdoor gatherings and barbeques, because you can eat them with your hands!
- My cherry almond cupcakes are made with both fresh and canned cherries, and I repurpose the cherry syrup into a simple cherry buttercream.
- One of my newest recipes, my homemade cherry pop tarts are made with small batch cherry jam (or store bought, if you prefer), this same flaky pie crust, and a little powdered sugar for the icing!
Dish Cleanup: A Lil Messy
I rate my recipe cleanups on a scale of 1 to 5. 1 is only a handful of dishes, and 5 is everything including the kitchen sink.
My cherry pie with almond extract recipe has a cleanup rating of a 3. You’ll need a cutting board and knife to cut up any larger cherries, along with a saucepan to heat the liquid filling. I recommend putting your freshly cut cherries in a large bowl that will also accommodate sugar and cornstarch so you don’t have to wash two.
Note: I don’t include the pie pan here, as that usually holds my pie for a couple of days and is not washed at the same time as the rest of the dishes.
Cherry Pie with Almond Extract Recipe
Thanks so much for stopping by!
If you make this homemade cherry almond pie and love it, please don’t forget to rate the recipe five stars.
Cherry Pie with Almond Extract
The traditional cherry pie is made even more delicious with a vanilla pie crust and a hint of almond extract in the filling. It's the perfect summer dessert made with fresh or frozen cherries.
Ingredients
- 2 pie crusts, homemade or store bought (my pie crust recipe uses vanilla!)
- 4 ½ cups cherries (680 g) (I used 2/3 Rainier and 1/3 Bing)
- ⅔ cup sugar (135 g)
- ⅓ cup cornstarch (50 g)
- ½ teaspoon salt (3 g)
- 2 teaspoons lemon juice (10 ml)
- 1 teaspoon vanilla extract (5 ml)
- 1 teaspoon almond extract (5 ml)
- 1 egg
- Coarse sugar (optional)
Instructions
Making the Cherry Almond Pie Filling
- If using fresh cherries, wash and dry them. Then, pit them and cut them in half. (Cut extra-large cherries in quarters.) Place the cherries in a large bowl.
- Add just the sugar, cornstarch, lemon juice, and salt to the cherries. Stir together, then set aside for at least the next 10 minutes while you roll out the pie crust.* During this time, the sugar will pull juices out of the cherries to make the liquid filling. This is called maceration.
- On a lightly floured surface, roll out one chilled disc of dough to a 12" (30 cm) round. To ensure it doesn't stick to the counter, rotate the dough one quarter turn after every roll. Transfer the round into a 9" (23 cm) pie dish and gently press out any air bubbles by running the back of your hand along the bottom and sides of the dish.
- Use a slotted spoon to scoop the cherries into the prepared crust, then place in the fridge, uncovered. Transfer the leftover liquid from the cherries into a small saucepan.
- Reduce the cherry liquid over medium heat, stirring occasionally, for 3-4 minutes until it begins to boil on the edges. Cook for one more minute, then remove from heat. Add in the extracts.
- Remove the pie from the fridge and pour the reduction over the cherries. Spread the reduction over the cherries, stirring a little as you go, then place back the pie in the fridge while you roll out the second disc of dough.
Assembling the Cherry Pie
- Preheat the oven to 400°F/200°C.
- Roll out the second disc of dough to a circle about 10" (25 cm) in diameter. This crust will be slightly thicker than the bottom crust. Use a pastry cutter or knife to cut 1-inch strips in the dough, then remove the pie from the fridge.
- Reserve the two longest strips of dough for the center. Place one of the two longest strips in the direct center of the pie, then place slightly shorter strips on either side of it. Next, you'll start weaving the pieces together. Gently fold (without creasing) the two newest strips of dough back a little more than halfway, then place the longest strip of dough perpendicularly over the long strip in the center. It should make an "x." Fold the two strips of dough back over the new strip to form your first weave.
- Continue this process one strip of dough at a time, weaving the strips under or over as needed. Take the second longest strip and place it in the center, perpendicular to the first strip. Working from the longest to the shortest strips, add one more strip at a time, weaving it under another strip when necessary (see the dedicated section and photos in the body of the blog post for more in-depth instruction). Press the edges of the top pie crust into the bottom one and flute the edges.*
- Whisk together the egg and one teaspoon of water and brush lightly across all visible pie crust. Sprinkle with coarse sugar, if desired.
Baking the Cherry Pie
- Bake the pie at for 15 minutes at 400°F/200°C, then reduce the oven temperature to 375°F/190°C. (No opening of the oven door required!) Bake for another 35-45 minutes until the filling is bubbly and venting steam through the lattice. If the pie crust begins to brown too much in the first half hour of bake time, cover the edges with aluminum foil or a pie crust shield.
- Place the pie on a cooling rack and let sit for 3-4 hours, until the bottom of the pie pan is room temperature or just slightly warm. That will allow the filling to fully set.
- Use a serrated knife to keep the latticework in tact while cutting up slices to serve, and enjoy!
Notes
*If you'd like to make this pie in advance, you can cover and refrigerate the cherry mixture on its own or the entire assembled pie for up to 24 hours before baking.
Store leftovers in an airtight container for up to three days at room temperature. The baked pie will last for up to five days when stored covered in the fridge.
Recommended Products
As an Amazon Associate and member of other affiliate programs, I earn from qualifying purchases.


Nutrition Information:
Yield:
8Serving Size:
1Amount Per Serving: Calories: 347Total Fat: 12gSaturated Fat: 4gTrans Fat: 0gUnsaturated Fat: 7gCholesterol: 23mgSodium: 190mgCarbohydrates: 57gFiber: 3gSugar: 30gProtein: 4g
The nutrition facts are estimated and may vary based on specific ingredients used.
I’d love to see how your cherry pie turns out: Take a photo and tag me on Instagram @floralapronblog to share with me, or use the hashtag #floralapronbakes.